Video version of the tutorial
Optical Character Recognition ( Optical Character Recognition , abbr. OCR ) allows a computer to read text on an image, allowing applications to understand signs, articles, leaflets, pages of text, menus, or anything in text. Mobile Vision Text API provides Android developers with a powerful and reliable OCR feature that supports most Android devices and does not increase the size of your application.
In this tutorial, you will create an application in which in the process of video filming all the text falling into the frame will be recognized and reproduced.
We also published articles about other Mobile Vision features:
Source code can be downloaded here .
Or clone the GitHub repository from the command line:
$ git clone https://github.com/googlesamples/android-vision.git
The visionSamples repository contains many examples of Mobile Vision related projects. In this lesson, only two are used:
 ocr-codelab / ocr-reader-start is the starting code that you will use in this lesson.
- ocr-codelab / ocr-reader-complete is the complete code of the finished application. You can use it for troubleshooting or go directly to the work application.
Update Google Play Services
You may need to update your installed version of Google Repository in order to use the Mobile Vision Text API .
Open Android Studio and open SDK Manager :
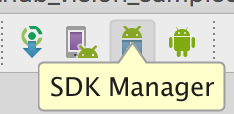
Make sure the Google Repository updated. It must be at least version 26 .

Add a Google Play Services dependency and create an app to launch
Now you can open the starting project:
Select the launch directory ocr-reader from the downloaded code ( File > Open > ocr-codelab/ocr-reader-start ).
Add a Google Play Services dependency to the app. Without this dependency, the Text API will not be available.
The project may indicate the absence of the integer / google_play_services_version file and generate an error. This is normal, we will fix it in the next step.
Open the build.gradle file in the app module and change the dependency block to include the play-services-vision dependency. When everything is ready, the file should look like this:
dependencies { implementation fileTree(dir: 'libs', include: ['*.jar']) implementation 'com.android.support:support-v4:26.1.0' implementation 'com.android.support:design:26.1.0' implementation 'com.google.android.gms:play-services-vision:15.0.0' }
Click 
Gradle sync button.
Click  start button.
After a few seconds you will see the “Read Text” screen, but this is just a black screen.

Nothing happens now because CameraSource not configured. Let's do that.
If something goes wrong with you, you can open the project ocr-reader-complete and make sure that it works correctly. This project is a finished version of the lesson, and if this version does not work, you should check that everything is fine with your device and Android Studio settings.
Configure TextRecognizer and CameraSource
To get started, we will create our TextRecognizer . This detector object processes the images and determines which text appears inside them. After initialization, TextRecognizer can be used to find text in all types of images. Find the createCameraSource method and create a TextRecognizer :
OcrCaptureActivity.java
private void createCameraSource(boolean autoFocus, boolean useFlash) { Context context = getApplicationContext();
TextRecognizer is now ready for use. However, it may not work yet. If the device does not have enough memory or Google Play Services cannot download OCR dependencies, the TextRecognizer object will not work. Before we start using it for text recognition, we need to check that it is ready. We will add this check to createCameraSource after TextRecognizer initialization:
OcrCaptureActivity.java
Now that we have verified that TextRecognizer ready for work, we can use it to recognize individual frames. But we want to do something more interesting: read the text in video mode. To do this, we will create a CameraSource , which is pre-configured to control the camera. We need to set high resolution shooting and enable autofocus to cope with the task of recognizing small text. If you are sure that your users will look at large blocks of text, such as signs, you can use a lower resolution, and then frame processing will be faster:
OcrCaptureActivity.java
Here’s what the createCameraSource method should look like when you're done:
OcrCaptureActivity.java
private void createCameraSource(boolean autoFocus, boolean useFlash) { Context context = getApplicationContext();
If you run the application, you will see that the video has started! But for processing images from the camera, we need to add this latest TODO to createCameraSource : create a Processor to process the text as it arrives.
Create an OcrDetectorProcessor
Now your application can detect text in individual frames using the detection method in TextRecognizer . So you can find the text, for example, in the photo. But in order to read the text directly during the video, you need to implement a Processor , which will process the text as soon as it appears on the screen.
Go to the OcrDetectorProcessor class OcrDetectorProcessor implement the Detector.Processor interface:
OcrDetectorProcessor.java
public class OcrDetectorProcessor implements Detector.Processor<TextBlock> { private GraphicOverlay<OcrGraphic> graphicOverlay; OcrDetectorProcessor(GraphicOverlay<OcrGraphic> ocrGraphicOverlay) { graphicOverlay = ocrGraphicOverlay; } }
To implement this interface, you need to override two methods. The first, receiveDetections , receives the TextBlocks from the TextRecognizer as they are detected. The second, release , is used to free resources from the destruction of the TextRecognizer . In this case, we just need to clear the graphic canvas, which will result in the removal of all OcrGraphic objects.
We will get the TextBlocks and create OcrGraphic objects for each text block detected by the processor. We will implement the logic of their drawing in the next step.
OcrDetectorProcessor.java
@Override public void receiveDetections(Detector.Detections<TextBlock> detections) { graphicOverlay.clear(); SparseArray<TextBlock> items = detections.getDetectedItems(); for (int i = 0; i < items.size(); ++i) { TextBlock item = items.valueAt(i); if (item != null && item.getValue() != null) { Log.d("Processor", "Text detected! " + item.getValue()); OcrGraphic graphic = new OcrGraphic(graphicOverlay, item); graphicOverlay.add(graphic); } } } @Override public void release() { graphicOverlay.clear(); }
Now that the processor is ready, we need to configure textRecognizer to use it. Return to the last remaining TODO in the createCameraSource method in OcrCaptureActivity :
OcrCaptureActivity.java
Now run the application. At this stage, when you hover the camera on the text, you will see the debug messages “Text detected!” In Android Monitor Logcat ! But this is not a very visual way of visualizing what TextRecognizer sees, right?
In the next step, we will draw this text on the screen.
Drawing text on the screen
Let's implement the draw method in OcrGraphic . We need to understand whether there is a text on the image, convert the coordinates of its borders into canvas frames, and then draw both borders and text.
OcrGraphic.java
@Override public void draw(Canvas canvas) {
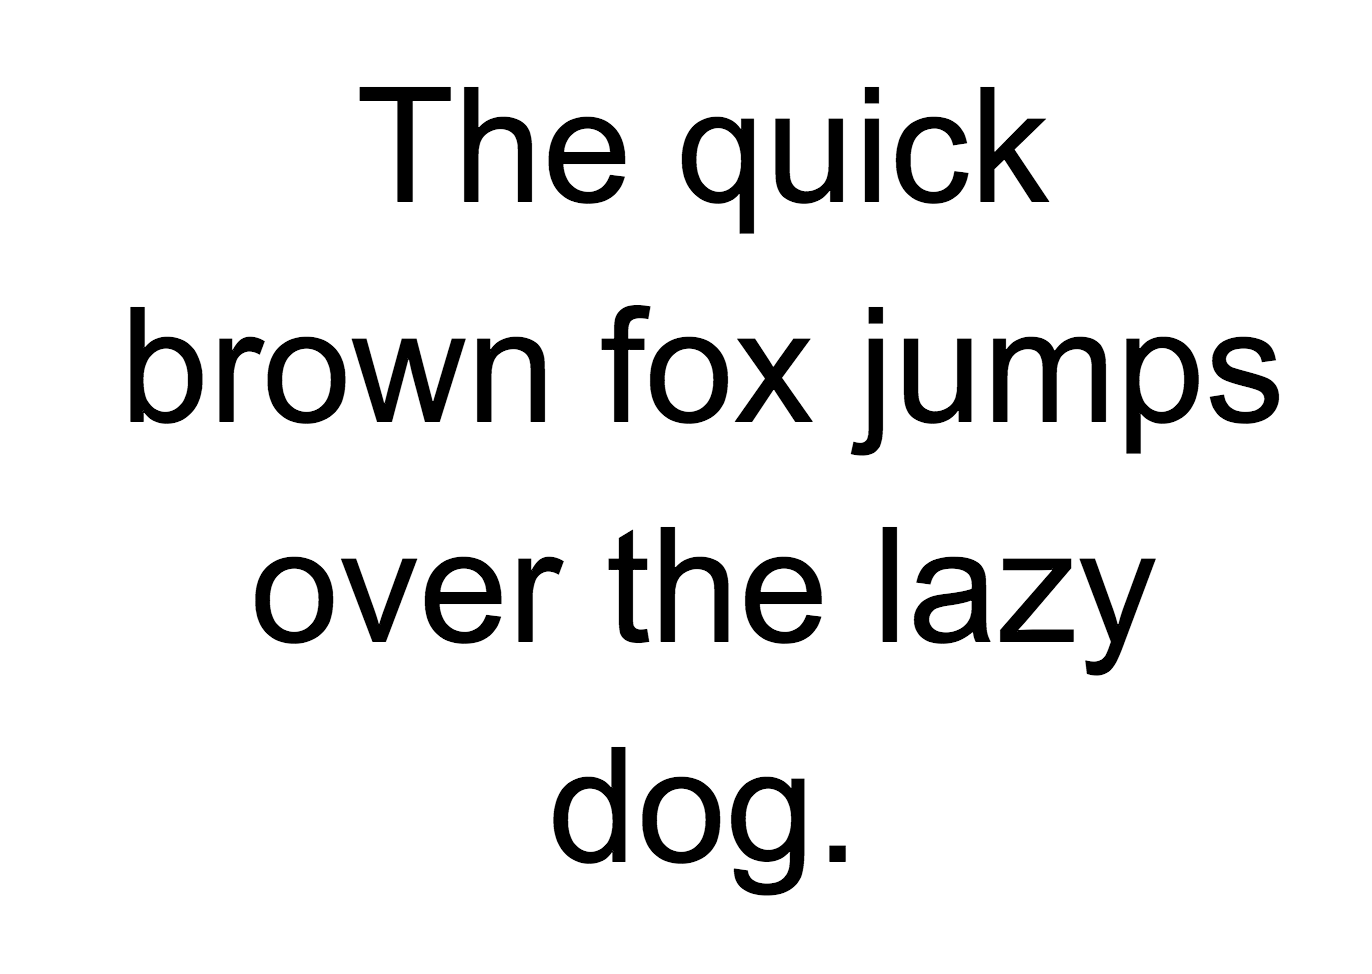
Run the application and test it on this sample text:

You should see a frame appear on the screen with text in it! You can play with the text color using TEXT_COLOR .
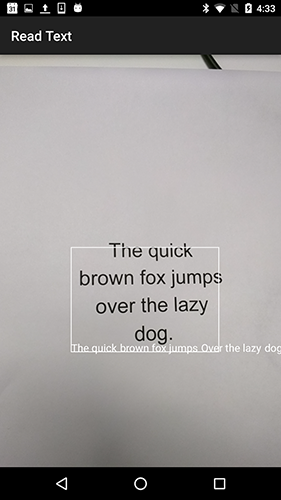
How about this?
The frame around the text looks right, but the text is at the bottom.
This is due to the fact that the engine transmits all the text that it recognizes in the TextBlock in the form of a single sentence, even if it sees a sentence divided into several lines. If you need to get a whole sentence, this is very convenient. But what if you want to know where each single line of text is located?
You can get the Lines from TextBlock by calling getComponents , and then, going through each line, easily get its location and text inside it. This allows you to draw text in the place where it actually appears.
OcrGraphic.java
@Override public void draw(Canvas canvas) {
Try this text again:
Fine! You can even break the found text into even smaller components, based on your needs. You can call getComponents on each line and get Elements (words in Latin). It is possible to customize textSize so that the text takes up as much space as the actual text on the screen.

Reproduction of the text when clicking on it
Now the text from the camera is converted to structured lines, and these lines are displayed on the screen. Let's do something else with them.
Using the TextToSpeech API , built into Android , and the contains method in OcrGraphic , we can teach the application to speak out loud when clicking on text.
First, let's implement the contains method in OcrGraphic . We just need to check if the x and y coordinates are within the frame of the displayed text.
OcrGraphic.java
public boolean contains(float x, float y) {
You may notice that there is much in common with the Draw method! In this project, you should achieve reuse of the code, but here we leave everything as is just for the sake of example.
Now let's move on to the onTap method in OcrCaptureActivity and process the click on the text if it is in this place.
OcrCaptureActivity.java
private boolean onTap(float rawX, float rawY) {
You can run the application and through Android Monitor Logcat make sure that clicking on the text is actually processed.
Let's make our application talk! Go to the start of the Activity and find the onCreate method. When launching the application, we must initialize the TextToSpeech engine for further use.
OcrCaptureActivity.java
@Override public void onCreate(Bundle bundle) {
Despite the fact that we correctly initialized TextToSpeech , as a rule, you still need to handle common errors, for example, when the engine is still not ready when you first click on the text.
TextToSpeech also dependent on the recognition language. You can change the language based on the recognized text language. Language recognition is not built into the Mobile Vision Text API , but it is available through the Google Translate API . As a language for text recognition, you can use the user's device language.
Great, it remains only to add the code for playing the text in the onTap method.
OcrCaptureActivity.java
private boolean onTap(float rawX, float rawY) {
Now, when you start the application and click on the detected text, your device will play it. Try it!
Completion
Now you have an application that can recognize the text from the camera and pronounce it out loud!
You can apply your knowledge on text recognition in your other applications. For example, read the addresses and phone numbers from business cards, search the text from photos of various documents. In short, use OCR wherever you may need to recognize text in an image.
A source