The Page Object pattern appeared in testing the web and proved itself very well there. When I started to automate tests for android applications, I first thought about it. I searched the network for information, asked my colleagues and, in principle, did not find the reasons not to try. I propose to see what came of it.
The classic Page Object implies two levels of abstraction: page elements and tests. I single out another one - business logic. I note that the way you build your framework will greatly influence the simplicity of writing tests in the future, as well as their support. I try to make the test code look like this is a regular test case written by an ordinary tester. Those. I start from the end:
- I write beautiful and clear test case code,
- I implement the methods from the test case in the business logic layer,
- I describe the elements that are needed for the test.
This approach is good because we do not do anything extra - the framework is built on as much as it is necessary for the tests to work. We can say that this is the concept of MVP in testing: they quickly made a piece, and it already started to bring benefits. If you first write thousands of lines describing the pages of your application and ways of interacting with them, and after three months you come out of the “hole” for the first click and realize that you had to do everything differently, then most of your creation will be doomed forever. ” gather dust in git's cellars ... A true tester knows that the earlier he found a mistake, the cheaper it is to fix it. Use this approach in everything - I wrote the test for a couple of hours, I tried it, I didn’t like it - I threw it out, I learned a lesson, I drove on.
So, the input data:
- Android application for trading on the stock exchange;
- Java to work in the same stack with developers;
- basic framework UI Automator;
- need to write a login test in the application.
Project preparation
Since I tried to integrate into the development process as much as possible, I didn’t create a new project. According to the
documentation , instrumental tests should be placed in the
src/androidTest/java folder. In my case, the collector has already been configured, if you have not, then read about the
configuration of the build . We also need a development environment, Android SDK, Emulator, tools, platform-tools and the necessary platforms for the emulator. If you are using Android Studio, then all this can be quickly delivered via the SDK Manager:

Test layer
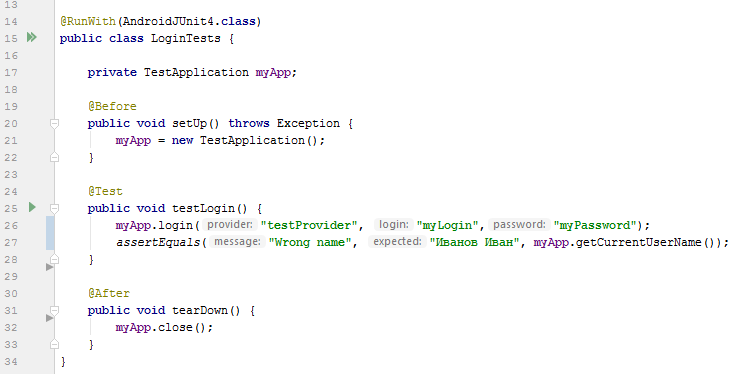
As I wrote above, we will automate the login test in the application. Remember that the code should look the same as a normal test case:
Precondition: run the application.
Step 1: Login as myLogin / myPassword.
Step 2: check the name of the current user.
Expected Result: the current user is Ivan Ivanov.
A small disclaimer: according to the best practice test design, in the preconditions you need to create / find an account. I lowered this moment for ease of example.Our class will look like this:
@RunWith(AndroidJUnit4.class) public class LoginTests { private TestApplication myApp; @Before public void setUp() { myApp = new TestApplication(); } @Test public void testLogin() { myApp.login("myLogin","myPassword"); String currentUser = myApp.getCurrentUserName(); assertEquals("Wrong name", " ", currentUser); } @After public void tearDown() { myApp.close(); } }
Business logic
The test uses the
TestApplication() class and its two methods:
login() and
getCurrentUserName() . Plus, you need a class constructor (it starts the application) and a
close() method
close() front of the work is clear:
public class TestApplication { private UiDevice device; private PageObject page; public TestApplication() { } public void login(String login, String password) { } public String getCurrentUserName() { return "" } public void close() { } }
An instance of our class will have two variables:
device , belonging to the android.support.test.uiautomator.UiDevice class - through it we interact with our device;page , the PageObject class that we will create in the next section.
Let's start with the constructor. In it we create instances of our variables and run the application:
public TestApplication() {
A couple of tips on launching the applicationFor a greater control of the tested application, you can add waiting for launching the launcher (if you start the emulator “on cold”) and the application itself. So advised and in the
documentation .
Note: launching an application via android.content.Context.getTargetContext() is only suitable if your tests are in the same project with the application itself. If separately, you will need to run through the menu.The business logic of the test is the specific steps that the user must take to obtain any meaningful (for the user) result. The implementation of the entrance under his ultrasound - a significant result. Steps: click on the “Login” button, enter the username in the “Login” field, enter the password in the “Password” field, click on the “Sign In” button. Thus, our method is filled with steps:
public void login(String login, String password) { page.login().click(); page.loginEntry().setText(login); page.passwordEntry().setText(password); page.signIn().click(); }
To get the current user, everything is easier, just get the value of the field:
public String getCurrentUserName() { return page.currentUserName().getText(); } }
And to close the application, simply click on the Home button:
public void close() { device.pressHome(); }
Description of page elements
The concept of this layer is that it should return ready-to-use elements (in our context this is the class
android.support.test.uiautomator.UiObject2 ). That is, the consumer should not worry about the state of the object, if he returned, then you can immediately interact with him: click, fill in or read the text. Hence the important consequence - in this layer we will realize the expectations:
private UiObject2 getUiObject(BySelector selector) { return device.wait(Until.findObject(selector), 10000); }
The method defined above will be used by the public interface of our
PageObject class. Example for the “Login” field:
public UiObject2 loginEntry() { return getUiObject(loginEntrySelector()); }
It remains to determine the selector by which we will find the field. The
android.support.test.uiautomator.BySelector instance is most conveniently obtained using the static methods of the
android.support.test.uiautomator.By class. I agreed with the development that, whenever possible, there will be unique resource-id:
private BySelector loginEntrySelector() { return By.res(packageName, "login"); }
It is convenient to inspect the interface in the uiautomatorviewer utility included in the tools package (installed in the Preparation section):

Select the desired item and look at the resource-id in the Node detail section. It consists of the name of the package and, in fact, an ID. We received the package name in the constructor of the
TestApplication class, and used the
PageObject object to
PageObject .
Complete code:
class PageObject public class PageObject { private UiDevice device; private final String packageName; private BySelector loginButtonSelector() { return By.res(packageName, "user_view"); } private BySelector loginEntrySelector() { return By.res(packageName, "login"); } private BySelector passwordEntrySelector() { return By.res(packageName, "password"); } private BySelector signInSelector() { return By.res(packageName, "btnLogin"); } private BySelector userNameSelector() { return By.res(packageName, "user_name"); } public PageObject(UiDevice device, String packageName) { this.device = device; this.packageName = packageName; } public UiObject2 login() { return getUiObject(loginButtonSelector()); } public UiObject2 loginEntry() { return getUiObject(loginEntrySelector()); } public UiObject2 passwordEntry() { return getUiObject(passwordEntrySelector()); } public UiObject2 signIn() { return getUiObject(signInSelector()); } public UiObject2 currentUserName() { return getUiObject(userNameSelector()); } private UiObject2 getUiObject(BySelector selector) { return device.wait(Until.findObject(selector), 10000); } }
Running tests
That's all, it remains to run. To begin, connect to the device or start the emulator. Check the connection with the
adb devices command (the adb utility is included with platform-tools):
List of devices attached emulator-5554 device
If you have a gradle, then do
gradlew.bat connectedAndroidTest
and enjoy it as “robots are injected, not man” (c).