 How AI can learn to generate pictures of cats
 .
Published in 2014, the research work
Generative Adversarial Nets (GAN) was a breakthrough in the field of generative models. Lead researcher Yann Lekun called adversarial nets "the best idea in machine learning over the past twenty years." Today, thanks to this architecture, we can create an AI that generates realistic images of cats. Cool!
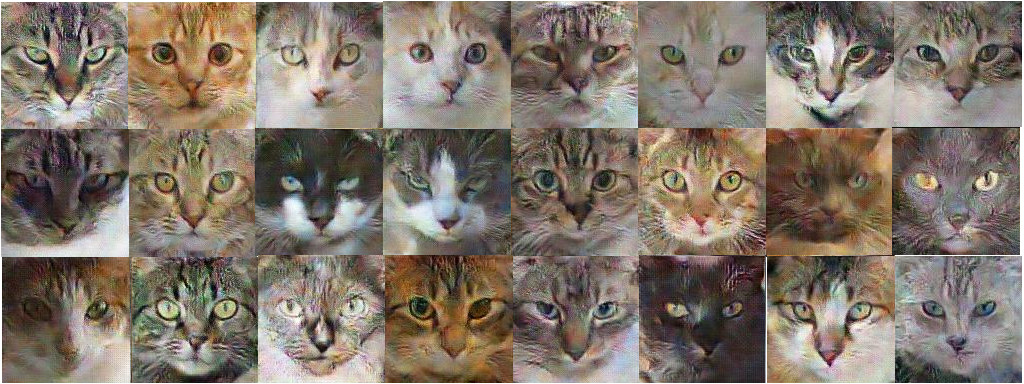
 DCGAN during training
All working code lies in the
Github repository . It will be useful to you if you have any experience of programming in Python, deep learning, working with Tensorflow and convolutional neural networks.
And if you are new to deep learning, I recommend to get acquainted with the excellent series of articles
Machine Learning is Fun!What is DCGAN?
Convolutional generative adversarial deep learning networks (Deep Convolutional Generative Adverserial Networks, DCGAN) are a deep learning architecture that generates data similar to data from a training set.
This model replaces the fully connected layers of the generative adversary network with convolutional layers. To understand how DCGAN works, let's use the metaphor of confrontation between an art expert and a forger.
The forger (“generator”) is trying to create a fake Van Gogh painting and pass it off as a real one.

The art historian ("discriminator") tries to catch the forger using his knowledge of the real Van Gogh canvases.

Over time, the art historian defines fakes better and better, and the falsifier makes them more and more perfect.
 As you can see, DCGANs are made up of two separate deep learning neural networks competing with each other.
- The generator is trying to create data that looks believable. He does not know what the real data is, but he learns from the responses of the enemy's neural network, changing the results of his work with each iteration.
- The discriminator tries to identify fake data (comparing with the real data), avoiding false alarms as far as possible with respect to the data as much as possible. The result of this model is feedback for the generator.
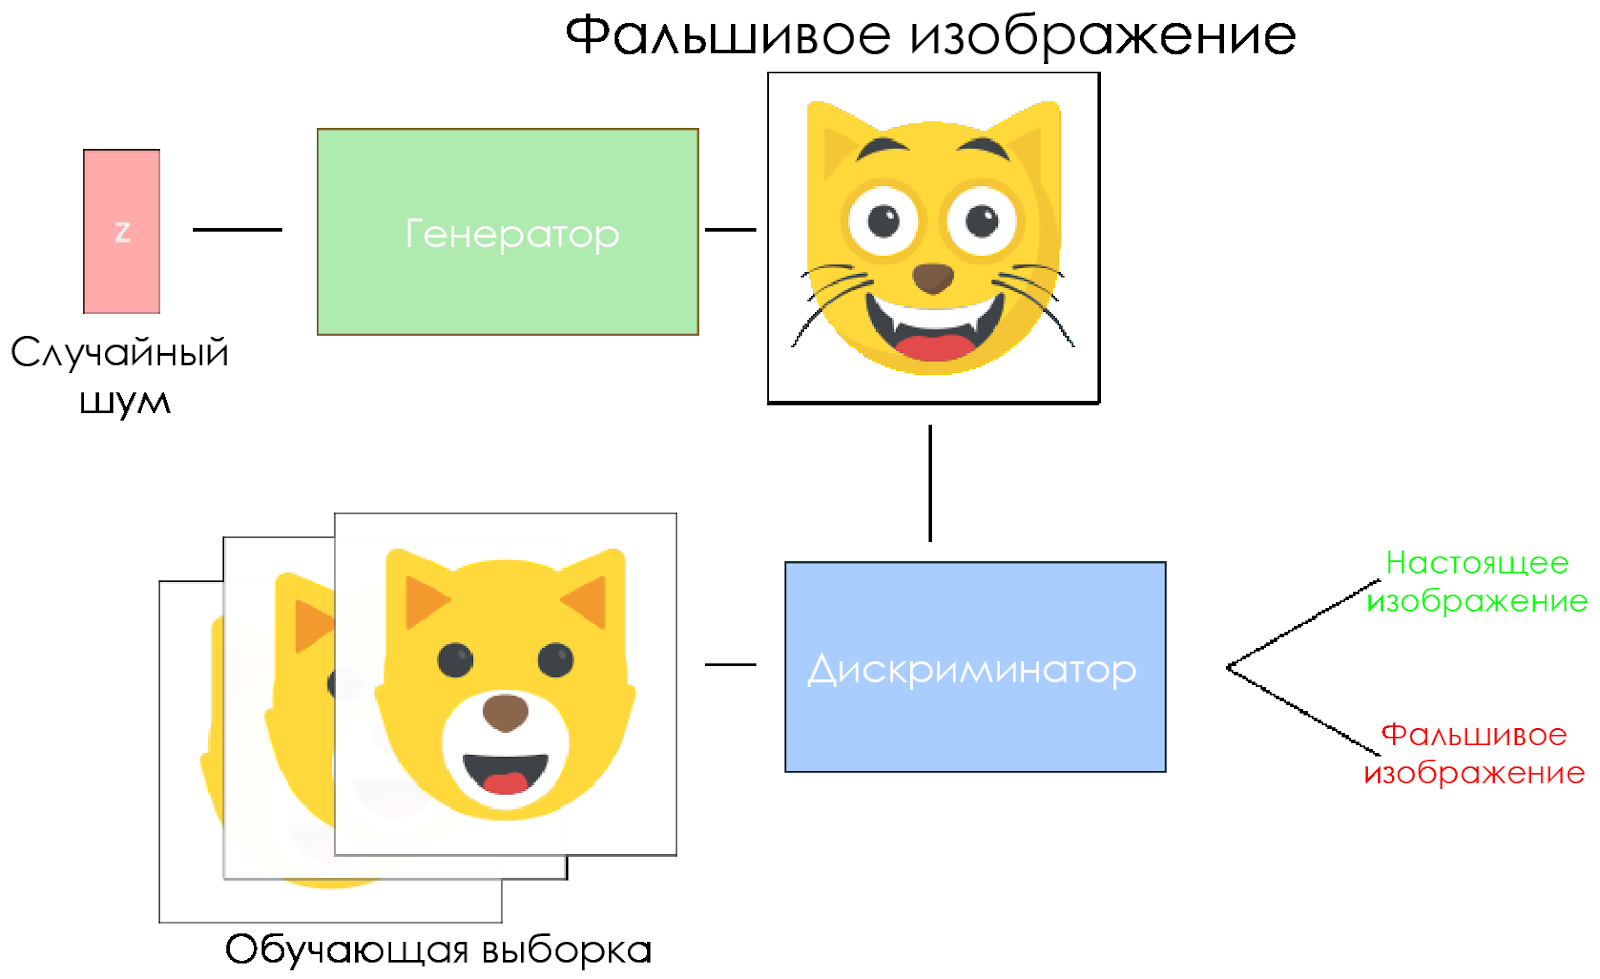 DCGAN scheme.
- The generator takes a random noise vector and generates an image.
- The picture is given to the discriminator, he compares it with the training sample.
- The discriminator returns a number — 0 (fake) or 1 (real image).
Let's create a DCGAN!
Now we are ready to create our own AI.
In this part we will focus on the main components of our model. If you want to see all the code, go
here .
Input data
Create stubs for the input:
inputs_real for the discriminator and
inputs_z for the generator. Please note that we will have two learning rates (learning rates), separately for the generator and the discriminator.
DCGANs are very sensitive to hyperparameters, so it is very important to fine-tune them.
def model_inputs(real_dim, z_dim): """ Create the model inputs :param real_dim: tuple containing width, height and channels :param z_dim: The dimension of Z :return: Tuple of (tensor of real input images, tensor of z data, learning rate G, learning rate D) """
Discriminator and generator
We use
tf.variable_scope for two reasons.
First, to make sure that the names of all variables begin with generator / discriminator. Later it will help us in learning two neural networks.
Secondly, we will reuse these networks with different input data:
- We will train the generator, and then take a sample of the images generated by it.
- In the discriminator, we will share variables for fake and real input images.
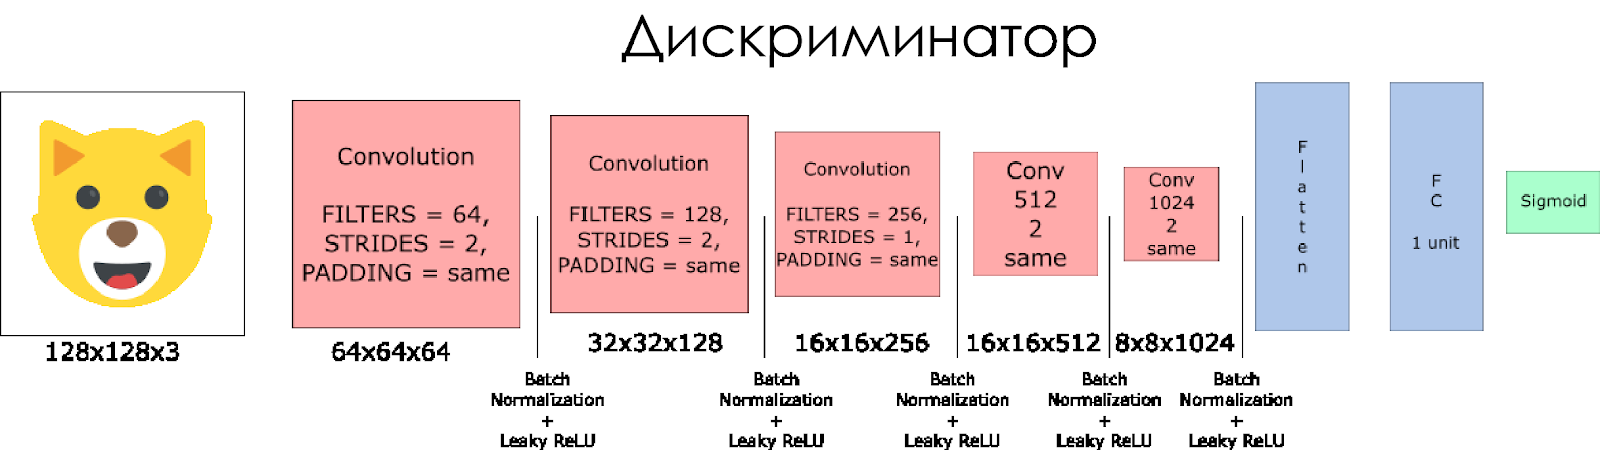
Let's create a discriminator. Remember that as input it takes a real or fake image and returns 0 or 1 in response.
A few notes:
- We need to double the size of the filter in each convolutional layer.
- It is not recommended to use downsampling. Instead, only strided convolutional layers are applicable.
- In each layer, we use batch normalization (with the exception of the input layer), since this reduces the covariance shift. You can read more in this wonderful article .
- As an activation function, we use Leaky ReLU, it will help to avoid the effect of a “fading” gradient.
def discriminator(x, is_reuse=False, alpha = 0.2): ''' Build the discriminator network. Arguments --------- x : Input tensor for the discriminator n_units: Number of units in hidden layer reuse : Reuse the variables with tf.variable_scope alpha : leak parameter for leaky ReLU Returns ------- out, logits: ''' with tf.variable_scope("discriminator", reuse = is_reuse):
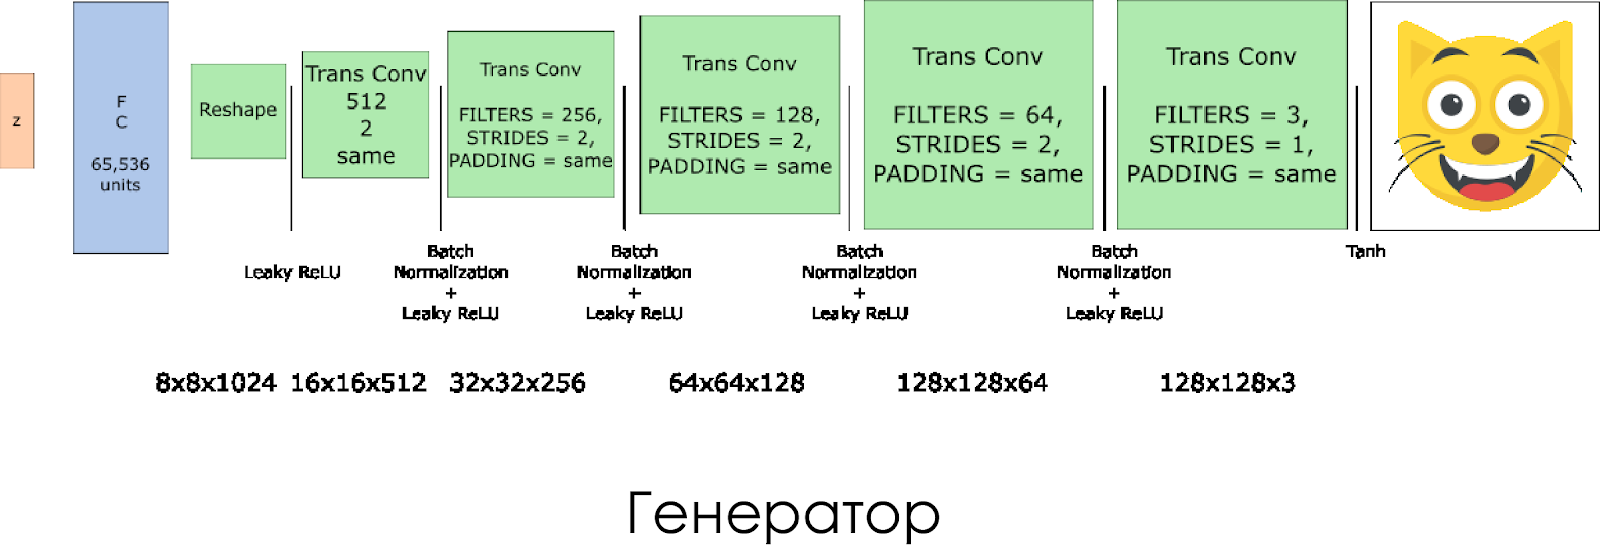
We created a generator. Remember that it takes as its input the noise vector (z) and, thanks to the transposed convolution layers, creates a fake image.
On each layer we reduce the filter size by half, and also double the size of the image.
Best of all, the generator works when using
tanh as an output activation function.
def generator(z, output_channel_dim, is_train=True): ''' Build the generator network. Arguments --------- z : Input tensor for the generator output_channel_dim : Shape of the generator output n_units : Number of units in hidden layer reuse : Reuse the variables with tf.variable_scope alpha : leak parameter for leaky ReLU Returns ------- out: ''' with tf.variable_scope("generator", reuse= not is_train):
Losses in the discriminator and generator
Since we are simultaneously training the generator and the discriminator, we need to calculate the losses for both neural networks. The discriminator should produce 1 when it “considers” the image as real, and 0 if it is false. In accordance with this and need to adjust the loss. The loss of the discriminator is calculated as the sum of the losses for the real and fake image:
d_loss = d_loss_real + d_loss_fakewhere
d_loss_real is a loss when the discriminator considers the image to be false, and in fact it is real. It is calculated as:
- Use
d_logits_real , all tags are 1 (because all data is real). labels = tf.ones_like(tensor) * (1 - smooth) . We use label smoothing: we will reduce the label values from 1.0 to 0.9 to help the discriminator generalize better.
d_loss_fake is a loss when the discriminator considers an image as real, but in fact it is false.
- Use
d_logits_fake , all tags are 0.
For generator loss,
d_logits_fake from the discriminator is used. This time, all labels are 1, because the generator wants to deceive the discriminator.
def model_loss(input_real, input_z, output_channel_dim, alpha): """ Get the loss for the discriminator and generator :param input_real: Images from the real dataset :param input_z: Z input :param out_channel_dim: The number of channels in the output image :return: A tuple of (discriminator loss, generator loss) """
Optimizers
After calculating the losses, the generator and the discriminator must be individually updated. To do this, using
tf.trainable_variables() we will create a list of all the variables defined in our graph.
def model_optimizers(d_loss, g_loss, lr_D, lr_G, beta1): """ Get optimization operations :param d_loss: Discriminator loss Tensor :param g_loss: Generator loss Tensor :param learning_rate: Learning Rate Placeholder :param beta1: The exponential decay rate for the 1st moment in the optimizer :return: A tuple of (discriminator training operation, generator training operation) """
Training
Now we implement the learning function. The idea is quite simple:
- We keep our model every five periods (epoch).
- We save the picture in the folder with the images every 10 trained batches.
- Every 15 periods we display
g_loss , d_loss and the generated image. This is necessary because Jupyter notebook may fail when displaying too many pictures. - Or we can directly generate real images by loading a saved model (this will save 20 hours of training).
def train(epoch_count, batch_size, z_dim, learning_rate_D, learning_rate_G, beta1, get_batches, data_shape, data_image_mode, alpha): """ Train the GAN :param epoch_count: Number of epochs :param batch_size: Batch Size :param z_dim: Z dimension :param learning_rate: Learning Rate :param beta1: The exponential decay rate for the 1st moment in the optimizer :param get_batches: Function to get batches :param data_shape: Shape of the data :param data_image_mode: The image mode to use for images ("RGB" or "L") """
How to start
All this can be run directly on your computer, if you are ready to wait for 10 years. So it is better to use cloud-based GPU-services like AWS or FloydHub. Personally, I trained this DCGAN for 20 hours on Microsoft Azure and their
Deep Learning Virtual Machine . I have no business relationship with Azure, I just like their customer service.
If you have any difficulties running on a virtual machine, refer to this wonderful
article .
If you improve the model, feel free to make a pull request.