From translator
Hello, habrchane. This is a translation of the article-documentation for the new technology Navigation for Android-developers. The technology is currently under development, but is already available for use and works very well in the preview version of Android Studio 3.2 and higher. I have already tried it in action and I can say that it impressed me. Finally, the implementation of the screen change has ceased to be something difficult, especially if you use data transfer from one screen to another. Actually, I do the translation in order for more Russian-speaking developers to pay attention to the technology, and to simplify its study.
If you notice significant errors or inaccuracies, please report in the comments.
Architectural component
The architectural component of Navigation allows you to simplify the implementation of navigation between destination destinations in your application. By default, Navigation supports fragments (Fragments) and activities (Activities) as destination screens, but you can also add support for new types of destination screens . A set of destination screens is called an application’s navigation graph .
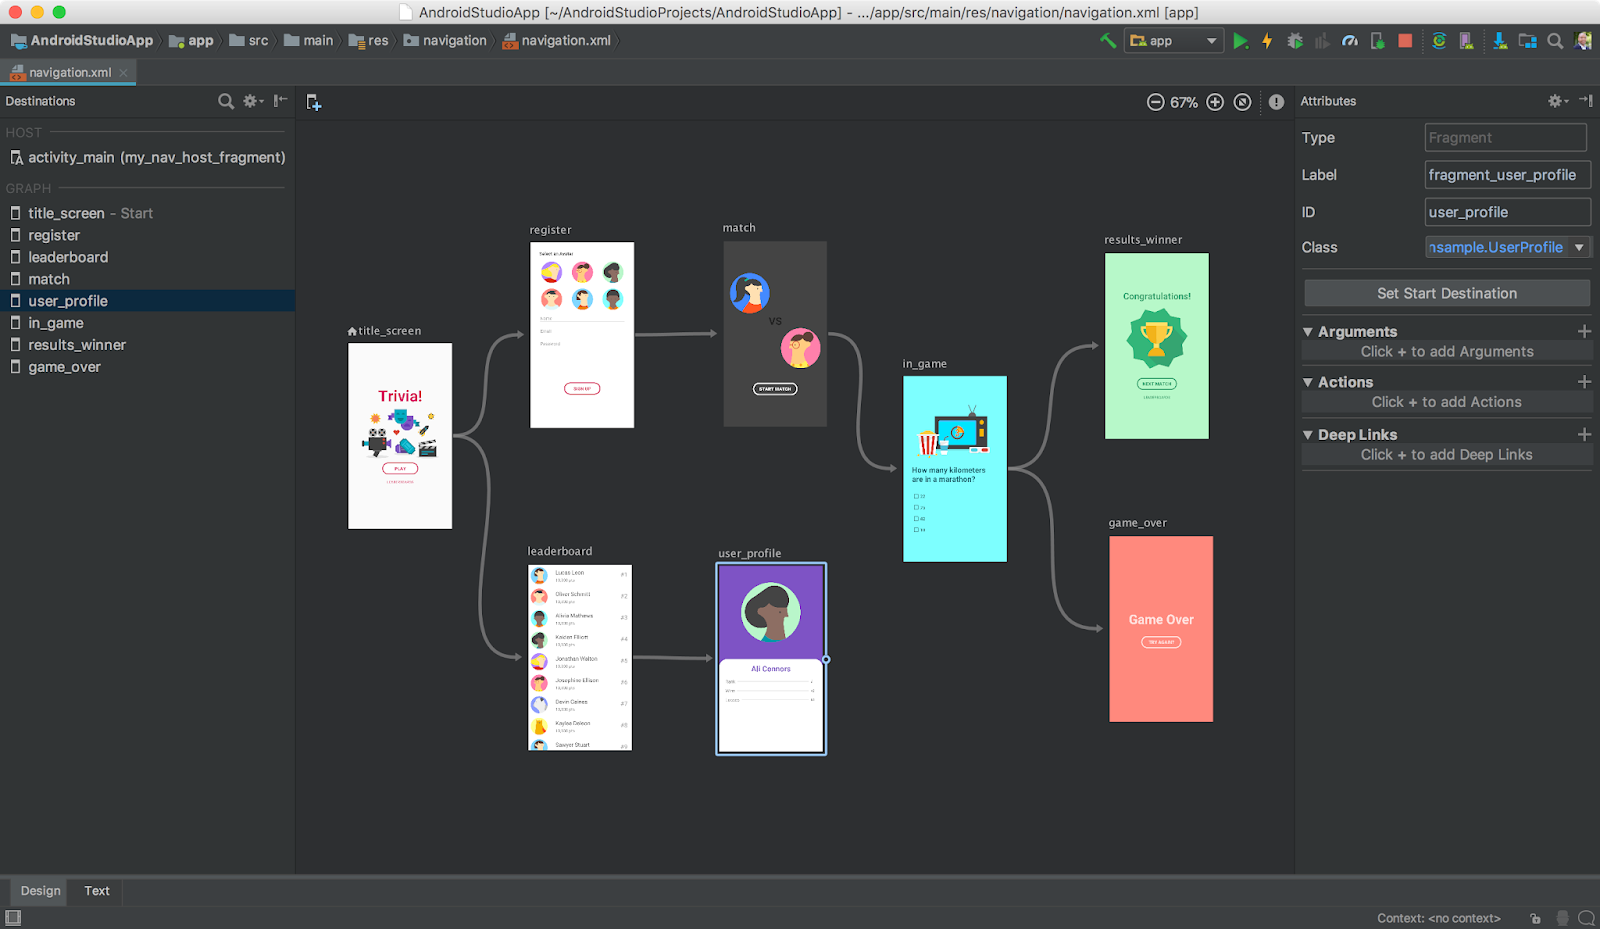
In addition to the destination screens on the navigation graph, there are connections between them, called actions . Figure 1 shows a visual representation of the navigation graph for a simple application of six destination screens connected by five actions.

Figure 1. Navigation graph
The architectural component of Navigation is based on the principles of navigation .
If you want to use the architectural component of Navigation in Android Studio, then you need a version of Android Studio 3.2 Canary 14 or higher.
Setting up a project with Navigation support
Before you can create a navigation graph, you need to configure Navigation for your project. To do this, follow these steps.
Add Navigation support in the build.gradle file (Module: app - Approx. Translator ). For more information, see Adding components to your project .
Note translator: It’s better not to be lazy and follow the link above, as the project is actively developing and the dependencies will definitely change:
dependencies { def nav_version = "1.0.0-alpha05" // use -ktx for Kotlin implementation "android.arch.navigation:navigation-fragment:$nav_version" // use -ktx for Kotlin implementation "android.arch.navigation:navigation-ui:$nav_version" // optional - Test helpers // use -ktx for Kotlin androidTestImplementation "android.arch.navigation:navigation-testing:$nav_version" }
- In the project window, right-click on the res folder and select New> Android resource file .
The New Resource dialog box opens. - Enter a file name, for example " nav_graph ".
- Select Navigation from the Resource type drop-down list.
- Click OK . The following will happen:
- The navigation subdirectory appears in the res directory.
- The nav_graph.xml file appears in the navigation directory.
- The nav_graph.xml file opens in the Navigation Editor. This file contains your navigation graph.
- Select the edit mode Text . The XML file for an empty navigation graph looks like this:
<?xml version="1.0" encoding="utf-8"?> <navigation xmlns:android="http://schemas.android.com/apk/res/android"> </navigation>
- Select Design edit mode to return to the Navigation Editor.
Note translator: if the Navigation Editor does not display a graph, study the beginning of the next paragraph, highlighted in yellow.
Navigation Editor Overview
The Navigation Editor is available by default only in Canary builds of Android Studio. To use the Navigation Editor in the Beta, Release Candidate, or Stable builds, go to File> Settings ( Android Studio> Preferences for Mac), select the Experimental category, check Enable Navigation Editor , and restart Android Studio.
Note translator: I recommend regardless of the assembly to check whether this tick.
In the Navigation Editor, you can quickly create navigation graphs instead of writing XML. As shown in Figure 2, the Navigation Editor has three sections:

Figure 2. Navigation Editor
Description of sections:
- List of destination screens — displays all destination screens added to the graph.
- Graph Editor - contains a visual representation of your graph
- Attribute Editor - contains attributes and actions of destination screens
Defining Destination Screens
The first step in creating a navigation graph is defining destination screens for your application. You can create a blank assignment screen or use fragments and activities from the current project.
The architectural component of Navigation is designed for applications that have one main activity (Main Activity - Approx. Translator ) with many fragments that are used as destination screens. The main activity is the "host" for the navigation graph. In an application with many activities, each of them will be a host for different navigation graphs. The conversion of activity into a host for the navigation graph is described later in the document.
To define the destination screen for your application, follow these steps.
- In the graph editor, click New Destination
 . The New Destination dialog box appears .
 - Click Create blank destination or select an existing fragment or activity. The Android Component dialog box appears .
- Enter a name in the Fragment Name field. It must match the class name of this fragment.
- Enter a name in the Fragment Layout Name field. This name will be assigned to the layout file of the fragment.
- Click Finish . A line with the name of the new destination screen appears in the list of destination screens, and the destination screen itself appears in the graph editor. In more detail:
- The graph editor displays a preview of the destination screen. If you have created a blank assignment screen, the new fragment will contain the inscription “Hello blank fragment”, and you will see the same inscription in the graph editor. If you selected an existing fragment or activity, the graph will display its miniature version.
- If you create a blank assignment screen, a class will be generated for it. The class name will match the name specified in step 3.
- If you create a blank assignment screen, a layout file will be generated for it. The file name will match the name given in step 4.
Figure 3 shows an empty and existing destination screen.

Figure 3. New and existing assignment screen.
- Click on the assignment screen you just created to select it. The attribute panel contains the following attributes:
- The Type field can have the values "Fragment" or "Activity" to display how the destination screen is implemented in the source code: as a fragment or as an activity.
- The Label field contains the name of the XML file for the destination screen.
- The ID field contains the ID of the destination screen (as a separate entity - Approx. Translator ), which is used to refer to it in the source code (via R.id - Approx. Translator ).
- The Class field contains the class name of the assignment screen (with all packages indicated - Approx. Translator ).
- Switch to Text edit mode to switch to XML view. XML now contains the attributes id, name (class name), label, and layout, which display the names of existing classes and layout files:
<?xml version="1.0" encoding="utf-8"?> <navigation xmlns:app="http://schemas.android.com/apk/res-auto" xmlns:tools="http://schemas.android.com/tools" xmlns:android="http://schemas.android.com/apk/res/android" app:startDestination="@id/blankFragment"> <fragment android:id="@+id/blankFragment" android:name="com.example.cashdog.cashdog.BlankFragment" android:label="Blank" tools:layout="@layout/fragment_blank" /> </navigation>
The XML contains the startDestination attribute containing the id of the empty destination screen ( app: startDestination = "@ + id / fragment" ). For more information on the destination start screen, see the Destination Start Screen section.
Connection of destination screens
Your application must have more than one destination screen to connect them. The XML for the navigation graph with two blank destination screens is described below:
<?xml version="1.0" encoding="utf-8"?> <navigation xmlns:app="http://schemas.android.com/apk/res-auto" xmlns:tools="http://schemas.android.com/tools" xmlns:android="http://schemas.android.com/apk/res/android" app:startDestination="@id/blankFragment"> <fragment android:id="@+id/blankFragment" android:name="com.example.cashdog.cashdog.BlankFragment" android:label="fragment_blank" tools:layout="@layout/fragment_blank" /> <fragment android:id="@+id/blankFragment2" android:name="com.example.cashdog.cashdog.BlankFragment2" android:label="Blank2" tools:layout="@layout/fragment_blank_fragment2" /> </navigation>
Destination screens are connected by actions. To connect two destination screens:
- In the graph editor, move the cursor to the destination screen from which you want to make the transition. A circle appears on it.

Figure 4. Action connection circle - Click on the circle and hold the mouse button. Move the cursor to the assignment screen to which you want to navigate. Let go. An arrow appears between the two destination screens, indicating the transition between them.

Figure 5. Connected destination screens - Click on the arrow to highlight the action. The following will appear on the attributes panel:
- Type field contains "Action".
- The ID field contains the action ID generated automatically.
- The Destination field contains the ID of the destination screen to which the transition is made.
- Switch to Text edit mode to see XML. An action tag has been added to the parent assignment screen. The action has a generated ID and an attribute that contains the ID of the next destination screen.
<?xml version="1.0" encoding="utf-8"?> <navigation xmlns:app="http://schemas.android.com/apk/res-auto" xmlns:tools="http://schemas.android.com/tools" xmlns:android="http://schemas.android.com/apk/res/android" app:startDestination="@id/blankFragment"> <fragment android:id="@+id/blankFragment" android:name="com.example.cashdog.cashdog.BlankFragment" android:label="fragment_blank" tools:layout="@layout/fragment_blank" > <action android:id="@+id/action_blankFragment_to_blankFragment2" app:destination="@id/blankFragment2" /> </fragment> <fragment android:id="@+id/blankFragment2" android:name="com.example.cashdog.cashdog.BlankFragment2" android:label="fragment_blank_fragment2" tools:layout="@layout/fragment_blank_fragment2" /> </navigation>
Designation of the destination screen as a starter
In the graph editor displays the icon of the house  immediately after the name of the first destination screen. This icon indicates that the destination screen is starting in the navigation graph. You can select a different assignment screen as the start screen by following these steps:
- Highlight the desired assignment screen in the graph editor.
- Click Set Start Destination in the attributes panel. Now this destination screen is the start page. Note translator: you can also right-click on the desired destination screen and select a similar item in the menu that opens.
Turning activity into a host for the navigation graph
Activity becomes a host for the navigation graph due to an empty NavHost element, which is added to the activity layout. NavHost is an item whose presence allows you to change destination screens in the order in which the user of your application needs it.
NavHost in Navigation by default implements NavHostFragment .
After adding NavHost, you must map it to your navigation graph using the app attribute : navGraph . This code demonstrates how to include in the layout NavHostFragment and connect it to the navigation graph:
?xml version="1.0" encoding="utf-8"?> <android.support.constraint.ConstraintLayout xmlns:android="http://schemas.android.com/apk/res/android" xmlns:app="http://schemas.android.com/apk/res-auto" xmlns:tools="http://schemas.android.com/tools" android:layout_width="match_parent" android:layout_height="match_parent" tools:context=".MainActivity"> <fragment android:layout_width="match_parent" android:layout_height="match_parent" android:id="@+id/my_nav_host_fragment" android:name="androidx.navigation.fragment.NavHostFragment" app:navGraph="@navigation/nav_graph" app:defaultNavHost="true" /> </android.support.constraint.ConstraintLayout>
This example contains the app attribute : defaultNavHost = "true" . He is responsible for intercepting the system Back button ( Note of the translator: the system Back button and the Up arrow on the top panel of the application will work the same ). You can also override AppCompatActivity.onSupportNavigateUp () and call NavController.navigateUp () as shown here:
Java @Override public boolean onSupportNavigateUp() { return Navigation.findNavController(this, R.id.nav_host_fragment).navigateUp(); }
Kotlin override fun onSupportNavigateUp() = findNavController(R.id.nav_host_fragment).navigateUp()
Binding actions to widgets
Navigate to the destination screen using the NavController . It can be obtained using the overloaded static method findNavController ():
After receiving the NavController, use its navigate () method to go to the destination screen. The navigate () method takes the resource ID. This may be the ID of the destination screen you want to go to, or it may be an action ID. Using the action ID instead of the destination screen ID allows you to customize the animation of the transition between the screens. For more information, see Creating an animation of the transition between destination screens .
This code demonstrates how to bind an action to a button:
Java viewTransactionsButton.setOnClickListener(new View.OnClickListener() { @Override public void onClick(View view) { Navigation.findNavController(view).navigate(R.id.viewTransactionsAction); } });
Kotlin viewTransactionsButton.setOnClickListener { view -> view.findNavController().navigate(R.id.viewTransactionsAction) }
Android supports a reverse stack that stores the last open destination screen. The first destination screen is pushed onto the stack when the user starts the application. Each call to the navigate () method puts a new destination screen on the stack. Pressing the Back or Up button calls the NavController.navigateUp () and NavController.popBackStack () methods to retrieve the destination screen from the stack.
For buttons, you can also use the convenient Navigation.createNavigateOnClickListener () method:
Java button.setOnClickListener(Navigation.createNavigateOnClickListener(R.id.next_fragment, null));
Kotlin button.setOnClickListener(Navigation.createNavigateOnClickListener(R.id.next_fragment, null))
Binding actions to the Navigation Drawer menu
You can link navigation actions to Navigation Drawer using the destination screen id as the menu item id (item). The following code shows an example of a destination screen, whose id is set to details_page_fragment :
<fragment android:id="@+id/details_page_fragment" android:label="@string/details" android:name="com.example.android.myapp.DetailsFragment" />
Using the same id for the destination screen and the menu item automatically links the menu item and the destination screen. This code demonstrates how to associate a target screen with a menu item (for example, this is a menu_nav_drawer.xml file):
<item android:id="@id/details_page_fragment" android:icon="@drawable/ic_details" android:title="@string/details" />
Or here is an example for a menu with categories (for example, menu_overflow.xml ):
<item android:id="@id/details_page_fragment" android:icon="@drawable/ic_details" android:title="@string/details" android:menuCategory:"secondary" />
Also, the architectural component of Navigation includes the class NavigationUI . This class has several static methods that you can use to associate menu items with destination screens. For example, this code shows how to use the setupWithNavController () method to connect a menu item with a NavigationView :
Java NavigationView navigationView = (NavigationView) findViewById(R.id.nav_view); NavigationUI.setupWithNavController(navigationView, navController);
Kotlin val navigationView = findViewById<NavigationView>(R.id.nav_view) navigationView.setupWithNavController(navController)
You must configure the navigation components of the menu using the NavigationUI methods so that their state remains synchronized with the changes in NavController .
Transferring data between destination screens
You can transfer data between assignment screens in two ways: using Bundle objects or type-safe using safeargs Gradle plugin. Follow these steps to transfer data using Bundle objects. If you use Gradle, then study the section Transferring data between the destination screens in the type-safe way .
- In the graph editor, select the destination screen to receive data.
- Click Add ( + ) in the Arguments section of the attributes panel. An argument will appear with empty fields name (name), type (type) and default value (default value).
- Enter the name of the argument.
- Enter a default value.
- Highlight the action (arrow) pointing to the destination screen. The Argument Default Values section should contain the argument just created.
- Switch to Text edit mode to view XML. The argument tag was added to the destination screen, containing the name and defaultValues attributes.
- In the source code, create a bundle and transfer it to the destination screen using the navigate () method:
Java Bundle bundle = new Bundle(); bundle.putString("amount", amount); Navigation.findNavController(view).navigate(R.id.confirmationAction, bundle);
Kotlin var bundle = bundleOf("amount" to amount) view.findNavController().navigate(R.id.confirmationAction, bundle)
In the assignment screen to which the data is sent, use the getArguments () method to get the bundle and use its contents:
Java TextView tv = view.findViewById(R.id.textViewAmount); tv.setText(getArguments().getString("amount"));
Kotlin val tv = view.findViewById(R.id.textViewAmount) tv.text = arguments.getString("amount")
Data transfer between destination screens in a type-safe way.
The architectural component of Navigation has a Gradle plugin called safeargs . It generates the simplest classes for type-safe access to the arguments of destination and action screens. The safeargs approach is based on using the Bundle, but requires a bit of extra code for more typical security. To add this plugin, paste the line androidx.navigation.safeargs into build.gradle (in Module: app - Approx. Translator ). For example:
apply plugin: 'com.android.application' apply plugin: 'androidx.navigation.safeargs' android { //... }
Note translator: also, you need to add to the build.gradle (Project: ProjectName) dependency classpath "android.arch.navigation: navigation-safe-args-gradle-plugin: 1.0.0-alpha02":
buildscript { repositories { google() } dependencies { classpath "android.arch.navigation:navigation-safe-args-gradle-plugin:1.0.0-alpha02" } }
After installing the plugin, follow these steps to use type-safe data transfer:
- In the graph editor, select the destination screen to which you want to transfer data.
- Click + in the Arguments section of the attributes panel. An attribute appears with empty fields.
- Enter the name of the argument.
- Select an argument type.
- Enter a default value.
- Highlight the action preceding the destination screen. The Argument Default Values section should contain the argument just created.
- Click Text to go to the XML editing mode.
<fragment android:id="@+id/confirmationFragment" android:name="com.example.buybuddy.buybuddy.ConfirmationFragment" android:label="fragment_confirmation" tools:layout="@layout/fragment_confirmation"> <argument android:name="amount" android:defaultValue="1" app:type="integer"/> </fragment>
After the safeargs plugin generated the code ( that is, after creating the argument with the type - Approx. Translator ), the classes for the sending screen and the receiving screen are also generated.
Note Translator: I had to press the Sync Project with Gradle Files button after creating the argument in order for the classes to be generated.
The sender's screen class has the same name as the original, with the addition of the word Directions at the end.
That is, if you have a FirstFragment assignment screen, then the generated class is called FirstFragmentDirections. This class has a method (!) Whose name matches the action ID that passes the argument. That is, if your FirstFragment screen passes an argument to the SecondFragment screen, and if the action connecting them is called action_first_to_second, this is what the desired FirstFragmentDirections.action_first_to_second () method looks like.
The sender class also contains a subclass, which is the return type of the method discussed above. That is, in our case, the return type of the action_first_to_second () method will be Action_first_to_second.
The class of the recipient has the same name as the original, with the addition of the word Args at the end. For our example, SecondFragment is the host, so the class SecondFragmentArgs is generated for it. This class has a fromBundle () method for taking arguments.
Note translator: now everything will become clearer. I modified this code a little in comparison with the original one. The changes concern only the names, which can be individual for everyone. This is done to simplify understanding. Here, the name of the argument is myArgument, and its type is String.
This code demonstrates how to use safeargs to pass arguments through the navigate () method:
Java @Override public void onClick(View view) { FirstFragmentDirections.Action_first_to_second action = FirstFragmentDirections.action_first_to_second(); action.setMyArgument("My argument value"); Navigation.findNavController(view).navigate(action); }
Kotlin override fun onClick(v: View?) { val action = FirstFragmentDirections.action_first_to_second action.myArgument = "My argument value" v.findNavController().navigate(action) }
This code demonstrates how to retrieve arguments with safeargs:
Java @Override public void onViewCreated(View view, @Nullable Bundle savedInstanceState) { String myArgument = SecondFragmentArgs.fromBundle(getArguments()).getMyArgument(); }
Kotlin override fun onViewCreated(view: View, savedInstanceState: Bundle?) { val myArgument = SecondFragmentArgs.fromBundle(arguments).myArgument }
Note translator: I personally liked this method of passing arguments. No other private static final String MY_ARGUMENT_KEY = "MY_ARGUMENT". It is very convenient that now for setting and extracting an argument its individual (!) Getter and setter are used.
Grouping assignment screens into a nested graph
Sequences of assignment screens can be grouped into subgraphs. The subgraph is called "nested graph" (nested graph) , and the parent graph is "root graph" (root graph) . Nested graphs are useful for organizing the reuse of parts of the user interface of your application, such as a branch (sequence of screens) authorization.
As well as the root, the nested graph must have a start screen. A nested graph encapsulates its destination screens. Screens outside the nested graph, for example, the root graph screens, have access only to the start screen of the nested graph. Figure 6 shows the navigation graph of the simplest money transfer application. The graph has two branches: to transfer money, and to view the balance.

Figure 6. Navigation graph of money transfer application
Grouping assignment screens into a nested graph:
- In the graph editor, hold down shift , and click on the screens you want to include in the nested graph. Each screen must be highlighted.
- Right-click on one of them, and select Move to Nested Graph> New Graph from the context menu. The selected screens will turn into a nested graph. Figure 7 shows nested graphs in the graph editor.

Figure 7. Nested graph in the graph editor - Click on the nested graph to select it. The following attributes should appear in the attributes panel:
- The Type field contains "Nested Graph".
- The ID field contains the generated ID for the nested graph.
- Double click on the nested graph. The nested graph screens will appear.
- In the list of screens (on the left), click Root to return to the root graph.
- Switch to Text edit mode to see XML. The nested graph has been added to the root graph. It is denoted by its own opening and closing navigation tag. ID sendMoneyGraph startDestination chooseRecipient :
<?xml version="1.0" encoding="utf-8"?> <navigation xmlns:app="http://schemas.android.com/apk/res-auto" xmlns:tools="http://schemas.android.com/tools" xmlns:android="http://schemas.android.com/apk/res/android" app:startDestination="@id/mainFragment"> <fragment android:id="@+id/mainFragment" android:name="com.example.cashdog.cashdog.MainFragment" android:label="fragment_main" tools:layout="@layout/fragment_main" > <action android:id="@+id/action_mainFragment_to_ sendMoneyGraph" app:destination="@id/sendMoneyGraph" /> <action android:id="@+id/action_mainFragment_to_viewBalanceFragment" app:destination="@id/viewBalanceFragment" /> </fragment> <fragment android:id="@+id/viewBalanceFragment" android:name="com.example.cashdog.cashdog.ViewBalanceFragment" android:label="fragment_view_balance" tools:layout="@layout/fragment_view_balance" /> <navigation android:id="@+id/sendMoneyGraph" app:startDestination="@id/chooseRecipient"> <fragment android:id="@+id/chooseRecipient" android:name="com.example.cashdog.cashdog.ChooseRecipient" android:label="fragment_choose_recipient" tools:layout="@layout/fragment_choose_recipient"> <action android:id="@+id/action_chooseRecipient_to_chooseAmountFragment" app:destination="@id/chooseAmountFragment" /> </fragment> <fragment android:id="@+id/chooseAmountFragment" android:name="com.example.cashdog.cashdog.ChooseAmountFragment" android:label="fragment_choose_amount" tools:layout="@layout/fragment_choose_amount" /> </navigation> </navigation>
- ID , , navigate() :
Java Navigation.findNavController(view).navigate(R.id.action_mainFragment_to_sendMoneyGraph);
Kotlin view.findNavController(view).navigate(R.id.action_mainFragment_to_sendMoneyGraph)
Android, ( deep link ) URI (, – . ), - . URI - , .
- .
- + Depp Links . Add Deep Link .
- URI URI. "www.cashdog.com/sendmoney" ( www.cashdog.com , ).
URI:
- Auto Verify Google , URI . Android App Links .
- Add .
 .
. - Text . :
<deepLink app:uri="https://cashdog.com/sendmoney"/>
Back, , . , , .
manifest.xml :
, .
Navigation , " " " ".
:
- . Navigation Property Animation View Animation . Animation Resources .
- , .
- Transitions , Enter. .
- , .
- Transitions , Exit. .
- , .
- Text . XML action. , . specifyAmountFragment , , :
<fragment android:id="@+id/specifyAmountFragment" android:name="com.example.buybuddy.buybuddy.SpecifyAmountFragment" android:label="fragment_specify_amount" tools:layout="@layout/fragment_specify_amount"> <action android:id="@+id/confirmationAction" app:destination="@id/confirmationFragment" app:enterAnim="@anim/slide_in_right" app:exitAnim="@anim/slide_out_left" app:popEnterAnim="@anim/slide_in_left" app:popExitAnim="@anim/slide_out_right" /> </fragment>
, ( enterAnim exitAnim ) ( popEnterAnim popExitAnim ).
- Navigation Editor, . , Report a bug .
Read also
Navigation . :
, , , . - . , . ! , - ( Android) – .
UPD: : https://github.com/PrincessYork/android_navigation