
In this article we will develop a plugin that will save the plugin settings in Jira. We will use the soy, requirejs, backbone js libraries to display the user interface. Soy, requirejs, backbone js are libraries built into Jira.
The goal of the article is to show how Jira’s built-in tools can be used to develop user interfaces.
The developed plug-in will contain a webwork module for saving plug-in parameters in Jira. Parameters will be entered on two screens (two parameters on each screen). Further, the parameters will be packaged in json, which will be stored in Jira. The source code of the plugin can be viewed
here .
Create the skeleton of the plugin
Open the terminal and execute the command below:
atlas-create-jira-pluginAnswer the questions in the terminal like this:
Define value for groupId: : ru.matveev.alexey.jira.tutorial.webworkui Define value for artifactId: : webwork-soy-require-backbone Define value for version: 1.0.0-SNAPSHOT: : Define value for package: ru.matveev.alexey.jira.tutorial.webworkui: : Y: : Y
Make changes to pom.xml
After creating the plug-in skeleton, you need to make changes for the correct operation of
atlassian-spring-scanner 2 .
Install the atlassian-spring-scanner version in 2.0.0:
<atlassian.spring.scanner.version>2.0.0</atlassian.spring.scanner.version>
Change the scope of the atlassian-spring-scanner-annotation dependencies from compile to provided:
<dependency> <groupId>com.atlassian.plugin</groupId> <artifactId>atlassian-spring-scanner-annotation</artifactId> <version>${atlassian.spring.scanner.version}</version> <scope>provided</scope> </dependency>
Remove the atlassian-spring-scanner-runtime dependency.
Create a service for getting and saving plugin settings
First, create an interface to manage the settings of the plugin.
src / main / java / ru / matveev / alexey / jira / tutorial / webworkui / api / PluginSettingService.java package ru.matveev.alexey.jira.tutorial.webworkui.api; public interface PluginSettingService { String getConfigJson(); void setConfigJson(String json); }
Now we will implement the interface.
src / main / java / ru / matveev / alexey / jira / tutorial / webworkui / impl / PluginSettingServiceImpl.java package ru.matveev.alexey.jira.tutorial.webworkui.impl; import com.atlassian.plugin.spring.scanner.annotation.imports.ComponentImport; import com.atlassian.sal.api.pluginsettings.PluginSettings; import com.atlassian.sal.api.pluginsettings.PluginSettingsFactory; import ru.matveev.alexey.jira.tutorial.webworkui.api.PluginSettingService; import javax.inject.Inject; import javax.inject.Named; @Named public class PluginSettingServiceImpl implements PluginSettingService { public final PluginSettings pluginSettings; private static final String PLUGIN_STORAGE_KEY = "ru.matveev.alexey.jira.tutorial.webworkui."; private static final String CONFIG_JSON = "configjson"; @Inject public PluginSettingServiceImpl(@ComponentImport PluginSettingsFactory pluginSettingsFactory) { this.pluginSettings = pluginSettingsFactory.createGlobalSettings(); } private void setSettingValue(String settingKey, String settingValue) { this.pluginSettings.put(PLUGIN_STORAGE_KEY + settingKey, settingValue != null?settingValue:""); } private String getSettingValue(String settingKey) { return pluginSettings.get(PLUGIN_STORAGE_KEY + settingKey) != null?pluginSettings.get(PLUGIN_STORAGE_KEY + settingKey).toString():""; } @Override public String getConfigJson() { return getSettingValue(CONFIG_JSON); } @Override public void setConfigJson(String json) { setSettingValue(CONFIG_JSON, json); } }
The getConfigJson and setConfigJson methods are responsible for getting and saving a parameter in json format.
Create webwork to manage plugin settings
Open the terminal in the plugin folder and execute the command below:
create-atlas-jira-plugin-moduleWe answer the questions in the terminal as follows:
Choose a number (1/2/3/4/5/6/7/8/9/10/11/12/13/14/15/16/17/18/19/20/21/22/23/24/25/26/27/28/29/30/31/32/33/34): 31 Enter Plugin Module Name My Webwork Module: : Config Show Advanced Setup? (Y/y/N/n) N: : Y Module Key config: : webwork-config Module Description The Config Plugin: : i18n Name Key config.name: : i18n Description Key config.description: : Enter Action Classname MyActionClass: : ConfigWebwork Enter Package Name ru.matveev.alexey.jira.tutorial.webworkui.jira.webwork: :Enter Alias ConfigWebwork: : Enter View Name success: : success.soy Enter Template Path /templates/webwork-config/configwebwork/success.soy.vm: : /templates/webwork-config/configwebwork/success.soy Add Another View? (Y/y/N/n) N: : N Add Another Action? (Y/y/N/n) N: : N Add Another Plugin Module? (Y/y/N/n) N: : N
As a result, the file src / main / java / ru / matveev / alexey / jira / tutorial / webworkui / jira / webwork / ConfigWebwork.java will be created. This file needs to be modified like this:
src / main / java / ru / matveev / alexey / jira / tutorial / webworkui / jira / webwork / ConfigWebwork.java package ru.matveev.alexey.jira.tutorial.webworkui.jira.webwork; import org.slf4j.Logger; import org.slf4j.LoggerFactory; import com.atlassian.jira.web.action.JiraWebActionSupport; import ru.matveev.alexey.jira.tutorial.webworkui.api.PluginSettingService; import javax.inject.Inject; public class ConfigWebwork extends JiraWebActionSupport { private static final Logger log = LoggerFactory.getLogger(ConfigWebwork.class); private final PluginSettingService pluginSettingService; private String configJson; @Inject public ConfigWebwork(PluginSettingService pluginSettingService) { this.pluginSettingService = pluginSettingService; } @Override public String execute() throws Exception { super.execute(); return SUCCESS; } public void doSave() { pluginSettingService.setConfigJson(configJson); } @ActionViewData public String getConfigJson() { return pluginSettingService.getConfigJson().isEmpty()?"{}":pluginSettingService.getConfigJson(); } public void setConfigJson(String json) { this.configJson = json; } }
The @ActionViewData annotation is necessary for the configJson parameter to be available in the soy template.
Create a web section and web item
We added webwork. Now add a menu item from which webwork will be launched.
Open the terminal and execute the following command:
create-atlas-jira-plugin-moduleWe answer the questions as follows:
Choose a number (1/2/3/4/5/6/7/8/9/10/11/12/13/14/15/16/17/18/19/20/21/22/23/24/25/26/27/28/29/30/31/32/33/34): 30 Enter Plugin Module Name My Web Section: : Webwork Config Section Enter Location (eg system.admin/mynewsection): admin_plugins_menu Show Advanced Setup? (Y/y/N/n) N: : N Add Another Plugin Module? (Y/y/N/n) N: : Y Choose a number (1/2/3/4/5/6/7/8/9/10/11/12/13/14/15/16/17/18/19/20/21/22/23/24/25/26/27/28/29/30/31/32/33/34): 25 Enter Plugin Module Name My Web Item: : Webwork Config Item Enter Section (eg system.admin/globalsettings): admin_plugins_menu/webwork-config-section Enter Link URL (eg /secure/CreateIssue!default.jspa): /secure/ConfigWebwork.jspa? Show Advanced Setup? (Y/y/N/n) N: : N Add Another Plugin Module? (Y/y/N/n) N: : N
As a result, we created a menu item on the Add-ons page.
Create a soy template
Details about soy templates can be read
here .
We will create a file
src / main / resources / templates / webwork-config / configwebwork / success.soy.
src / main / resources / templates / webwork-config / configwebwork / success.soy {namespace webwork.config} /** * This template is needed for drawing the formview. */ {template .formview} {@param configJson: string} {webResourceManager_requireResource('ru.matveev.alexey.jira.tutorial.webworkui.webwork-soy-require-backbone:webwork-soy-require-backbone-resources')} <html> <head> <meta charset="utf-8"/> <meta name="decorator" content="atl.admin"> <meta name="admin.active.section" content="admin_plugins_menu/telegram-config-section"> <meta name="admin.active.tab" content="telegram-general-config-item"> <title>my page page</title> </head> <body> <div id="container"> <form class="aui" action="ConfigWebwork!save.jspa" method="POST"> <div class="field-group"> <label for="configJson">Json</label> <input class="text long-field" type="text" id="configJson" name="configJson" placeholder="Json String" value="{$configJson}"> <div class="description">the configJson Parameter</div> </div> <div class="buttons-container"> <div class="buttons"> <input class="button submit" type="submit" value="Save" id="config-save-button"> <a class="cancel" href="#">Cancel</a> </div> </div> </form> </div> </body> </html> {/template}
In the atlassian-plugin.xml file, add a link to the soy template created to the web-resource tag:
<resource type="soy" name="webwork-config" location="/templates/webwork-config/configwebwork/success.soy"/>
Now we will make changes to atlassian-plugin.xml so that when accessing webwork, the created soy template would be displayed:
<view name="success" type="soy">:webwork-soy-require-backbone-resources/webwork.config.formview</view>
webwork-soy-require-backbone-resources is the name attribute in the web-resource tag, where we added a link to our soy template.
webwork.config.formview - the namespace and name of the template from the soy file.
Test plugin
Open the terminal in the plugin folder and execute the following command:
atlas-runAfter Jira starts up, go to the browser using the following link:
localhost : 2990 / jira / secure / ConfigWebwork.jspa
The screen will look like this:
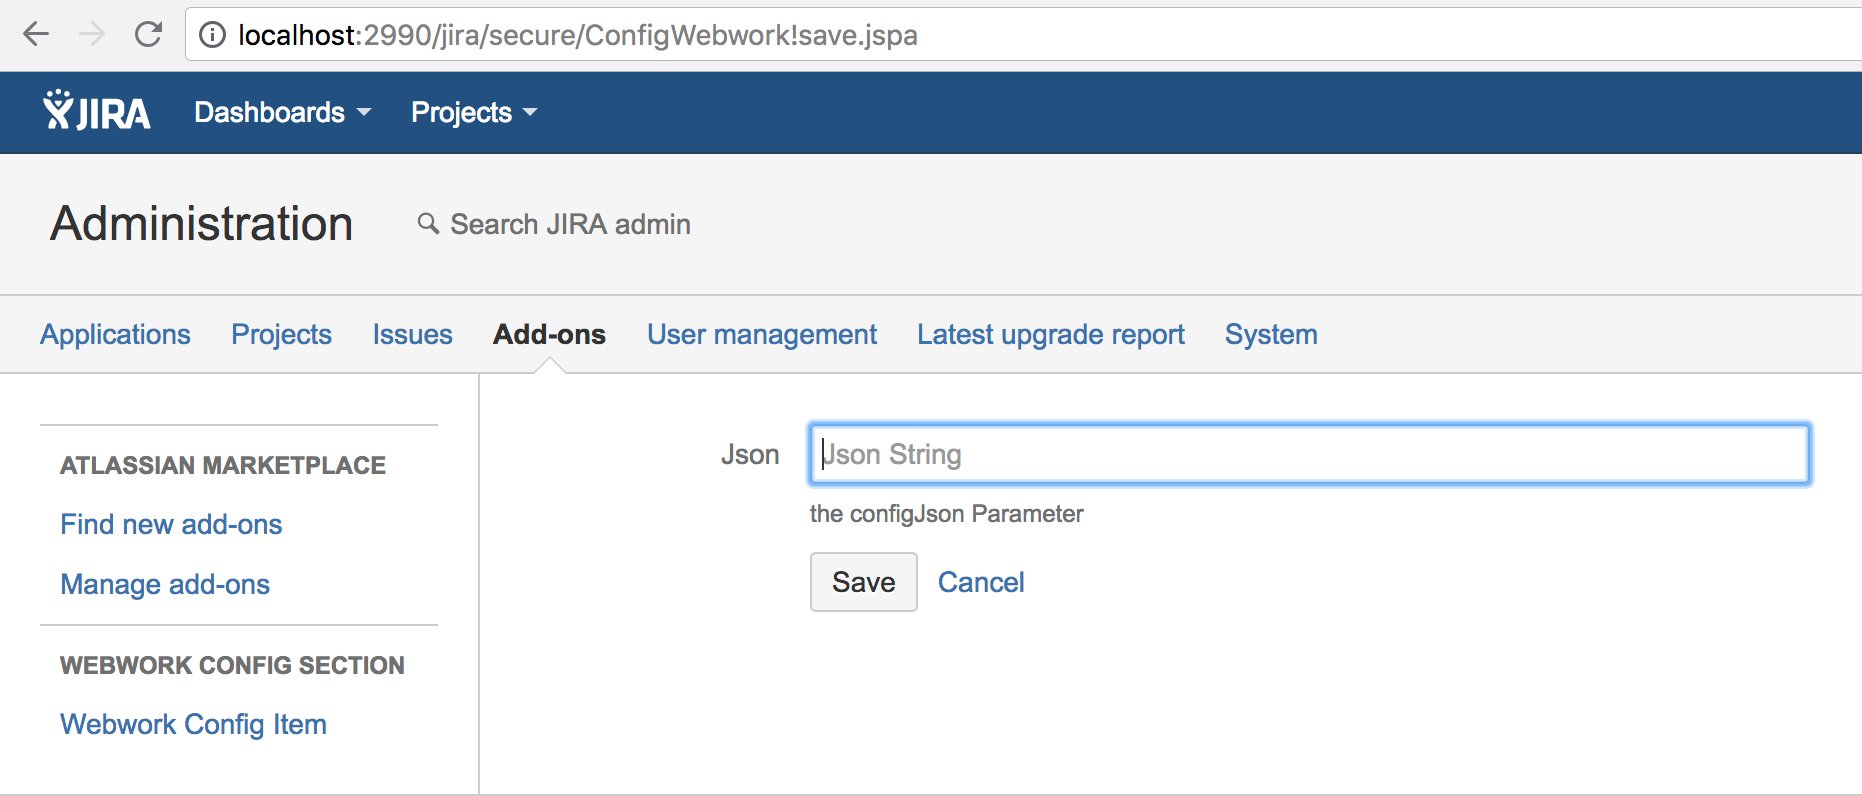
You can try entering data in the Json field and save. Webwork works.
Now we need to make it so that there are two screens to fill in the parameters, and on the last screen, the Save button should bring all the parameters in json format and save in the plugin settings.
We will use backbone js to control the logic of moving around the screens and bringing the parameters to the json format. About backbone js can be read
here .
Create a backbone model
src / main / resources / js / webwork-config-model.jsdefine ('webwork / config / model', [
'jquery',
'backbone',
'underscore'
], function ($, Backbone, _) {
var WebConfigModel = Backbone.Model.extend ({
defaults: {
parameter1: '',
parameter2: '',
parameter3: '',
parameter4: ''
}
});
return {
Model: WebConfigModel
};
})
In order for the model to be available when loading the soy template, the file with the model must be added to atlassian-plugin.xml in the web-resource tag:
<resource type="download" name="webwork-config-model.js" location="/js/webwork-config-model.js"/>
Create a backbone view
I wrote comments in the code for important points.
src / main / resources / js / webwork-config-view.js// define is an requirejs directive and defines the model as a webwork / config / view module. This allows us to define dependencies in other files on the model.
define ('webwork / config / view', [
'jquery',
'backbone',
'underscore'
], function ($, Backbone, _) {
"Use strict";
var AppView = Backbone.View.extend ({
events: {
"Click # config-save-button": "saveConfig",
"Click # next-button": "nextButton",
"Click # back-button": "prevButton"
},
// function that works with the Save button. Saves parameters from the screen to the model and converts the parameters to json format
saveConfig: function () {
this.model.set ("parameter3", $ ("# parameter3"). val ());
this.model.set ("parameter4", $ ("# parameter4"). val ());
$ ("# configJson"). val (JSON.stringify (this.model));
},
// function that works with the Next button on the first screen. Saves parameters from the first screen to the model and draws the second screen.
nextButton: function () {
this.model.set ("parameter1", $ ("# parameter1"). val ());
this.model.set ("parameter2", $ ("# parameter2"). val ());
var template = webwork.config.page2 ({configJson: $ ("# configJson"). val (), parameter3: this.model.get ('parameter3'), parameter4: this.model.get ('parameter4')} );
$ ("# container"). replaceWith (template);
$ ("# configJson"). val (JSON.stringify (this.model));
},
// function that works on the Back button on the second screen. Saves parameters from the second screen to the model and draws the first screen.
prevButton: function () {
this.model.set ("parameter3", $ ("# parameter3"). val ());
this.model.set ("parameter4", $ ("# parameter4"). val ());
var template = webwork.config.page1 ({configJson: $ ("# configJson"). val (), parameter1: this.model.get ('parameter1'), parameter2: this.model.get ('parameter2')} );
$ ("# container"). replaceWith (template);
$ ("# configJson"). val (JSON.stringify (this.model));
},
initialize: function () {
this.render ();
},
render: function () {
var template = webwork.config.page1 ({configJson: $ ("# configJson"). val (), parameter1: this.model.get ('parameter1'), parameter2: this.model.get ('parameter2')} );
$ ("# container"). replaceWith (template);
},
// this is a link to the main container. The view will catch all events from the items below this item.
el: '#maincontainer'
});
return {
View: AppView
};
})
In order for the twist to be available when the soy template is loaded, the twist file must be added to atlassian-plugin.xml in the web-resource tag:
<resource type="download" name="webwork-config-view.js" location="/js/webwork-config-view.js"/>
Create a js file to customize the backbone model and view
src / main / resources / js / webwork-soy-require-backbone.jsrequire ([
'webwork / config / view',
'webwork / config / model',
'jquery',
'backbone',
'underscore'
], function (webworkConfigView, webworkConfigModel, $, Backbone, _) {
var webworkConfigModel = new webworkConfigModel.Model (JSON.parse ($ ("# configJson"). val ()));
var actionsView = new webworkConfigView.View ({model: webworkConfigModel});
})
Our js file uses requirejs. The require directive allows you to ensure that the file is loaded only after all the dependencies are downloaded. We defined the following dependencies for our file: webwork / config / view, webwork / config / model, query, backbone, underscore.
Add the parameters necessary for the work of soy templates
Add to the web-resource tag in the atlassian-plugin.xml file:
<transformation extension="soy"> <transformer key="soyTransformer"/> </transformation> <resource name="success-soy.js" type="download" location="/templates/webwork-config/configwebwork/success.soy"/>
These options allow you to access the soy template in js files.
Make changes to success.soy
I added comments on important points.
src / main / resources / templates / webwork-config / configwebwork / success.soy {namespace webwork.config} /** * webwork. json . page1. , json backbone model. */ {template .formview} {@param configJson: string} {webResourceManager_requireResource('ru.matveev.alexey.jira.tutorial.webworkui.webwork-soy-require-backbone:webwork-soy-require-backbone-resources')} <html> <head> <meta charset="utf-8"/> <meta name="decorator" content="atl.admin"> <meta name="admin.active.section" content="admin_plugins_menu/telegram-config-section"> <meta name="admin.active.tab" content="telegram-general-config-item"> <title>my page page</title> </head> <body> <div id="maincontainer"> <div id="container"> <input class="text long-field hidden" type="text" id="configJson" name="configJson" placeholder="Json String" value="{$configJson}"> </div> </div> </body> </html> {/template} /** * . parameter1 parameter2. */ {template .page1} {@param configJson: string} {@param parameter1: string} {@param parameter2: string} <div id="container"> <form class="aui"> <div class="field-group"> <label for="parameter1">Parameter 1</label> <input class="text long-field" type="text" id="parameter1" name="parameter1" placeholder="Parameter1 value" value="{$parameter1}"> <div class="description">Value of Parameter 1</div> </div> <div class="field-group"> <label for="parameter2">Parameter 2</label> <input class="text long-field" type="text" id="parameter2" name="parameter2" placeholder="Parameter2 value" value="{$parameter2}"> <div class="description">Value of Parameter 2</div> </div> <div class="field-group"> <input class="text long-field hidden" type="text" id="configJson" name="configJson" placeholder="Json String" value="{$configJson}"> </div> <div class="buttons-container"> <div class="buttons"> <a class="cancel" href="#">Cancel</a> <input class="button submit" type="submit" value="Next" id="next-button"> </div> </div> </form> </div> {/template} /** * . parameter3 parameter4. */ {template .page2} {@param configJson: string} {@param parameter3: string} {@param parameter4: string} <div id="container"> <form class="aui" action="ConfigWebwork!save.jspa" method="POST"> <div class="field-group"> <label for="parameter1">Parameter 3</label> <input class="text long-field" type="text" id="parameter3" name="parameter3" placeholder="Parameter3 value" value="{$parameter3}"> <div class="description">Value of Parameter 3</div> </div> <div class="field-group"> <label for="parameter4">Parameter 4</label> <input class="text long-field" type="text" id="parameter4" name="parameter4" placeholder="Parameter4 value" value="{$parameter4}"> <div class="description">Value of Parameter 4</div> </div> <div class="field-group"> <input class="text long-field hidden" type="text" id="configJson" name="configJson" placeholder="Json String" value="{$configJson}"> </div> <div class="buttons-container"> <div class="buttons"> <input class="button submit" type="submit" value="Back" id="back-button"> <input class="button submit" type="submit" value="Save" id="config-save-button"> </div> </div> </form> </div> {/template}
Test the application
Open the terminal in the plugin folder and run:
atlas-runAfter Jira is launched, open the browser by the link:
http://localhost:2990/jira/secure/ConfigWebwork.jspaYou will see the following screen:
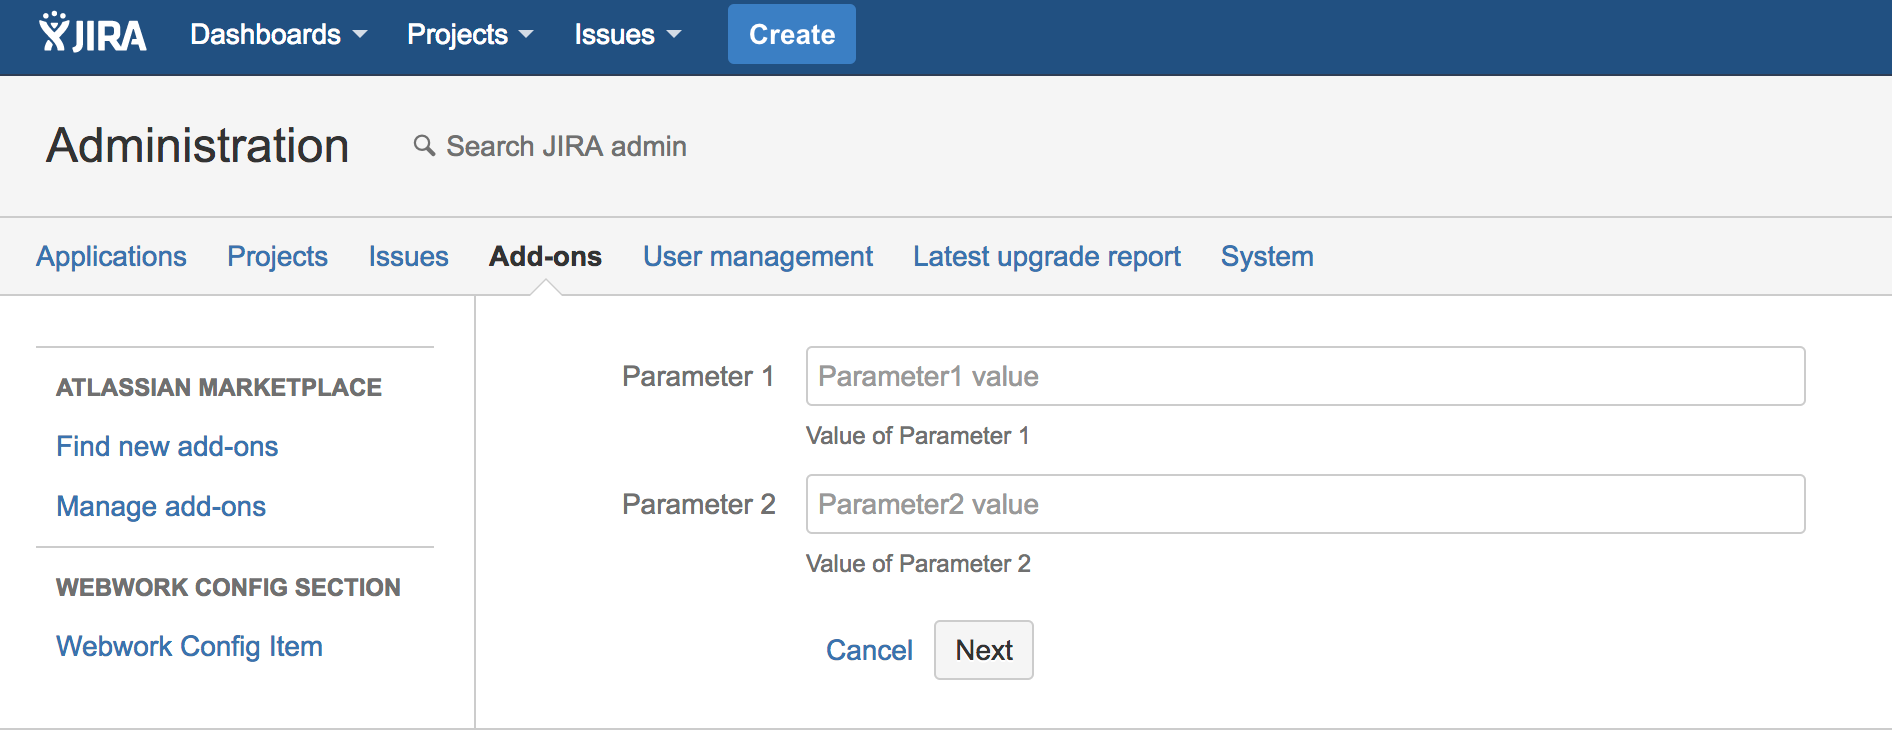
Fill in the settings and click Next. The following screen will appear:
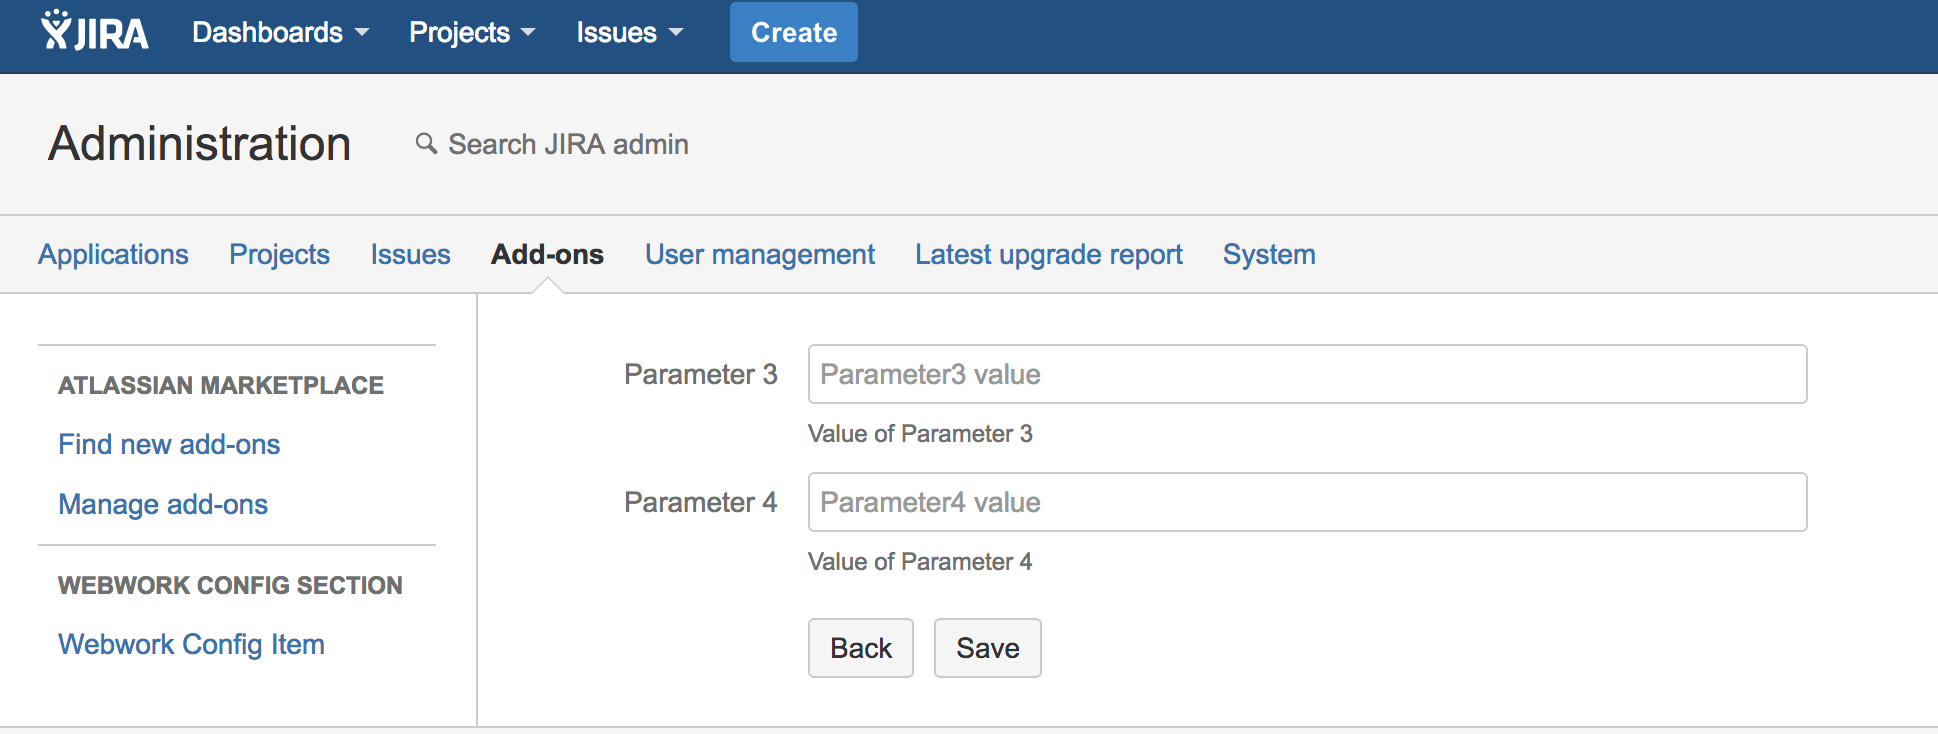
Fill in parameters 3 and 4 and click on the Save button. Parameters will be saved in Json format. You can click on the Back button and you will be taken to the first screen.
Our plugin works.