
The previous article described the design of a NAS software platform.
It is time to implement it.
Check
Be sure, before starting to check the pool performance:
zpool status -v
The pool and all disks in it must be ONLINE.
Further, I assume that at the previous stage everything was done according to the instructions , and it works, or you yourself understand what you are doing.
Facilities
First of all, you should take care of convenient management, if you have not done so from the very beginning.
It will take:
- SSH server:
apt-get install openssh-server . If you do not know how to configure SSH, it’s too early to do NAS on Linux You can read the features of its use in this article , then use one of the manuals . - tmux or screen :
apt-get install tmux . To save the session at logins on SSH and use multiple windows.
After installing SSH, you need to add a user in order not to log in via SSH as root (login is disabled by default and you do not need to enable it):
zfs create rpool/home/user adduser user cp -a /etc/skel/.[!.]* /home/user chown -R user:user /home/user
For remote administration it is a sufficient minimum.
However, for now, you need to keep the keyboard and monitor connected, as you still need to reboot when updating the kernel and in order to make sure that everything works right after the download.
An alternative is to use Virtual KVM, which is provided by IME . There is a console there, though in my case it is implemented as a Java applet, which is not very convenient.
Customization
Cache preparation
As far as you remember, in the configuration I described there is a separate SSD under L2ARC, which is not yet used, but taken "for growth".
It is optional, but it is desirable to fill this SSD with random data (in the case of the Samsung EVO, it’s still filled with zeros after running the blkdiscard, but not on all SSDs like this):
dd if=/dev/urandom of=/dev/disk/by-id/ata-Samsung_SSD_850_EVO bs=4M && blkdiscard /dev/disk/by-id/ata-Samsung_SSD_850_EVO
Disable logging compression
Compression is used on ZFS, and so compression of logs via gzip is clearly superfluous.
I turn off:
for file in /etc/logrotate.d/* ; do if grep -Eq "(^|[^#y])compress" "$file" ; then sed -i -r "s/(^|[^#y])(compress)/\1#\2/" "$file" fi done
System update
Everything is simple:
apt-get dist-upgrade --yes reboot
Creating a snapshot for the new state
After rebooting, in order to fix the new working state, you need to rewrite the first snapshot:
zfs destroy rpool/ROOT/debian@install zfs snapshot rpool/ROOT/debian@install
File System Organization
Preparing sections for SLOG
The first thing to do in order to achieve normal ZFS performance is to render the SLOG to the SSD.
Let me remind you that the SLOG in the used configuration is duplicated on two SSDs: for it, LUKS-XTS devices will be created on top of the 4th partition of each SSD:
dd if=/dev/urandom of=/etc/keys/slog.key bs=1 count=4096 cryptsetup --verbose --cipher "aes-xts-plain64:sha512" --key-size 512 --key-file /etc/keys/slog.key luksFormat /dev/disk/by-id/ata-Samsung_SSD_850_PRO-part4 cryptsetup --verbose --cipher "aes-xts-plain64:sha512" --key-size 512 --key-file /etc/keys/slog.key luksFormat /dev/disk/by-id/ata-Micron_1100-part4 echo "slog0_crypt1 /dev/disk/by-id/ata-Samsung_SSD_850_PRO-part4 /etc/keys/slog.key luks,discard" >> /etc/crypttab echo "slog0_crypt2 /dev/disk/by-id/ata-Micron_1100-part4 /etc/keys/slog.key luks,discard" >> /etc/crypttab
Section preparation for L2ARC and paging
First you need to create partitions for swap and l2arc:
sgdisk -n1:0:48G -t1:8200 -c1:part_swap -n2::196G -t2:8200 -c2:part_l2arc /dev/disk/by-id/ata-Samsung_SSD_850_EVO
The swap partition and L2ARC will be encrypted in a random key, since after reboot, they are not required and they can always be re-created.
Therefore, a line is written in crypttab to encrypt / decrypt partitions in plain mode:
echo swap_crypt /dev/disk/by-id/ata-Samsung_SSD_850_EVO-part1 /dev/urandom swap,cipher=aes-xts-plain64:sha512,size=512 >> /etc/crypttab echo l2arc_crypt /dev/disk/by-id/ata-Samsung_SSD_850_EVO-part2 /dev/urandom cipher=aes-xts-plain64:sha512,size=512 >> /etc/crypttab
Then you need to restart the daemons and enable paging:
echo 'vm.swappiness = 10' >> /etc/sysctl.conf sysctl vm.swappiness=10 systemctl daemon-reload systemctl start systemd-cryptsetup@swap_crypt.service echo /dev/mapper/swap_crypt none swap sw,discard 0 0 >> /etc/fstab swapon -av
Since active use of paging on SSD is not planned, the parameter swapiness , which is the default 60, must be set to 10
L2ARC is not yet used at this stage, but the section for it is already ready:
$ ls /dev/mapper/ control l2arc_crypt root_crypt1 root_crypt2 slog0_crypt1 slog0_crypt2 swap_crypt tank0_crypt0 tank0_crypt1 tank0_crypt2 tank0_crypt3
Pula tankN
The creation of pool tank0 will be described, tank1 is created by analogy.
In order not to engage in the creation of identical partitions manually and to avoid mistakes, I wrote a script to create encrypted partitions for pools:
Now, using this script, you need to create a pool for storing data:
./create_crypt_pool.sh zpool create -o ashift=12 -O atime=off -O compression=lz4 -O normalization=formD tank0 raidz1 /dev/disk/by-id/dm-name-tank0_crypt*
Notes on the parameter ashift=12 see my previous articles and comments to them.
After creating the pool, I put his log on the SSD:
zpool add tank0 log mirror /dev/disk/by-id/dm-name-slog0_crypt1 /dev/disk/by-id/dm-name-slog0_crypt2
Later, when OMV is installed and configured, it will be possible to create pools through the GUI:
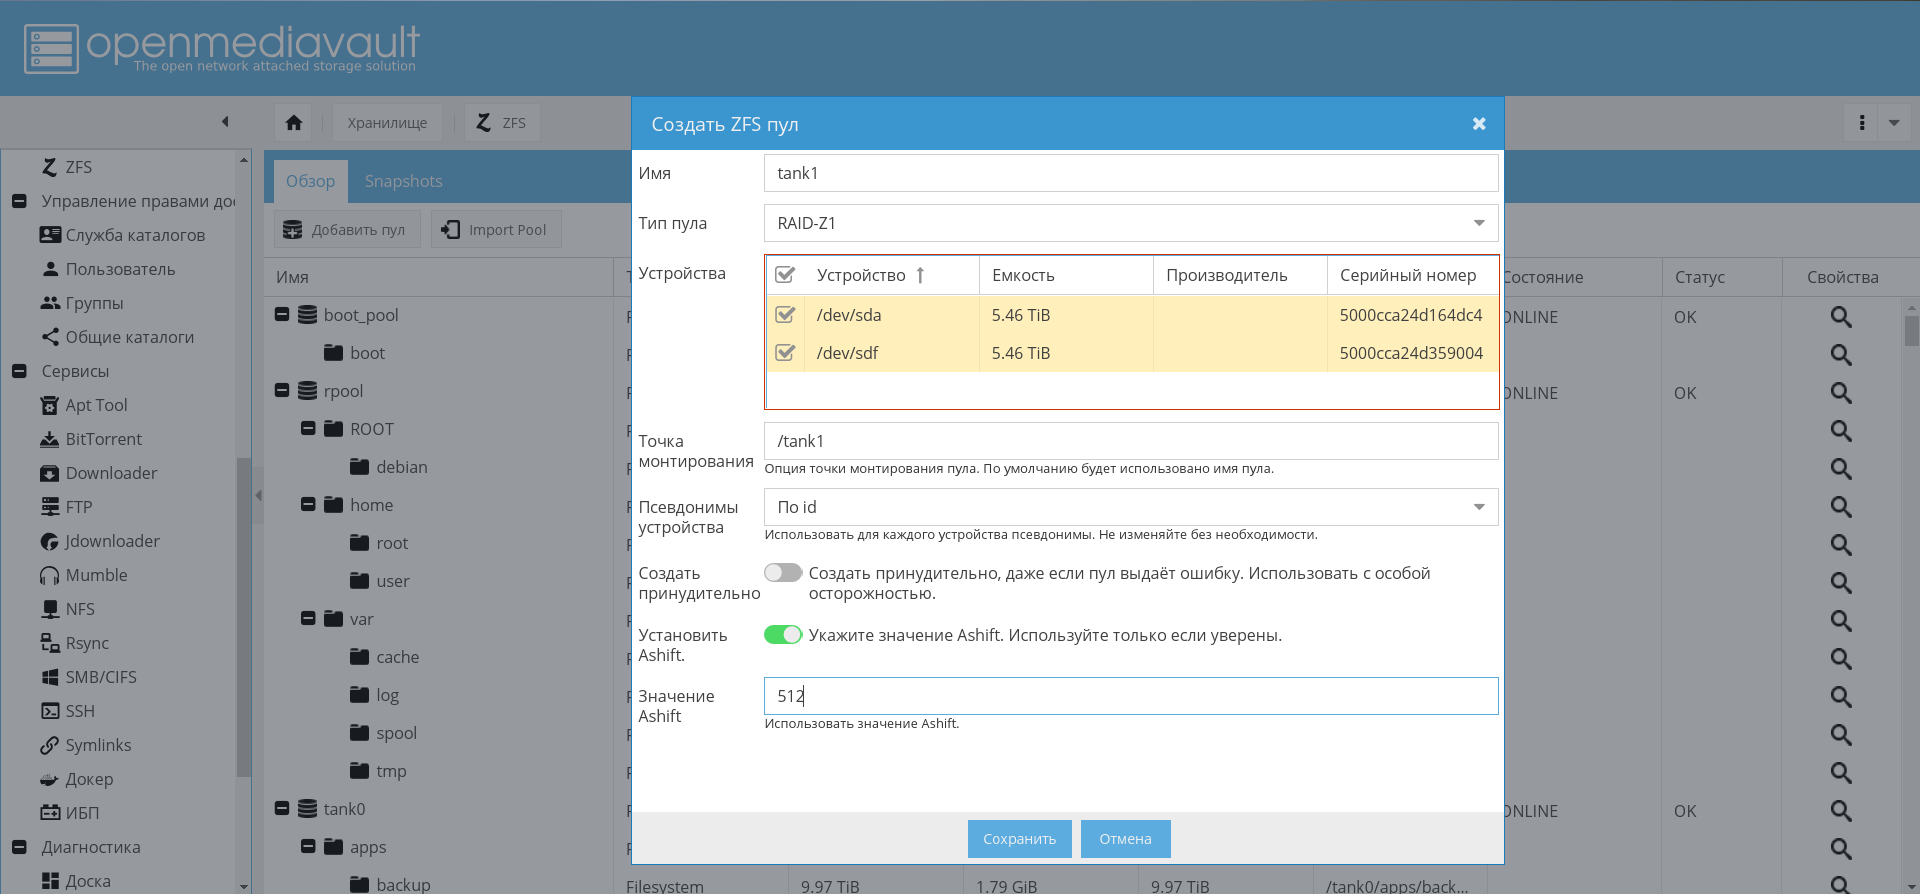
Enable pool import and automount volumes on boot.
In order to ensure that pool automapping is enabled, run the following commands:
rm /etc/zfs/zpool.cache systemctl enable zfs-import-scan.service systemctl enable zfs-mount.service systemctl enable zfs-import-cache.service
At this stage, the configuration of the disk subsystem is completed.
operating system
The first step is to install and configure OMV to finally get some kind of basis for the NAS.
OMV installation
OMV will be installed as a deb package. In order to do this, it is possible to use the official instructions .
The add_repo.sh script adds the OMV Arrakis repository to /etc/apt/ sources.list.d so that the batch system sees the repository.
add_repo.sh cat <<EOF >> /etc/apt/sources.list.d/openmediavault.list deb http://packages.openmediavault.org/public arrakis main
Please note that compared to the original, the partner repository is enabled.
To install and initialize initialization, follow the commands below.
Commands for installing OMV. ./add_repo.sh export LANG=C export DEBIAN_FRONTEND=noninteractive export APT_LISTCHANGES_FRONTEND=none apt-get update apt-get --allow-unauthenticated install openmediavault-keyring apt-get update apt-get --yes --auto-remove --show-upgraded \ --allow-downgrades --allow-change-held-packages \ --no-install-recommends \ --option Dpkg::Options::="--force-confdef" \ --option DPkg::Options::="--force-confold" \ install postfix openmediavault
OMV is installed. It uses its core, and a reboot may be required after installation.
After rebooting, the OpenMediaVault interface will be available on port 80 (go to the browser on the NAS by IP address):
Default login / password: admin/openmediavault .
OMV Setup
Further, most of the settings will go through the WEB-GUI.
Establishing a secure connection
Now we need to change the password of the WEB-administrator and generate a certificate for the NAS in order to work further over HTTPS.
Password change is performed on the tab "System-> General Settings-> Web Administrator Password" .
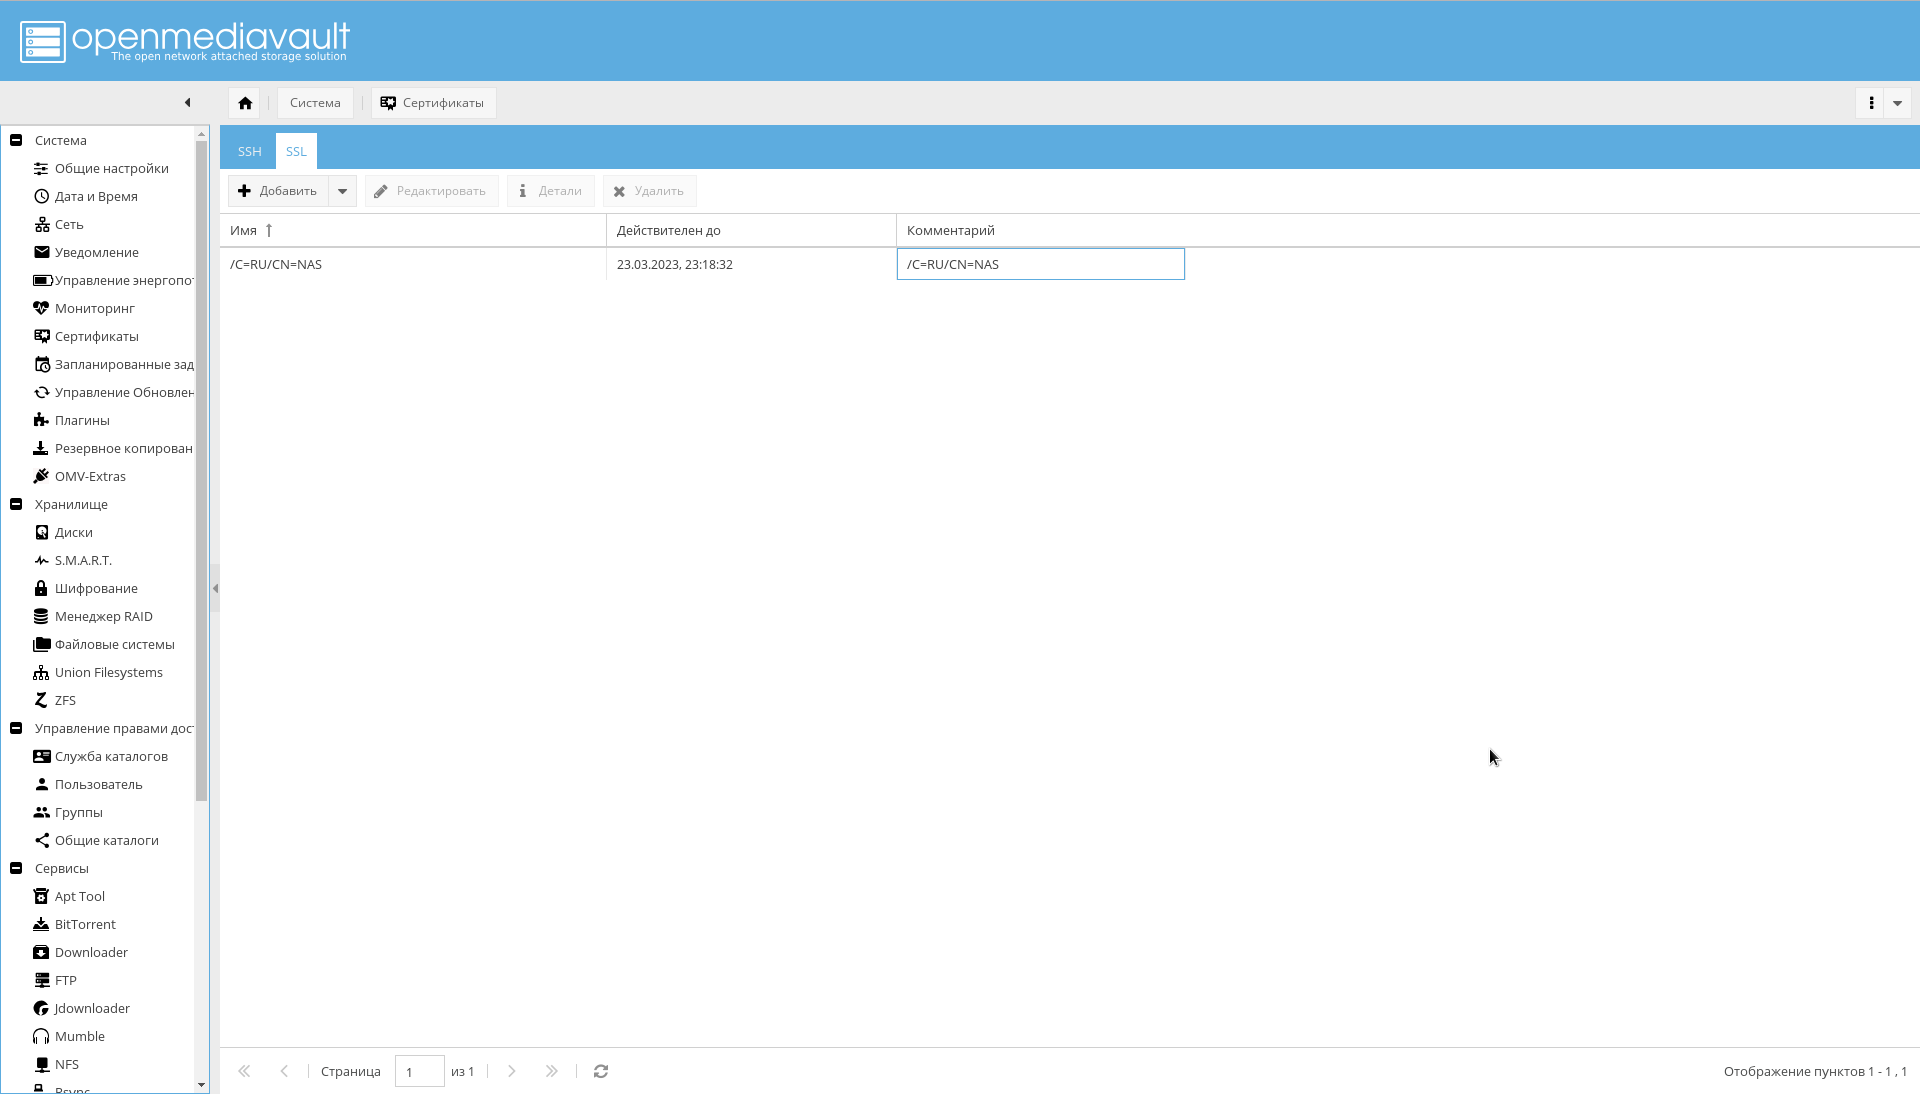
To generate a certificate on the tab "System-> Certificates-> SSL" you must select "Add-> Create . "
The created certificate will be visible on the same tab:
After creating the certificate, on the tab "System-> General Settings" you must enable the checkbox "Enable SSL / TLS" .
A certificate is required before the setup is complete. In the final version, a signed certificate will be used to access OMV.
Now you need to re-log into OMV, on port 443, or simply by assigning in the browser the https:// prefix before IP.
If you can log in, on the tab "System-> General Settings" you need to enable the checkbox "Forced SSL / TLS".
Change ports 80 and 443 to 10080 and 10443 .
And try to log in at the following address: https://IP_NAS:10443 .
Changing ports is important because ports 80 and 443 will use the docker container with nginx-reverse-proxy.
Primary settings
The minimum settings that must be done first:
- On the System-> Date and Time tab, check the time zone value and set the NTP server.
- On the System-> Monitoring tab, enable the collection of performance statistics.
- On the System-> Power Management tab, you should probably turn off Monitoring so that OMV does not try to control the fans.
Network
If the second NAS network interface has not yet been connected, connect it to the router.
Then:
- On the System-> Network tab, set the host name to "nas" (or whatever you like).
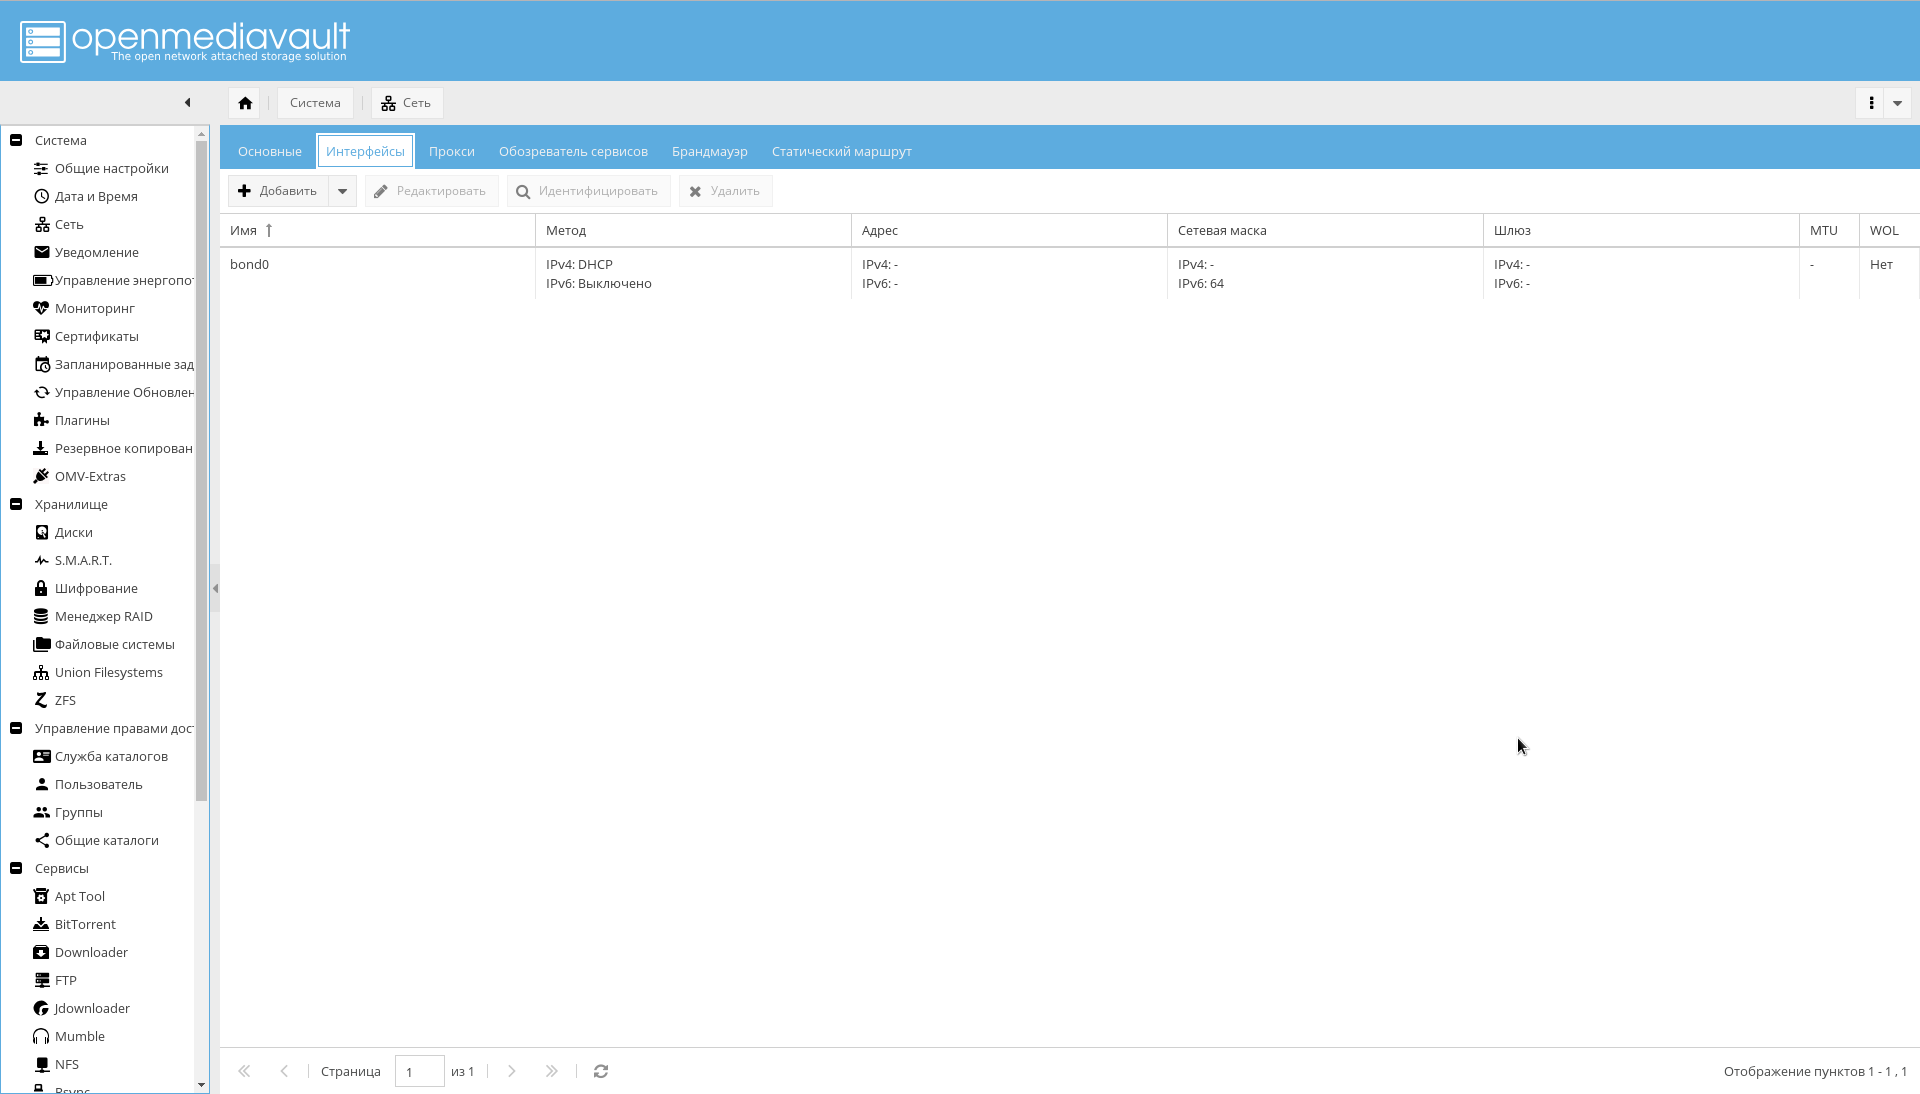
- Set up bonding for interfaces, as shown in the figure below: "System-> Network-> Interfaces-> Add-> Bond" .
- Add the desired firewall rules on the System-> Network-> Firewall tab . To get started, access to ports 10443, 10080, 443, 80, 22 for SSH and permission to receive / send ICMP is enough.
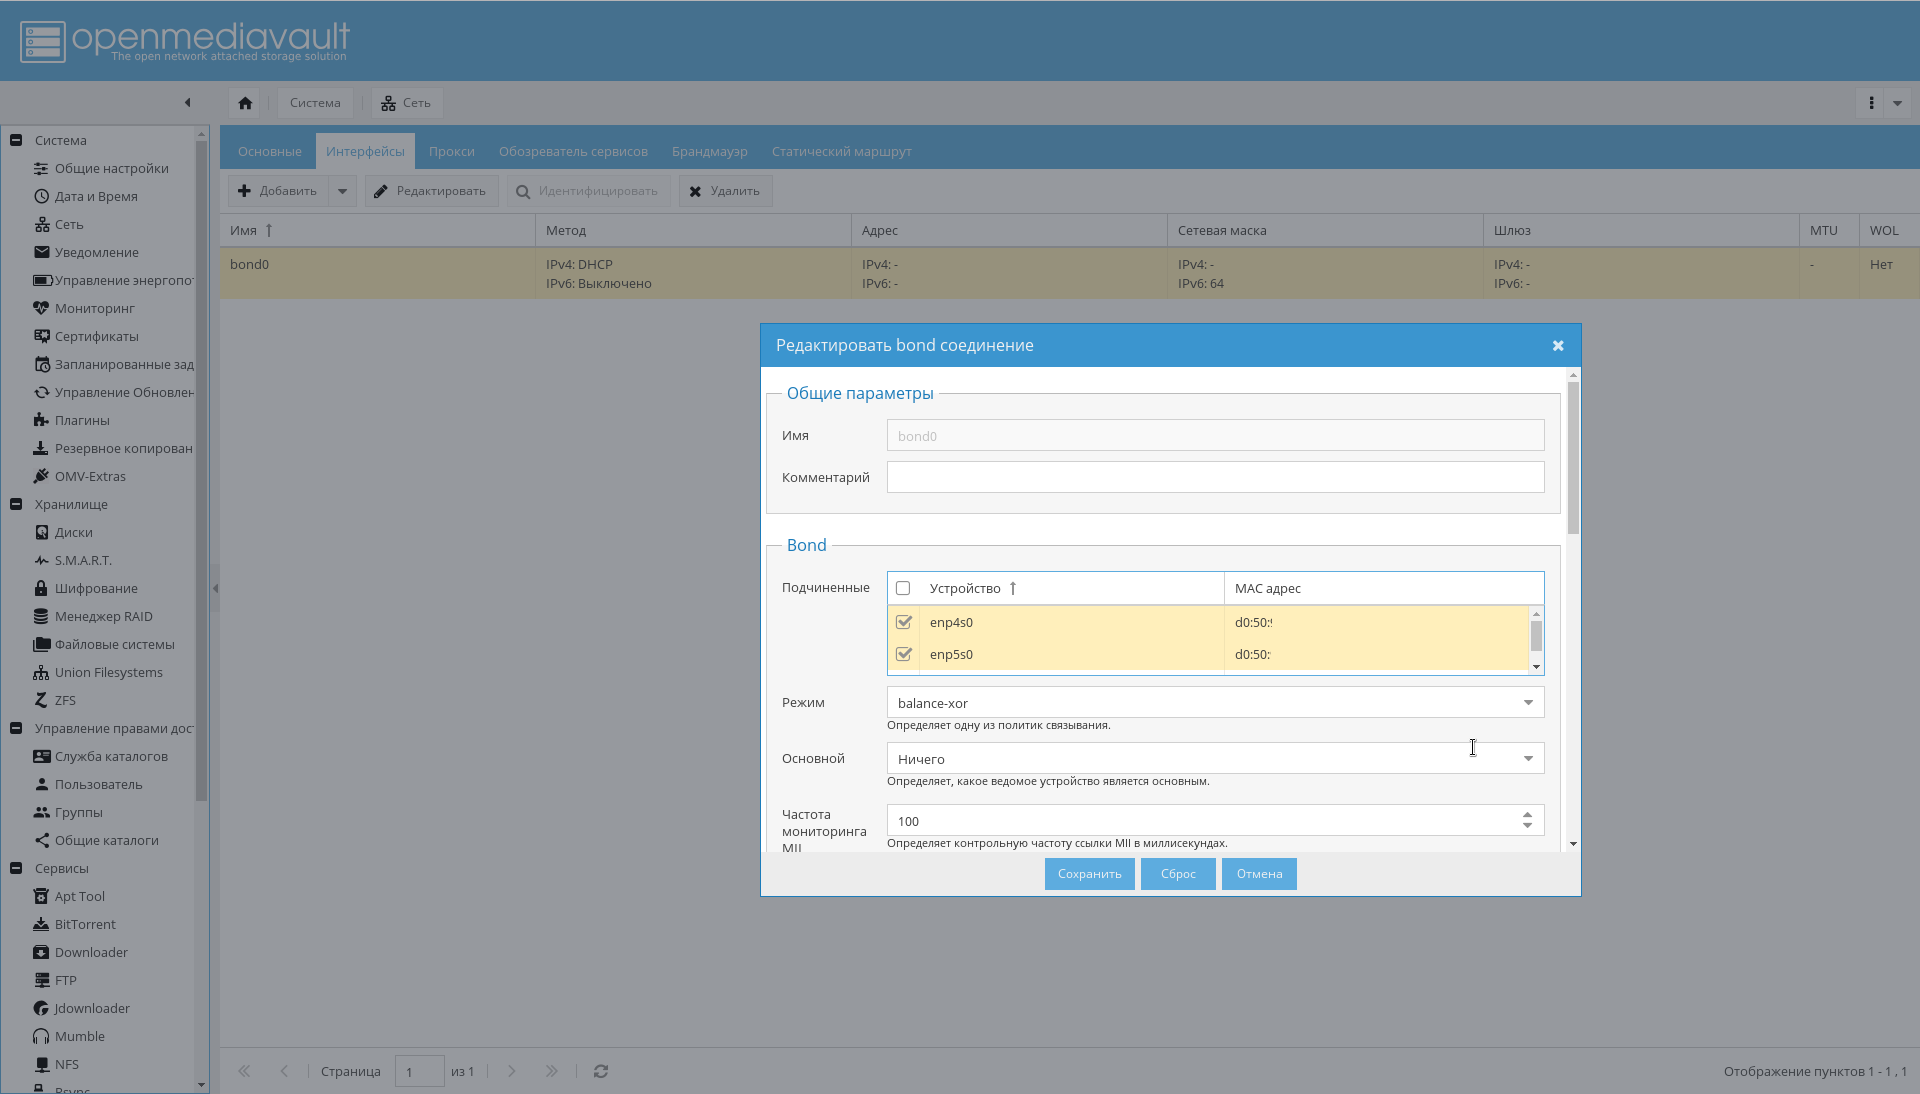
As a result, there should appear interfaces in bonding, which the router will see as one interface and assign it one IP address:
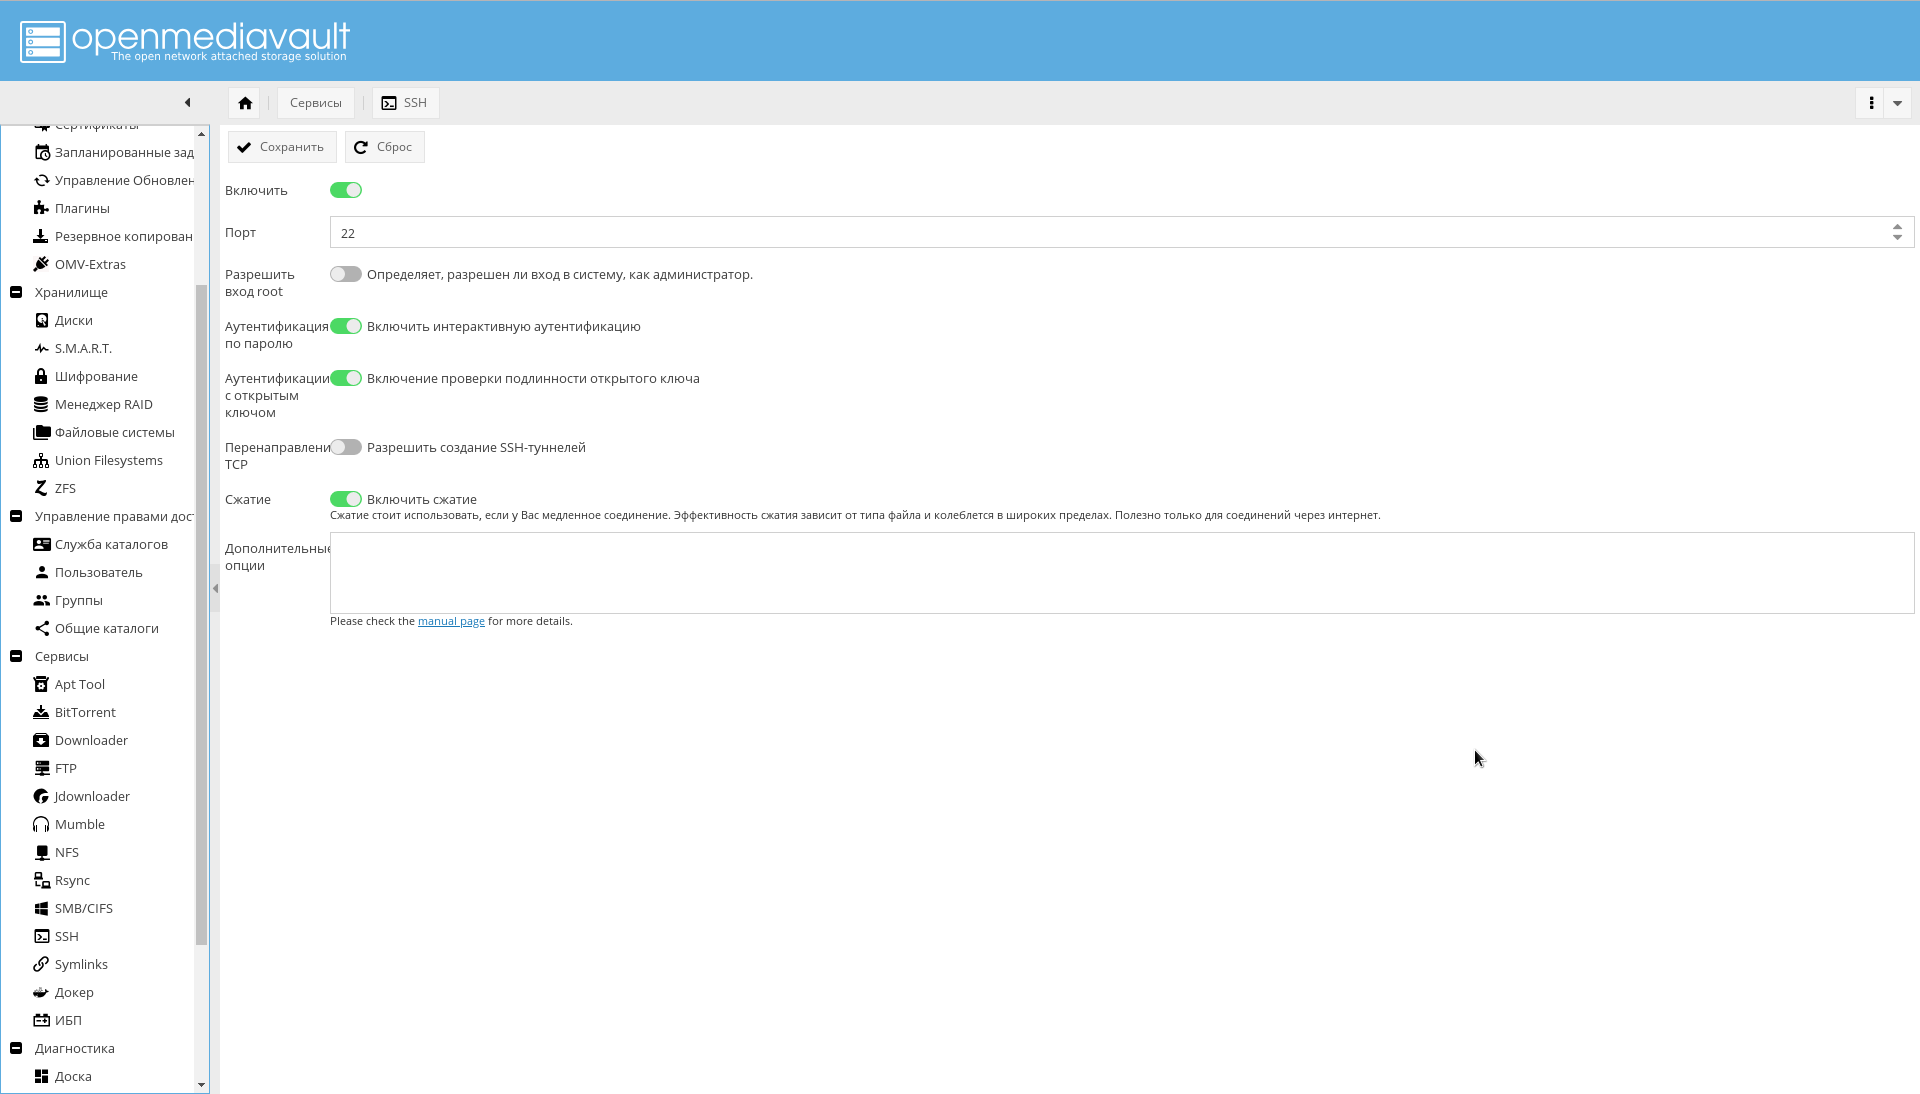
If desired, it is possible to further configure SSH from the WEB GUI:
Repositories and modules
On the tab "System-> Update Management-> Settings" enable "Community Supported Updates . "
First you need to add OMV extras repositories .
This can be done simply by installing the plugin or package, as indicated on the forum .
On the page "System-> Plugins" you need to find the plugin "openmediavault-omvextrasorg" and install it.
As a result, the "OMV-Extras" icon will appear in the system menu (it can be seen on screenshots).
Go there and enable the following repositories:
- OMV-Extras.org. Stable repository containing many plugins.
- OMV-Extras.org Testing. Some plugins from this repository are missing in the stable repository.
- Docker CE. Actually, Docker.
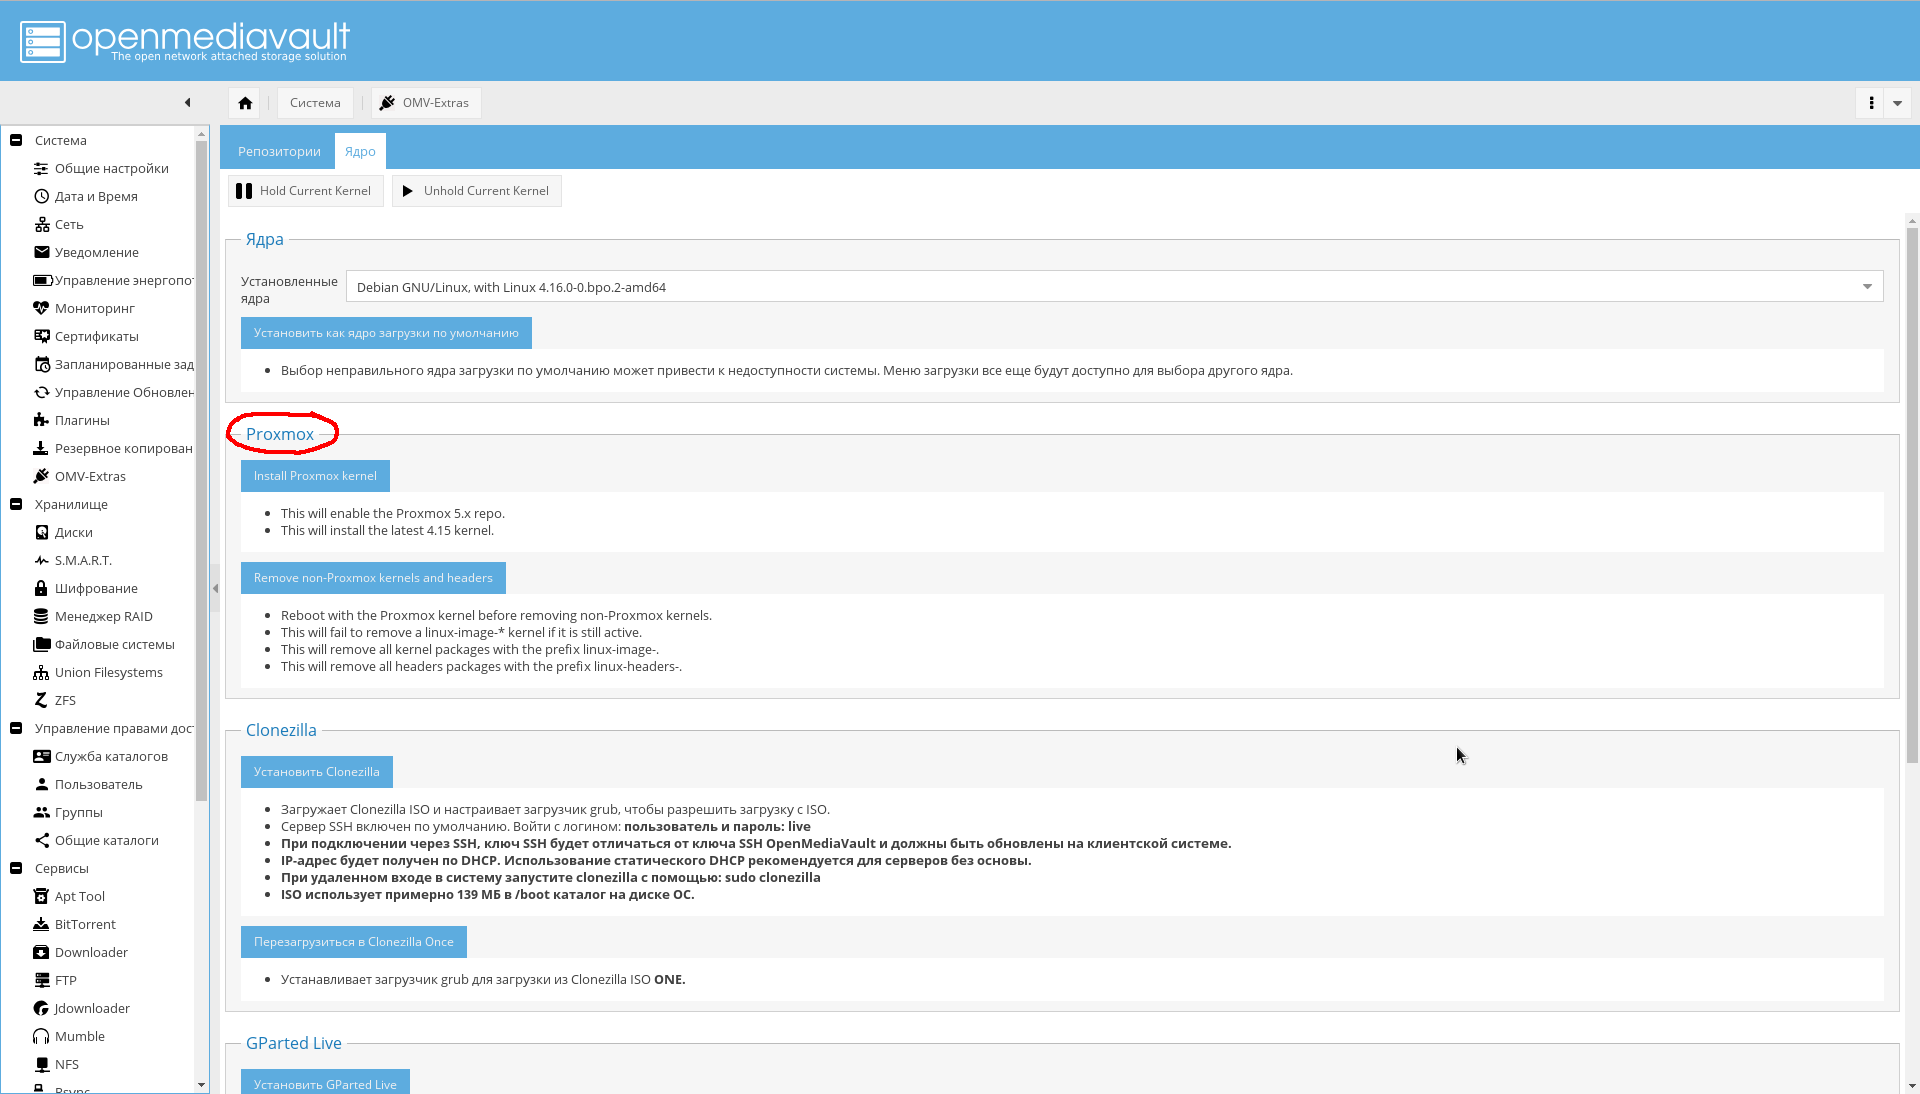
On the tab "System-> OMV Extras-> Kernel" you can select the kernel you need, including the core from Proxmox (I did not install it myself, because I do not need it yet, therefore I do not recommend it):
Install the necessary plug-ins ( in bold absolutely necessary, in italics - optional, which I did not install):
List of plugins.- openmediavault-apttool. Minimum GUI for working with the batch system. Adds "Services-> Apttool" .
- openmediavault-anacron. Adds the ability to work from a GUI with an asynchronous scheduler. Adds "System-> Anacron" .
- openmediavault-backup. Provides backup system in storage. Adds the page "System-> Backup" .
- openmediavault-diskstats. Needed to collect statistics on disk performance.
- openmediavault-dnsmasq . Allows you to raise on the NAS server DNS and DHCP. Because I do it on a router, I do not need it.
- openmediavault-docker-gui . Docker Container Management Interface. Adds "Services-> Docker" .
- openmediavault-ldap . LDAP authentication support. Adds "Access Management-> Directory Service" .
- openmediavault-letsencrypt . Support for Let's Encrypt from GUI. It is not needed because embedding in the nginx-reverse-proxy container is used.
- openmediavault-luksencryption . LUKS encryption support. It is necessary that the encrypted disks are visible in the OMV interface. Adds "Storage-> Encryption" .
- openmediavault-nut . UPS support. Adds "Services-> UPS" .
- openmediavault-omvextrasorg . OMV Extras should already be installed.
- openmediavault-resetperms. Allows you to reinstall rights and reset access control lists on public directories. Adds "Access Management-> Shared Directories-> Reset Permissions" .
- openmediavault-route. A useful plugin for managing routing. Adds "System-> Network-> Static Route" .
- openmediavault-symlinks. Provides the ability to create symbolic links. Adds the page "Services-> Symlinks" .
- openmediavault-unionfiles systems. UnionFS support. It may be useful in the future, although Docker uses ZFS as a backend. Adds "Storage-> Union Files Systems" .
- openmediavault-virtualbox . Can be used to embed virtual machine management capabilities in a GUI.
- openmediavault-zfs . The plugin adds support for ZFS in OpenMediaVault. After installation, the "Storage-> ZFS" page appears.
Discs
All discs in the system must be visible to OMV. Verify this by looking at the tab "Storage-> Disks" . If not all drives are visible, run the scan.
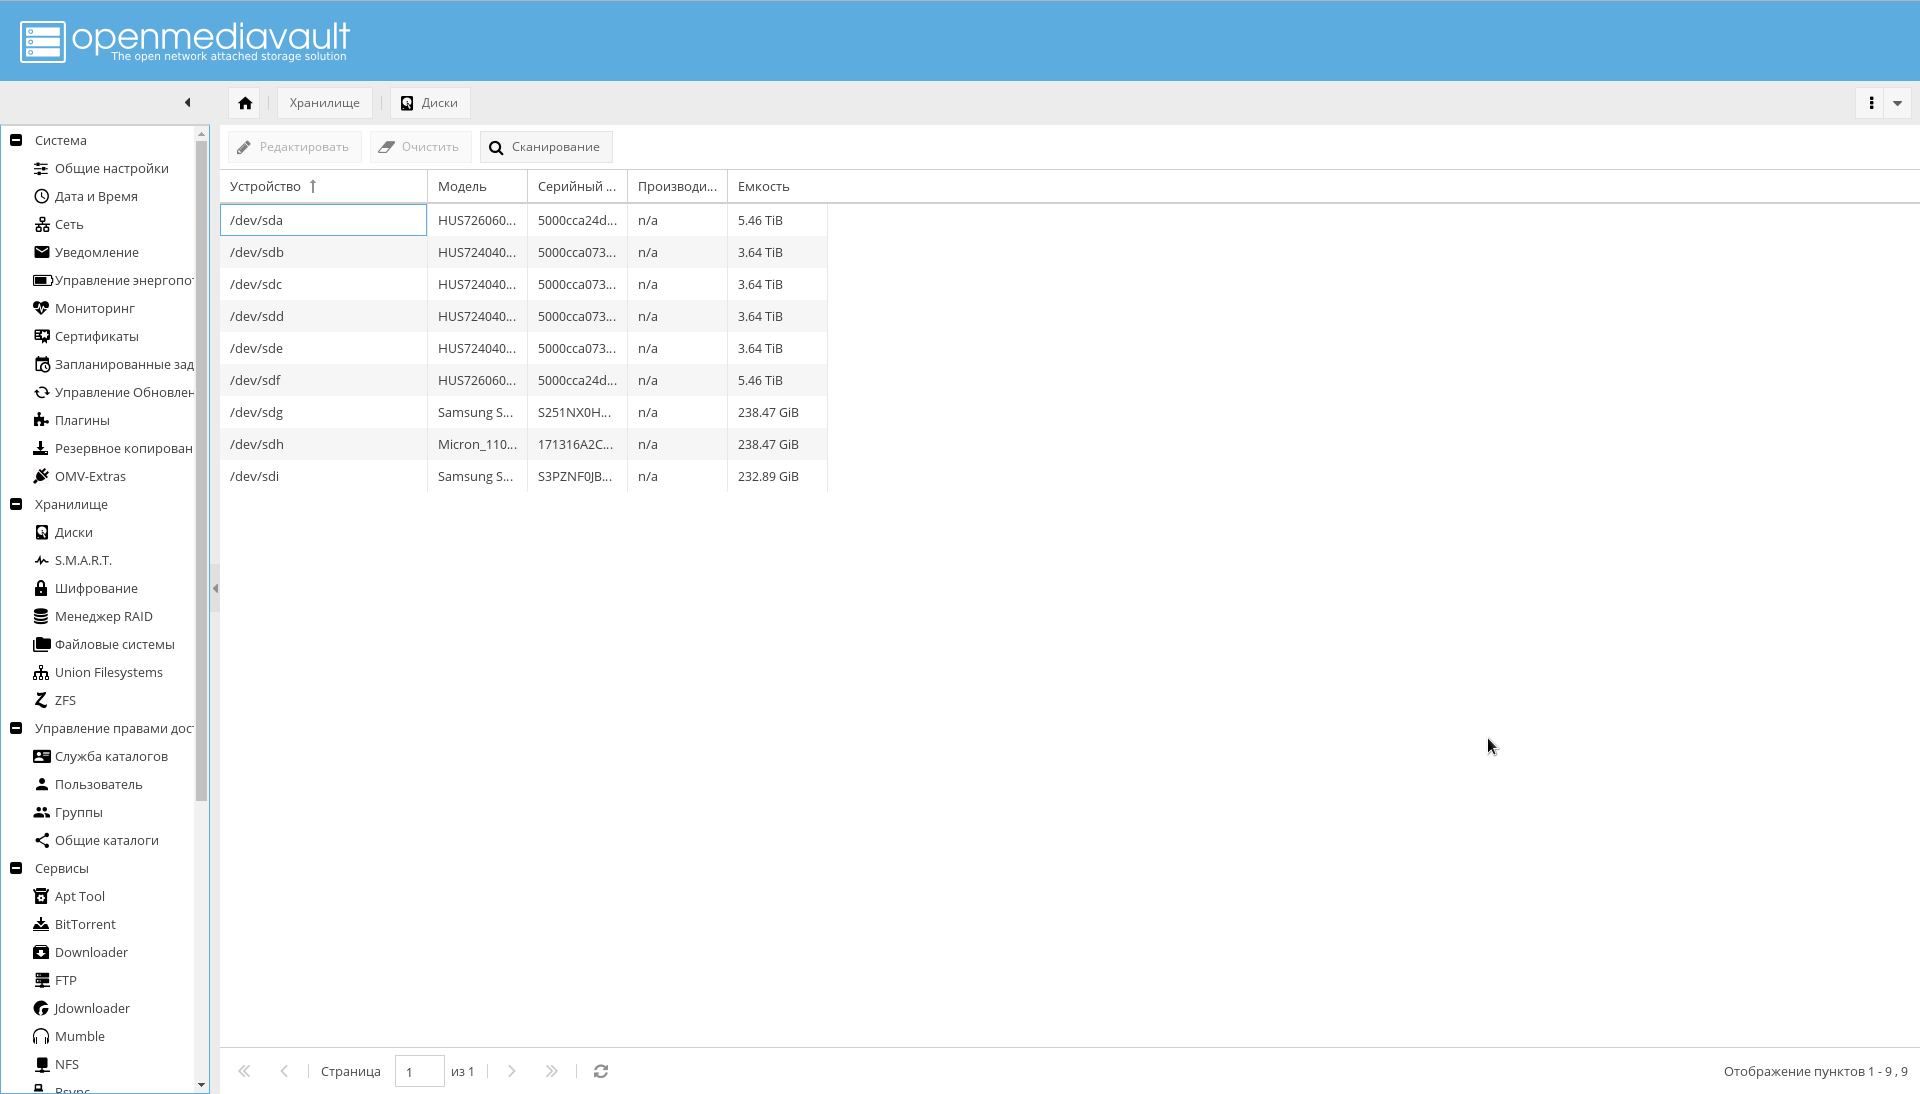
In the same place, on all HDDs, you need to enable recording caching (by clicking on the disk from the list and clicking the "Edit" button).
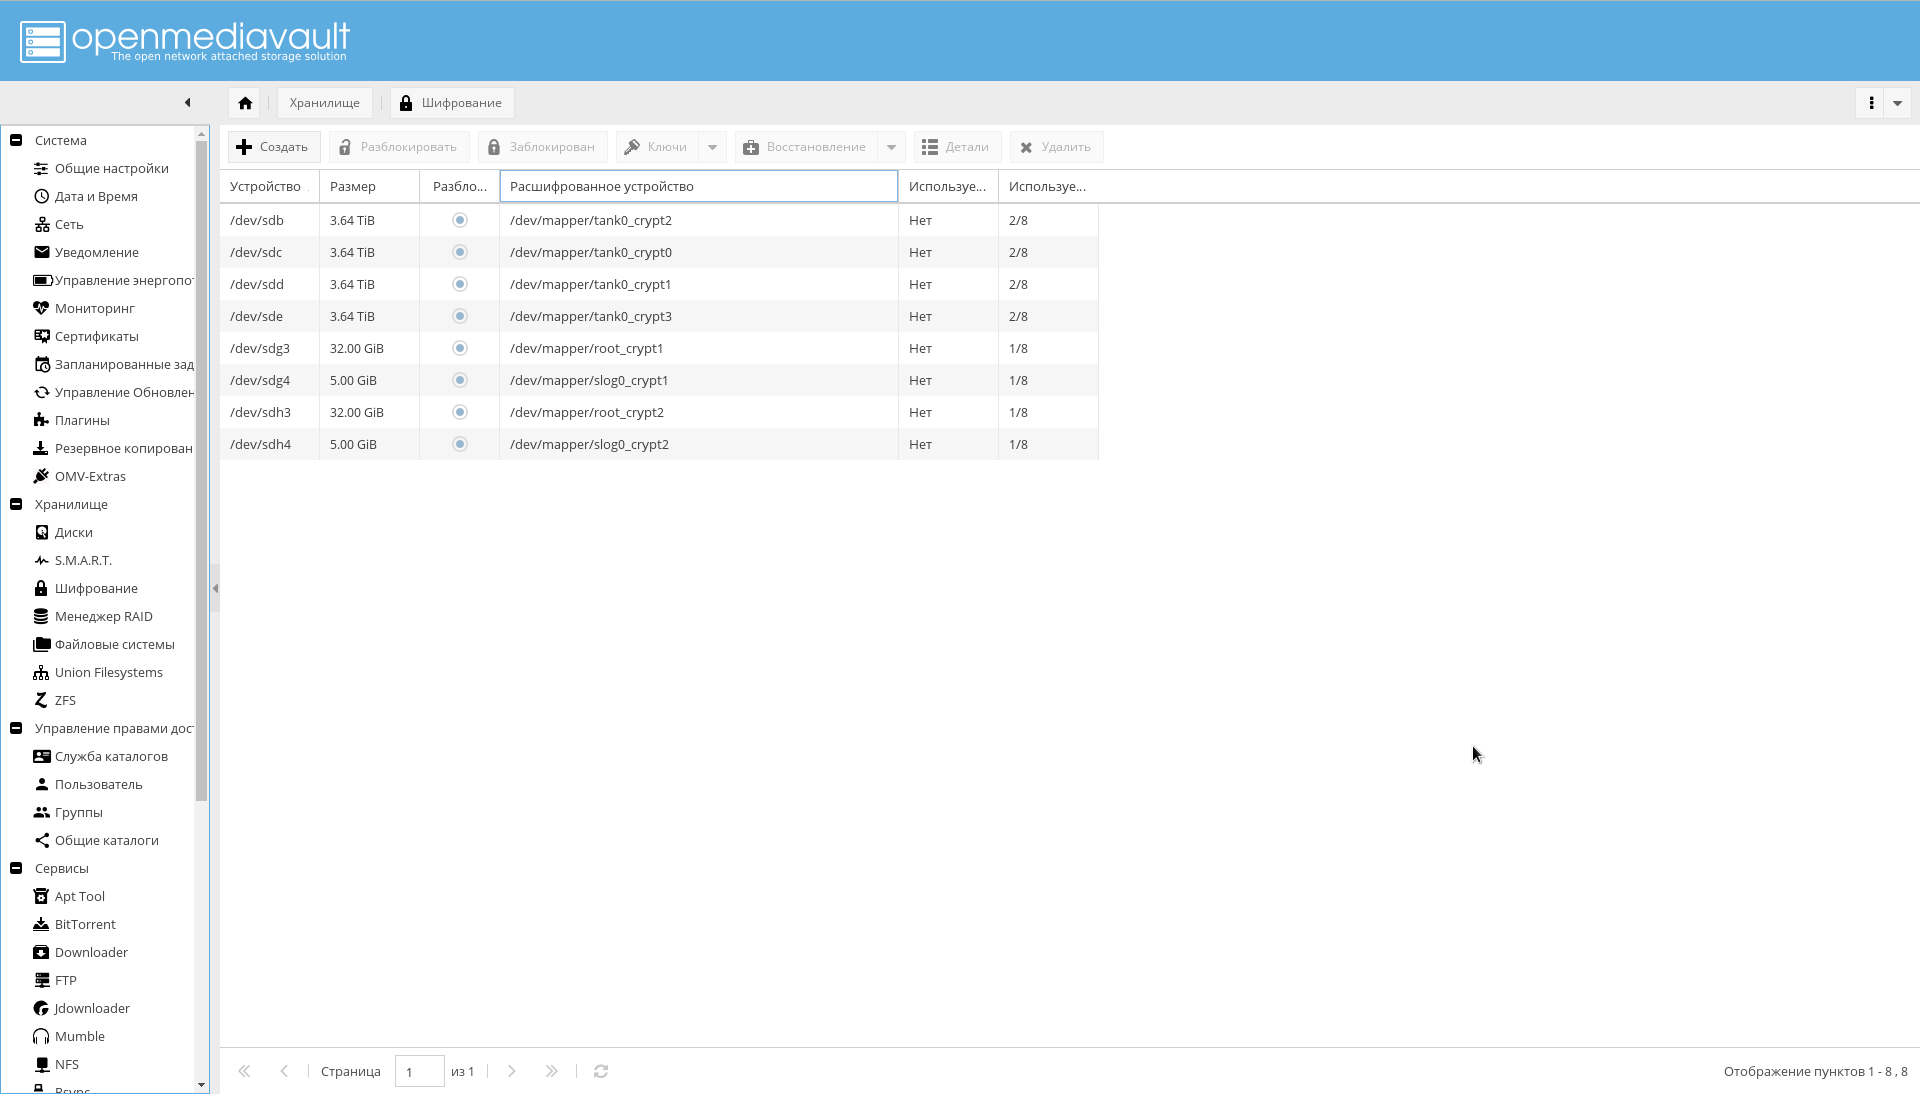
Make sure that all encrypted partitions are visible in the "Storage-> Encryption" tab :
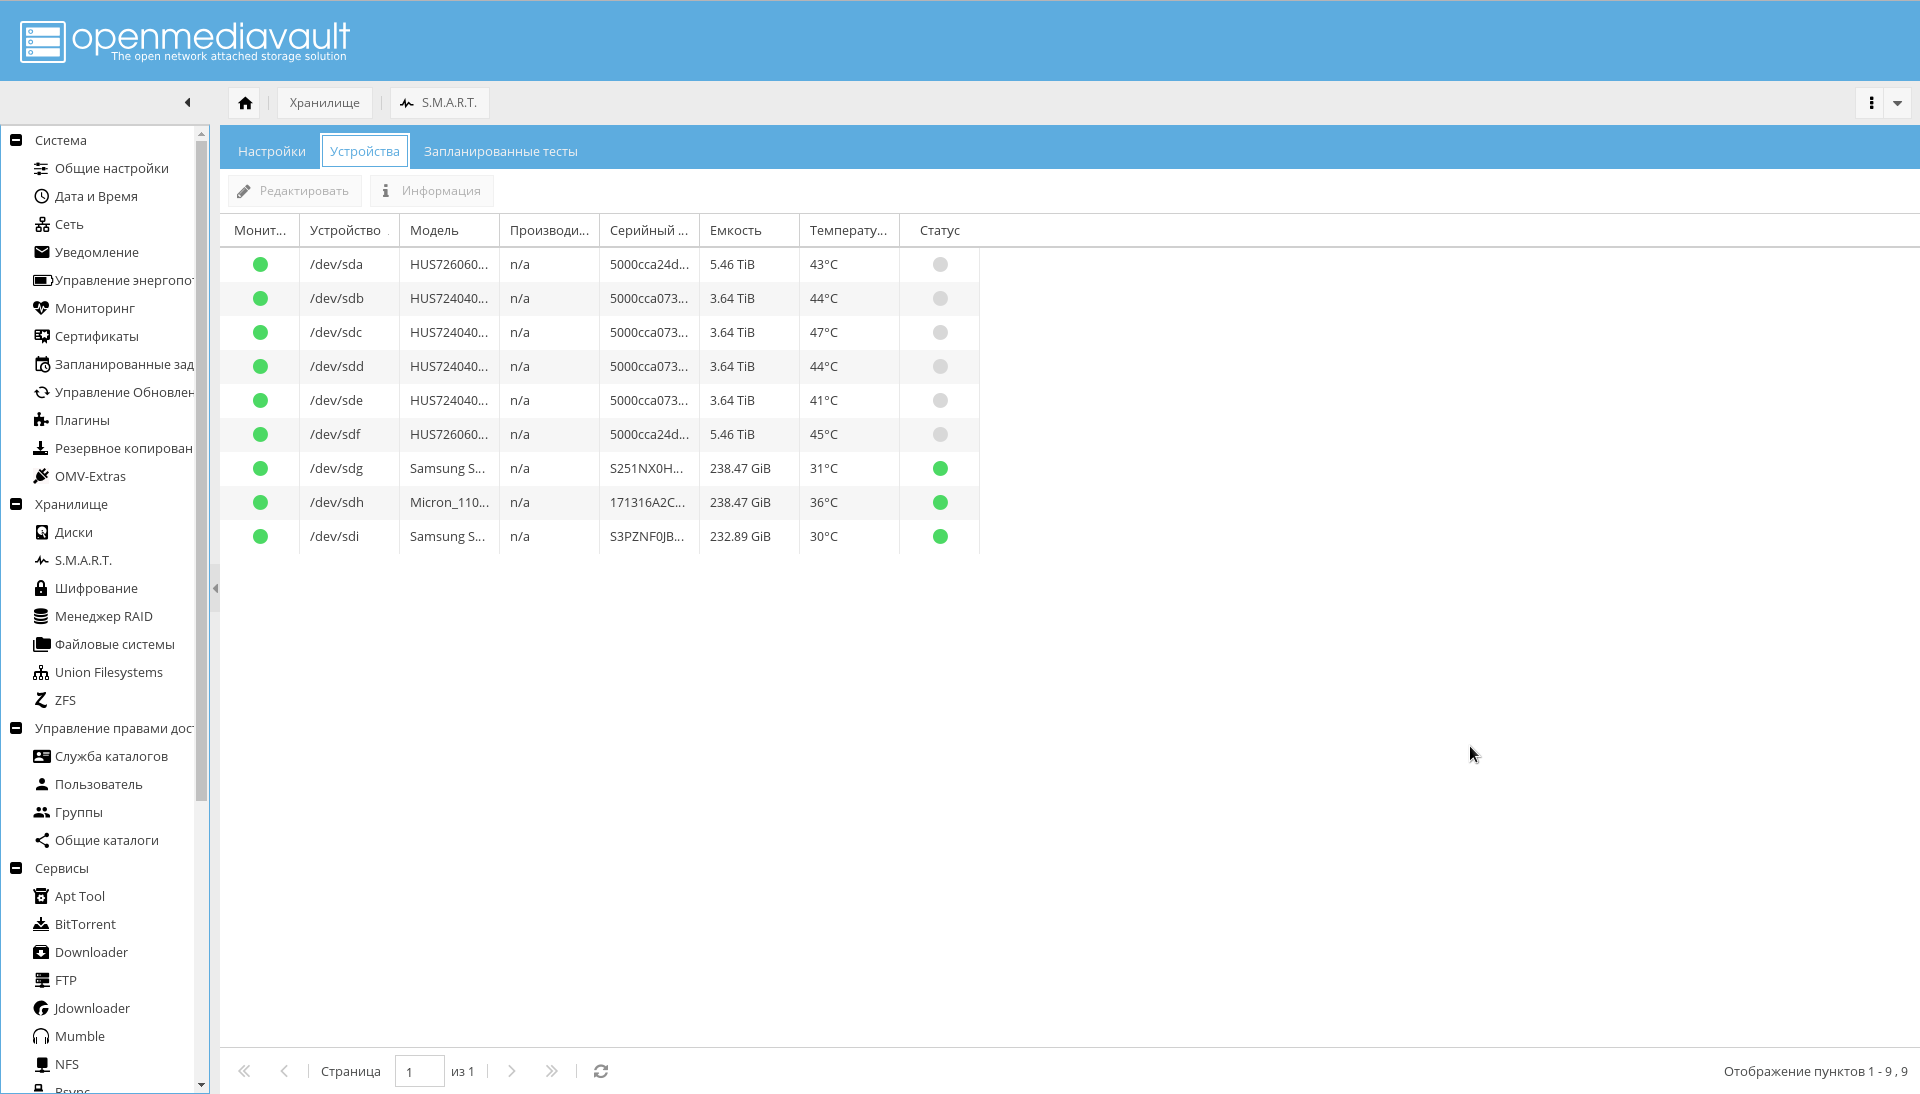
Now it's time to set up the SMART specified as a means of improving reliability:
- Go to the "Storage-> SMART-> Settings" tab . Turn on SMART.
- In the same place, select the values of the temperature levels of the disks (critical, usually 60 C, and the optimum temperature of the disk 15-45 C).
- Go to the "Storage-> SMART-> Devices" tab . Enable monitoring for each drive.
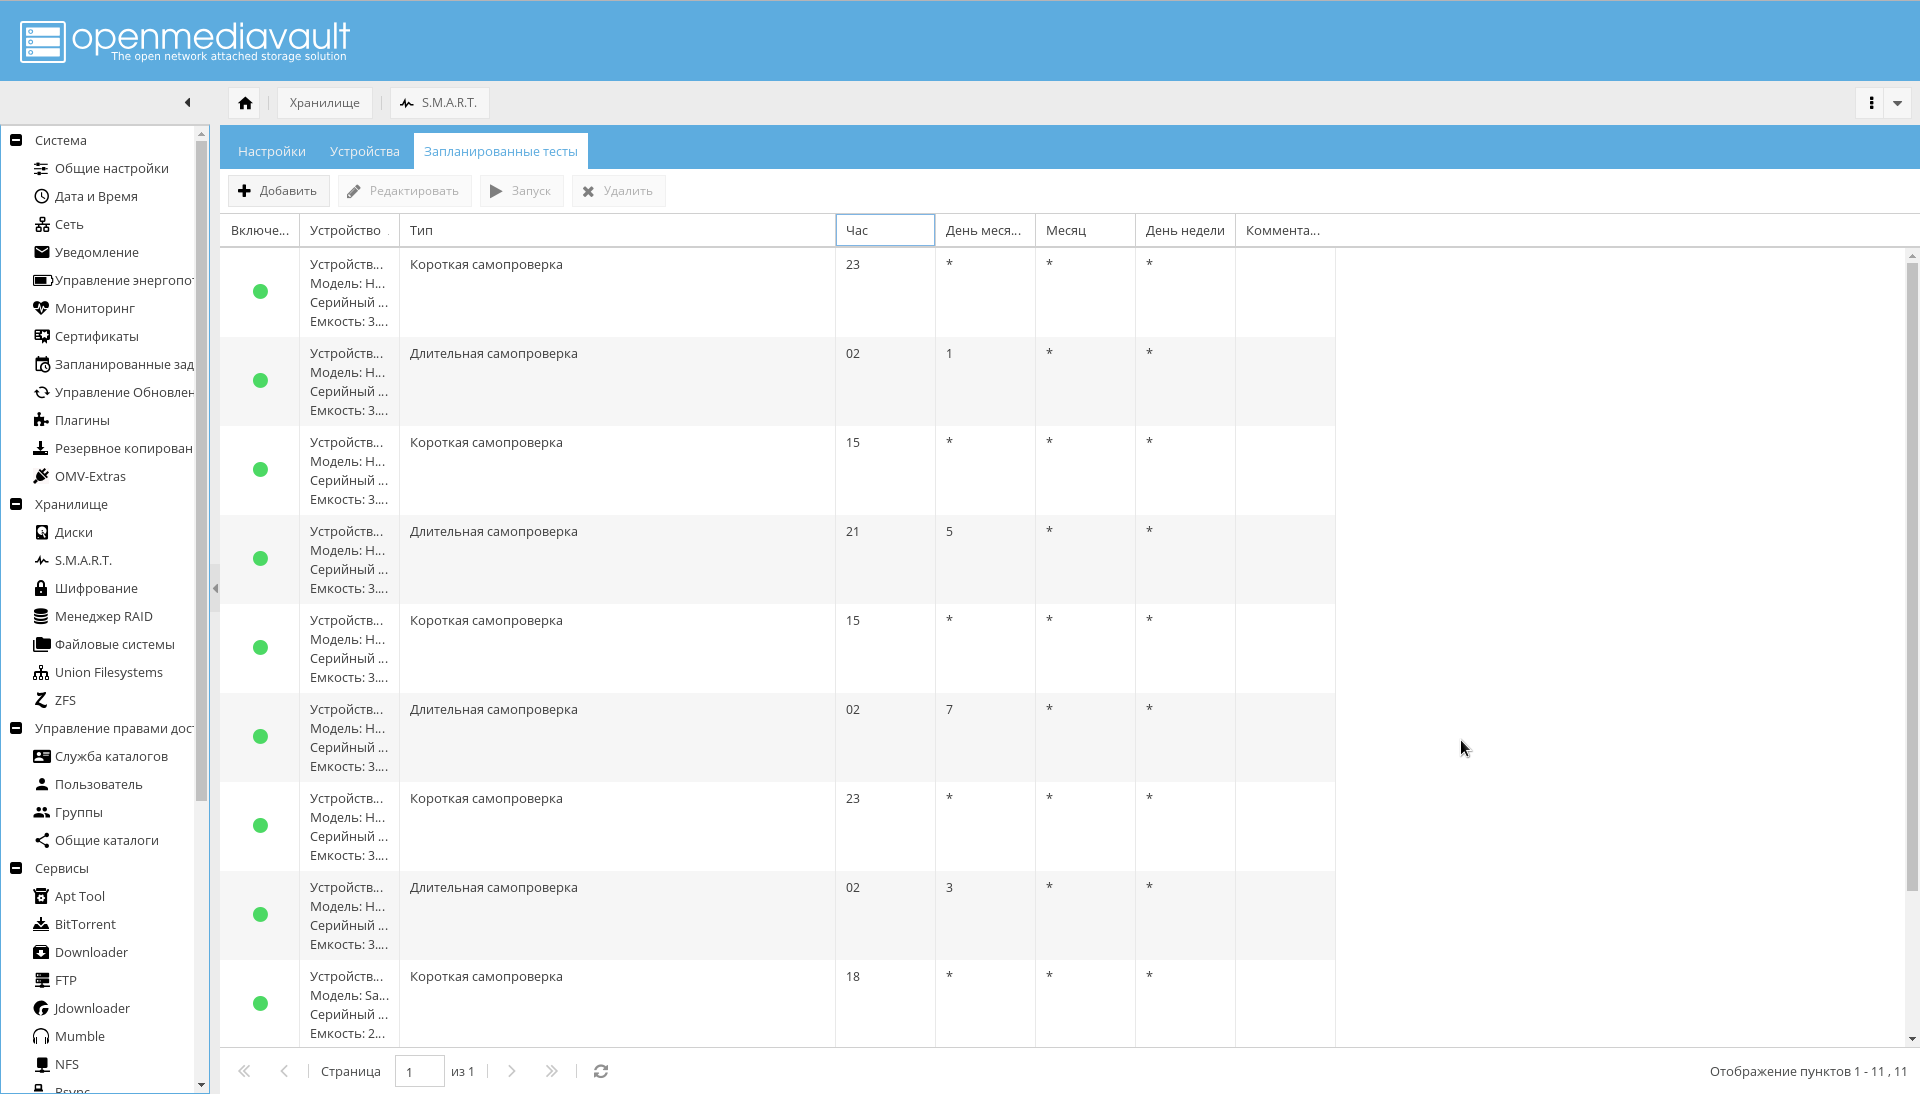
- Go to the "Storage-> SMART-> Scheduled Tests" tab . For each disc, add a short self-test once a day and a long self-test once a month. And so that the periods of self-checking do not overlap.
At this disk configuration may be considered over.
File Systems and Shared Directories
It is necessary to create file systems for predefined directories.
It is possible to do this from the console, or from the WEB-interface OMV ( Storage-> ZFS-> Select pool tank0-> Button "Add" -> Filesystem ).
Commands to create a file system. zfs create -o utf8only=on -o normalization=formD -p tank0/user_data/books zfs create -o utf8only=on -o normalization=formD -p tank0/user_data/music zfs create -o utf8only=on -o normalization=formD -p tank0/user_data/pictures zfs create -o utf8only=on -o normalization=formD -p tank0/user_data/downloads zfs create -o compression=off -o utf8only=on -o normalization=formD -p tank0/user_data/videos
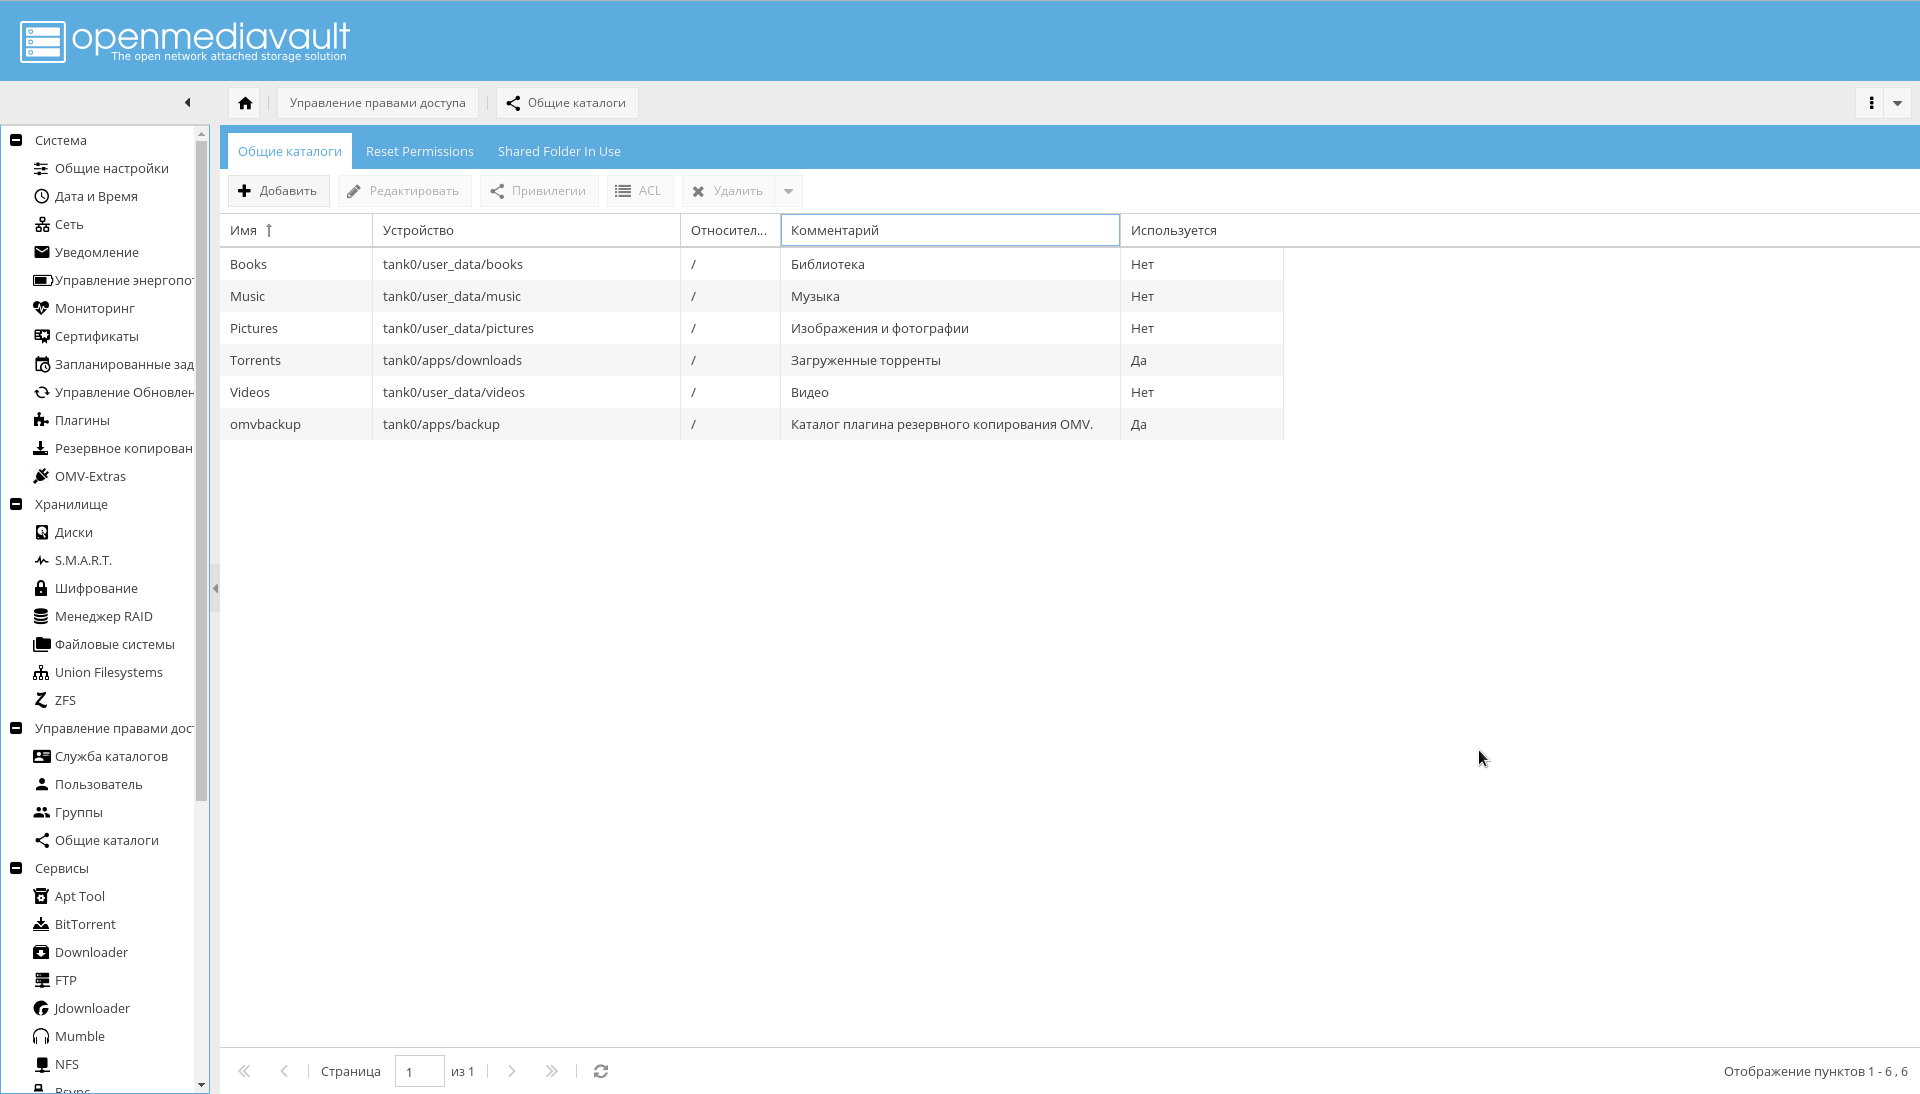
The result should be the following directory structure:

After that, add the created filesystems as shared directories on the page "Manage access rights-> Shared directories-> Add" .
Please note that the "Device" parameter is equal to the path to the file system created in ZFS, and the "Path" parameter for all directories is "/".
Backup
Backup is done with two tools:
If you use the plugin, you will most likely get an error:
lsblk: /dev/block/0:22: not a block device
In order to fix it, as noted by OMV developers in this "very non-standard configuration", it would be possible to abandon the plugin and use the ZFS tools in the form of zfs send/receive .
Or explicitly specify the parameter "Root device" in the form of a physical device from which to boot.
It’s more convenient for me to use the plugin and back up the OS from the interface, instead of building something special with zfs send, so I prefer the second option.
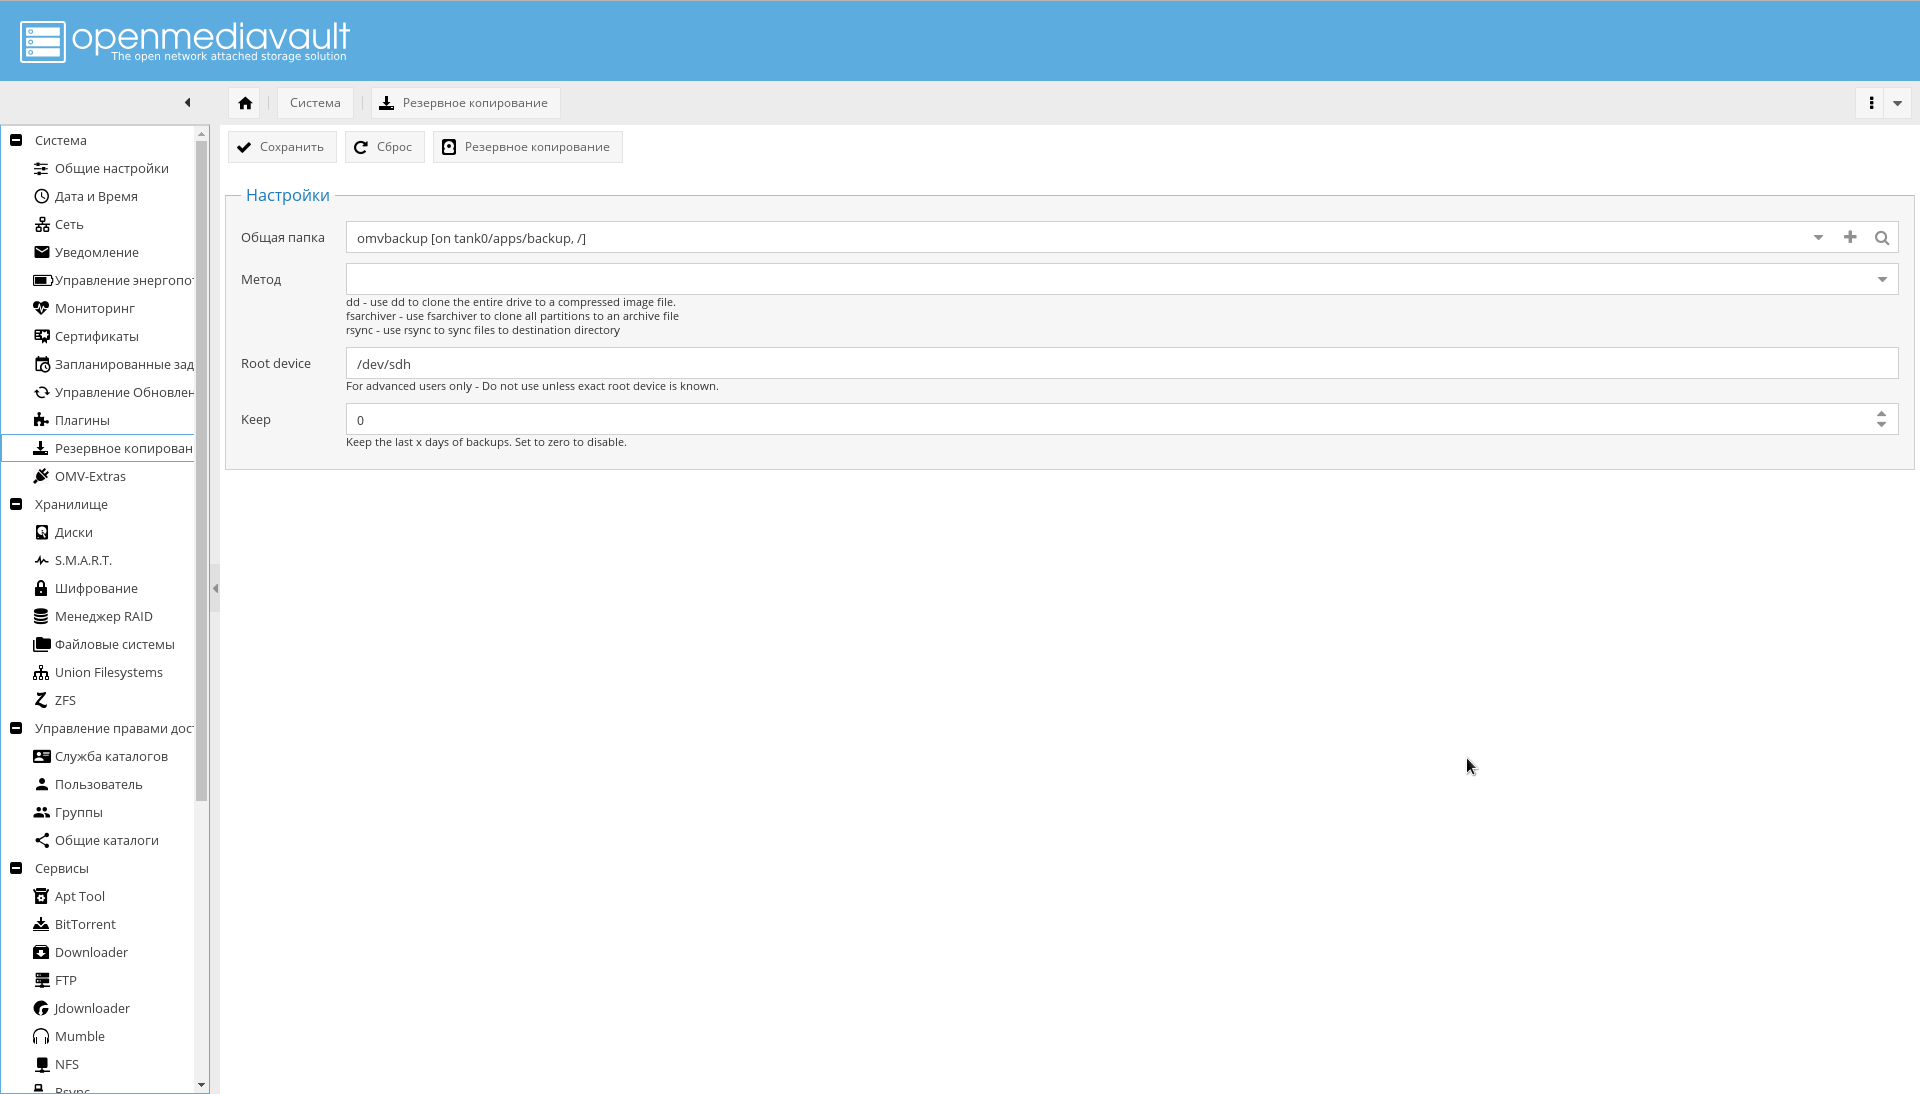
To make the backup work, first create the tank0/apps/backup file system via ZFS, then in the "System-> Backup" menu, click "+" in the "Shared folder" field and add the created device as a target, and the "Path" field set to "/".
There are problems with zfs-auto-snapshot too. If it is not configured, it will take pictures every hour, every day, every week, every month for a year.
The result is that in the screenshot:
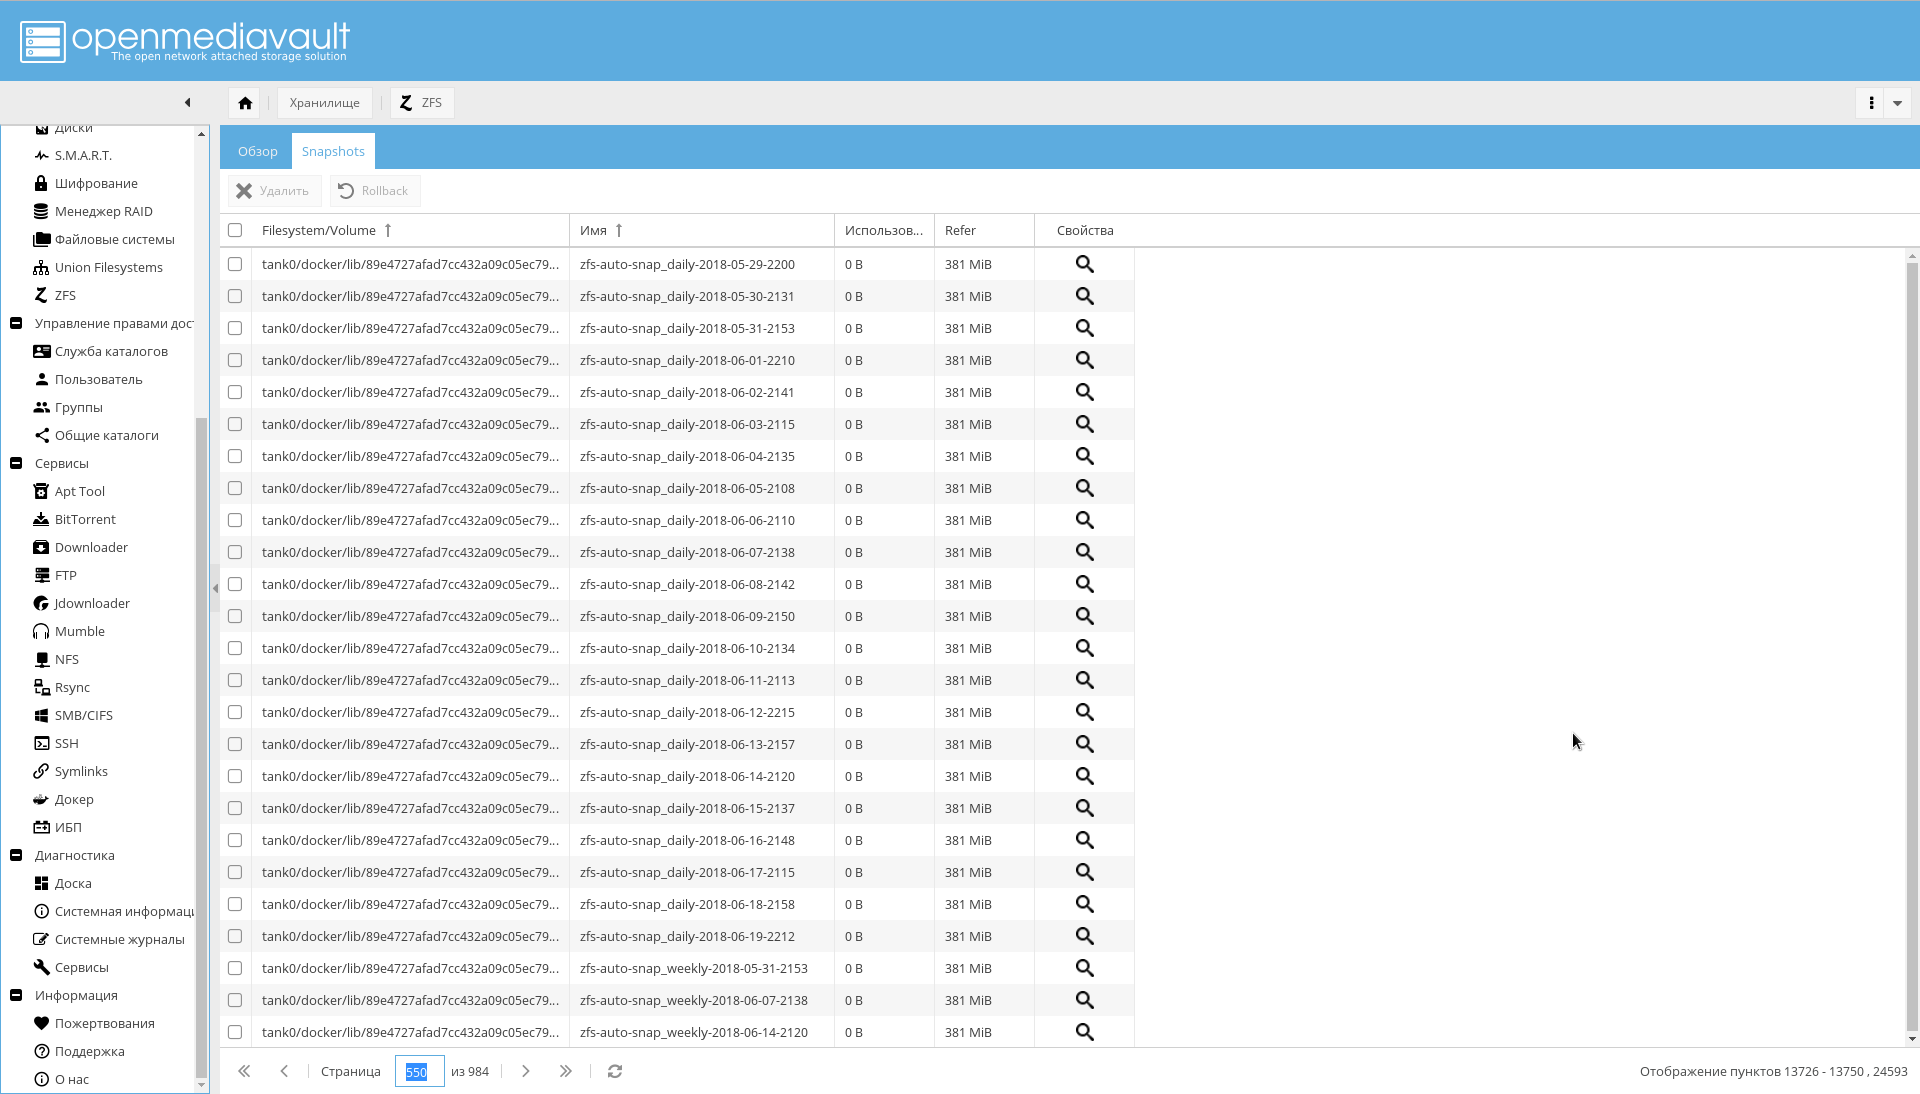
If you already bumped into this, run the following code to delete automatic snapshots:
zfs list -t snapshot -o name -S creation | grep "@zfs-auto-snap" | tail -n +1500 | xargs -n 1 zfs destroy -vr
Then configure the launch of zfs-auto-snapshot in cron.
To get started, simply delete /etc/cron.hourly/zfs-auto-snapshot if you do not need to take pictures every hour.
E-mail notifications
Notification by e-mail was specified as one of the means to achieve reliability.
Because now you need to configure E-mail notifications.
To do this, register a box on one of the public servers (well, set up your own SMTP server, if you really have reasons to do so).
After that, go to the "System-> Notification" page and enter:
- SMTP server address.
- SMTP server port.
- Username.
- The address of the sender (usually the first component of the address is the same as the name).
- User Password.
- In the "Recipient" field, your usual address to which the NAS will send notifications.
It is highly desirable to enable SSL / TLS.
An example of setting for Yandex is shown in the screenshot:

Network configuration outside NAS
IP address
I use a white static IP-address, which costs plus 100 rubles per month. If there is no desire to pay and your address is dynamic, but not for NAT, it is possible to adjust external DNS records through the API of the selected service.
However, it is worth bearing in mind that an address not behind a NAT can suddenly become an address behind a NAT: as a rule, providers do not give any guarantees.
Router
As a router, I have a Mikrotik RouterBoard , similar to the one in the picture below.
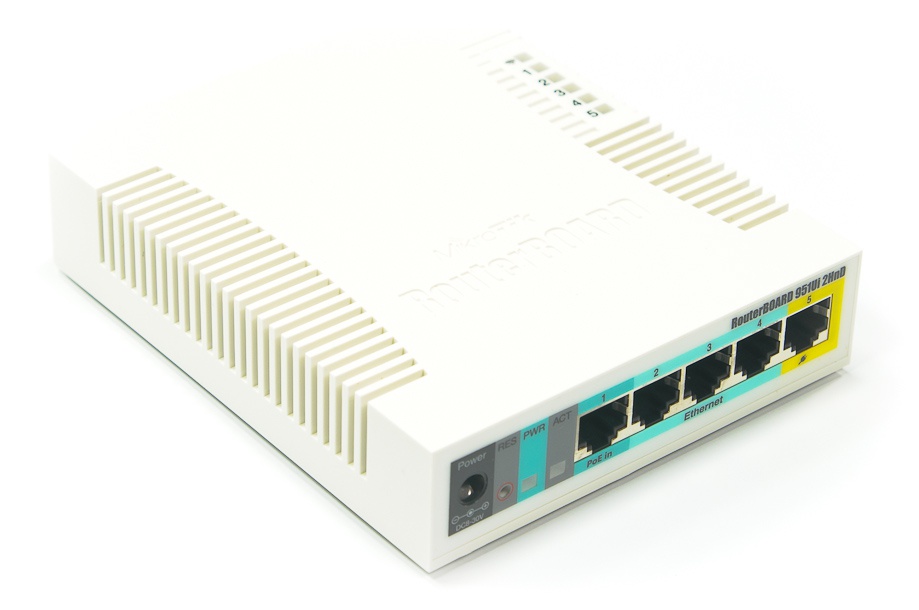
On the router, you need to do three things:
- Configure static addresses for the NAS. In my case, addresses are issued via DHCP, and you need to ensure that adapters with a specific MAC address always get the same IP address. In RouterOS, this is done on the "IP-> DHCP Server" tab with the "Make static" button.
- Configure the DNS server so that it for the name "nas", as well as names ending in ".nas" and ".NAS.cloudns.cc" (where "NAS" is a zone on ClouDNS or similar service) gave the IP system. Where to do this in RouterOS is shown in the screenshot below. In my case, this is implemented by matching the name with a regular expression: "
^.*\.nas$|^nas$|^.*\.NAS.cloudns.cc$ " - Configure port forwarding. In RouterOS this is done on the tab "IP-> Firewall" , I will not dwell on this further.

ClouDNS
With CLouDNS, it's simple. Get an account, confirm. NS records you will have already registered. Next, a minimal setup is required.
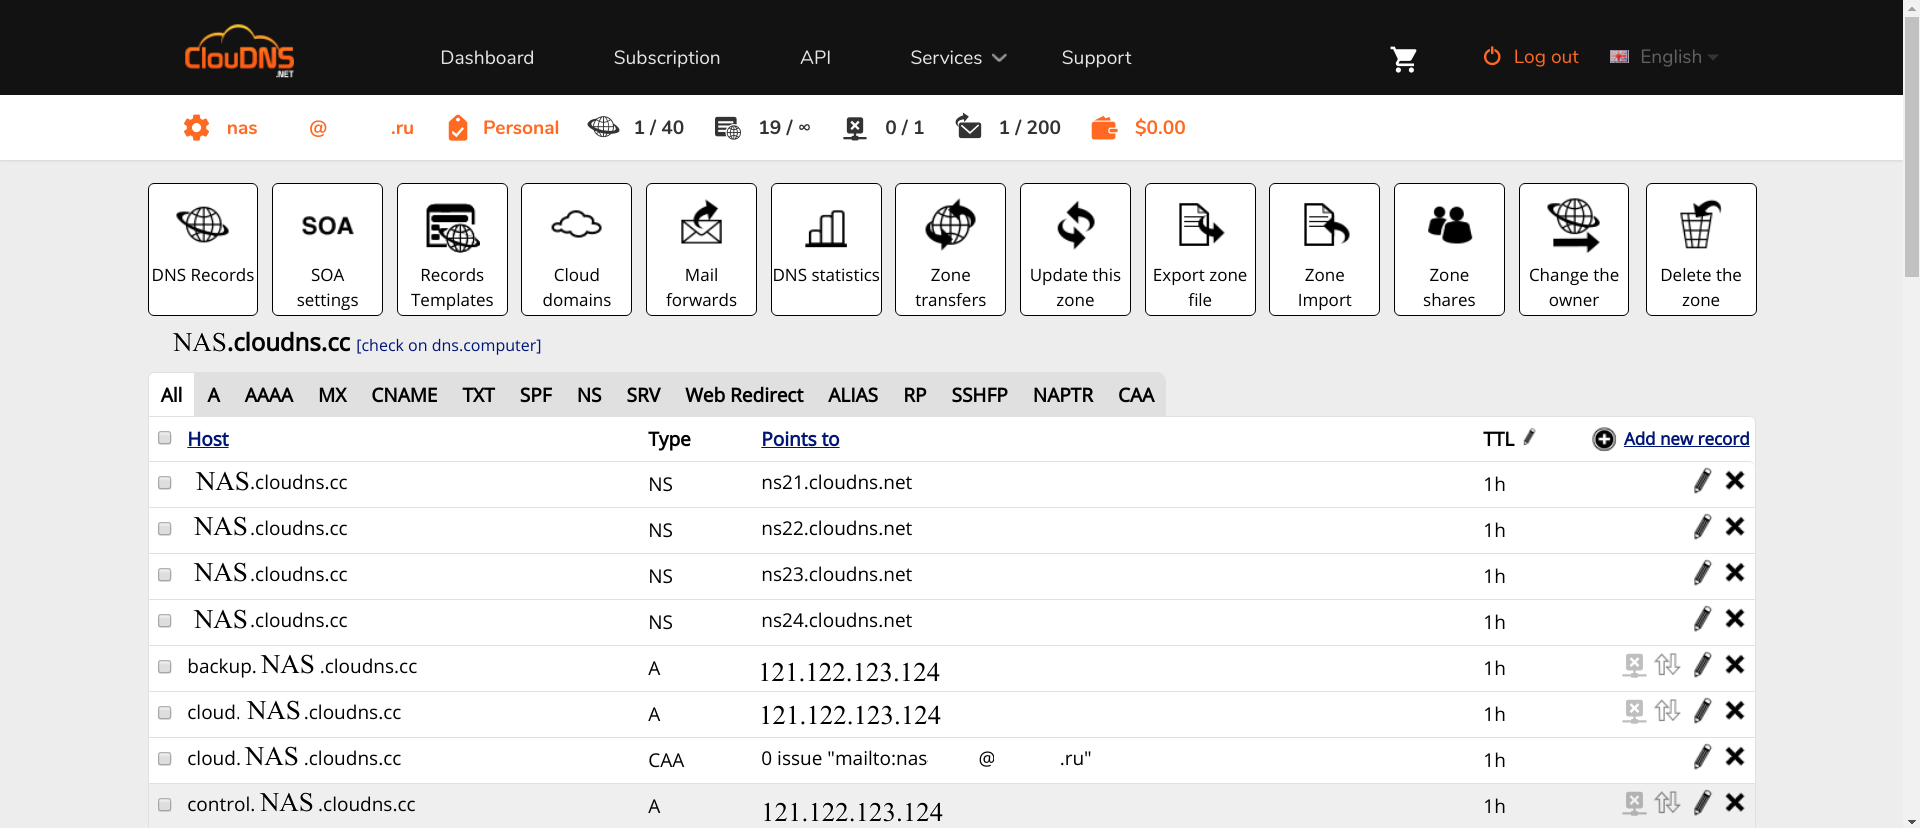
First, you need to create the necessary zones (the zone with the name NAS, underlined in red on the screenshot, is what you need to create, with a different name, of course).
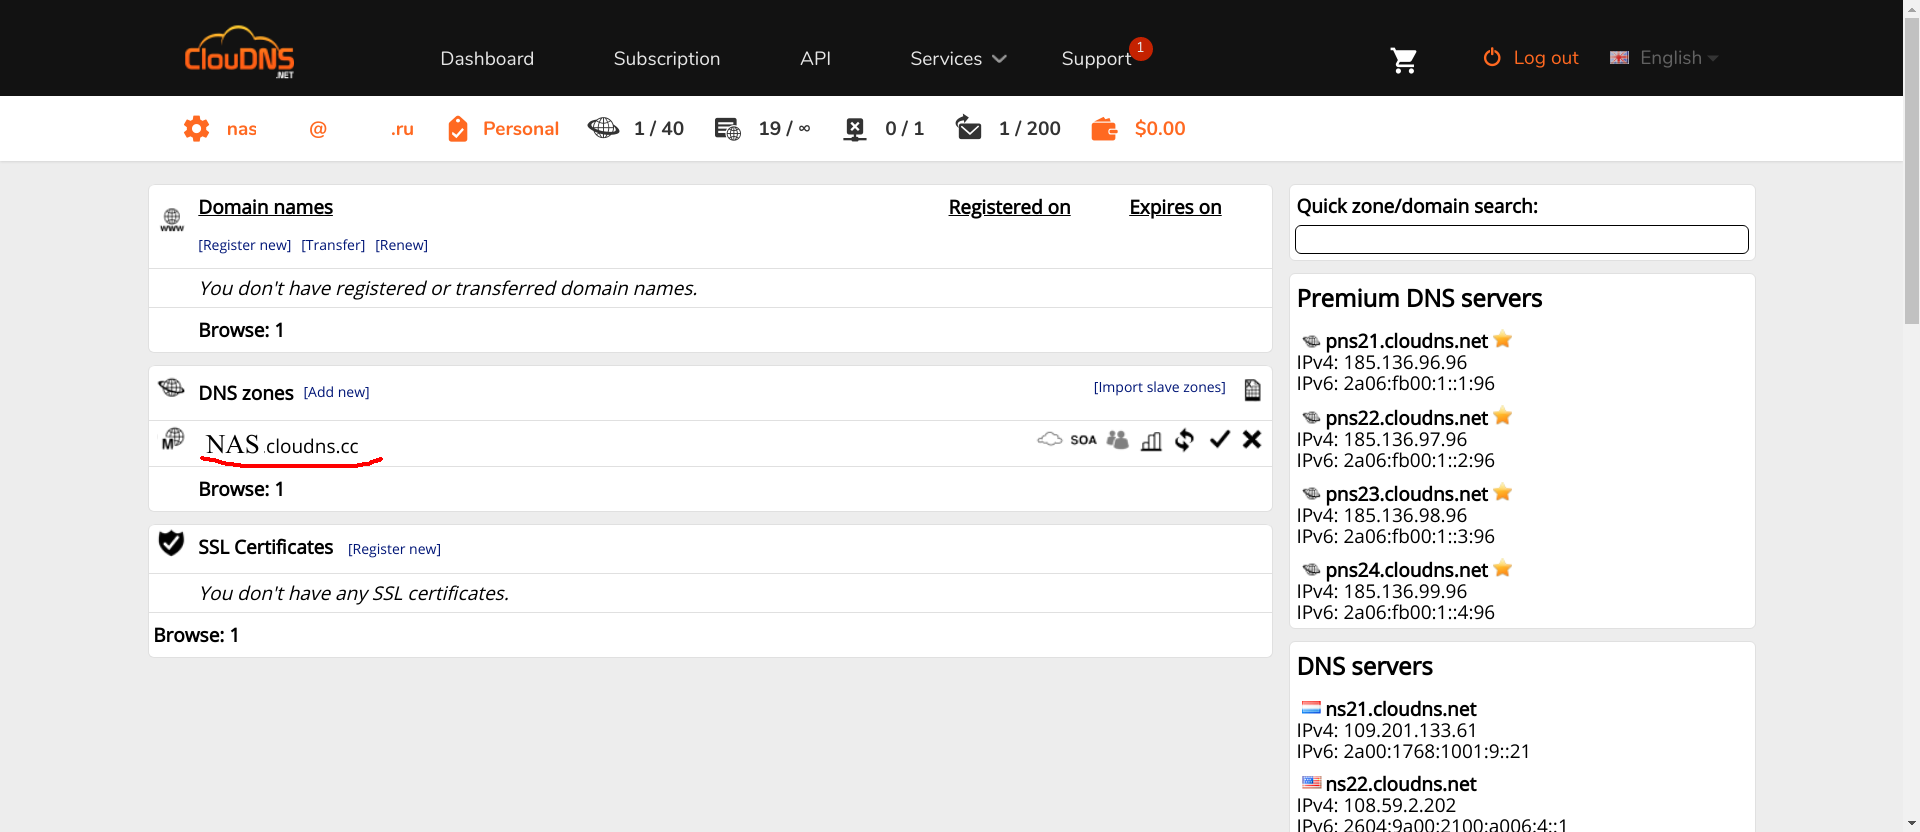
Secondly, in this zone you must register the following A-records :
- nas , www , omv , control and empty name . To access the OMV interface.
- ldap Interface phpLdapAdmin.
- ssp . Interface for changing user passwords.
- test . Test server.
The remaining domain names will be added as services are added.
Click on the zone, then "Add new record" , select the A-type, enter the zone name and the IP address of the router, behind which stands the NAS.
Secondly, you need to access the API. In ClouDNS it is paid, so you must first pay for it. In other services it is free. If you know what is better, and this is supported by Lexicon , please write in the comments.
Having access to the API, there must be added a new user API.
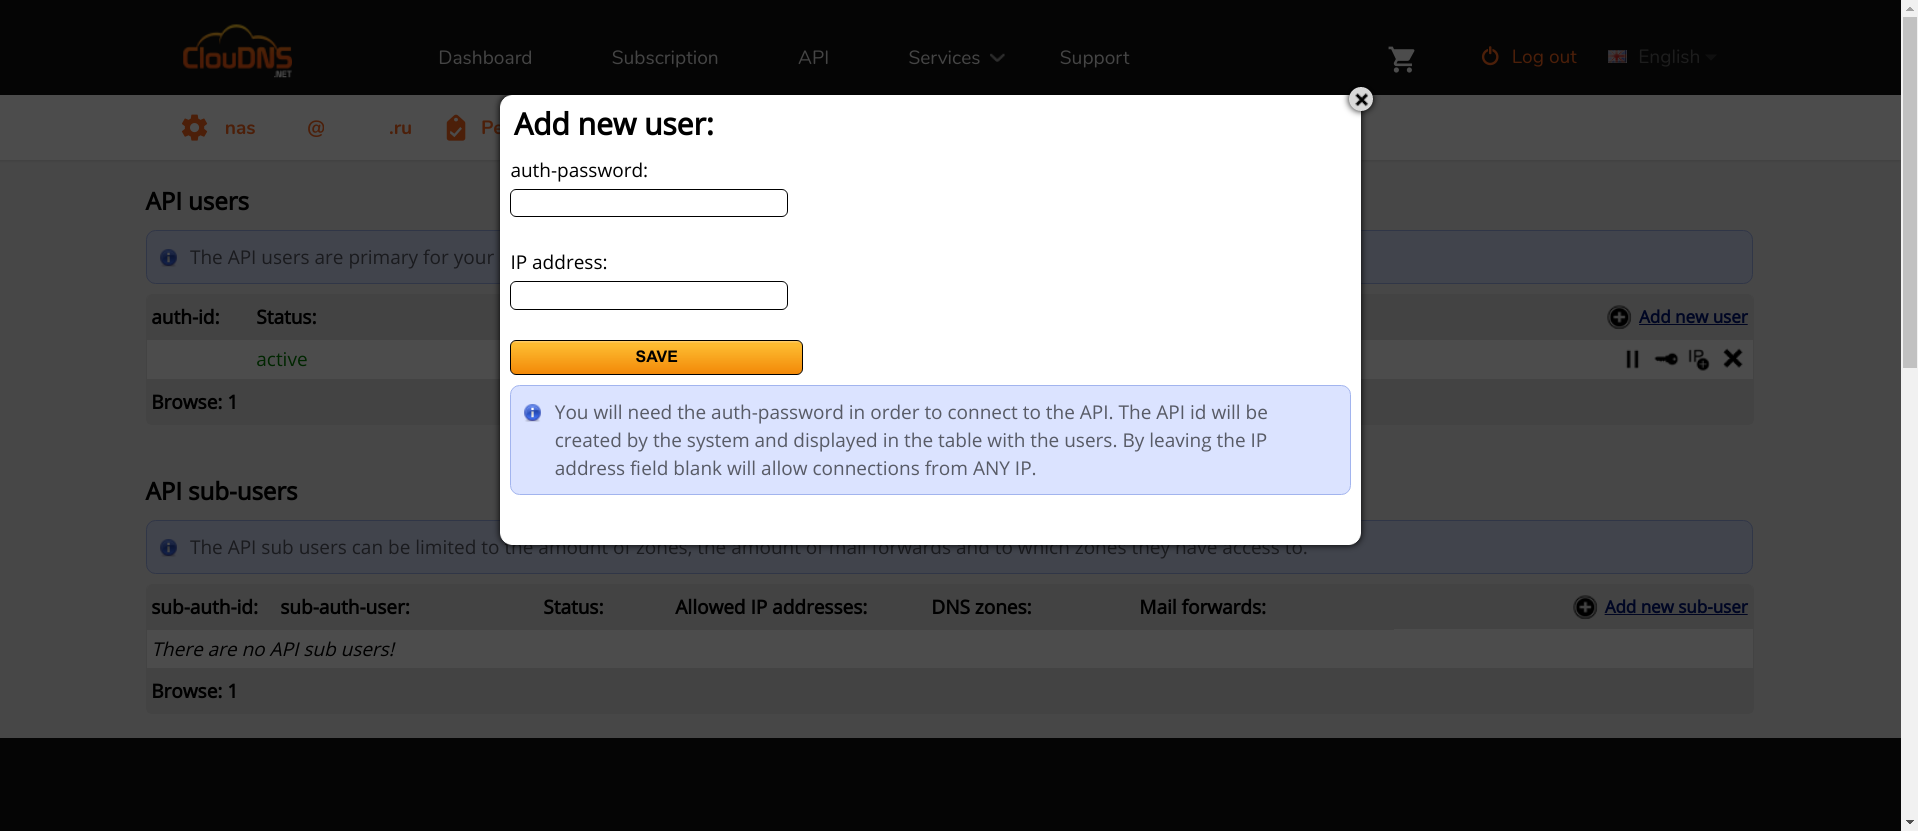
In the "IP address" field you need to enter the IP of the router: this is the address from which the API will be available. , , API, auth-id auth-password . Lexicon, .
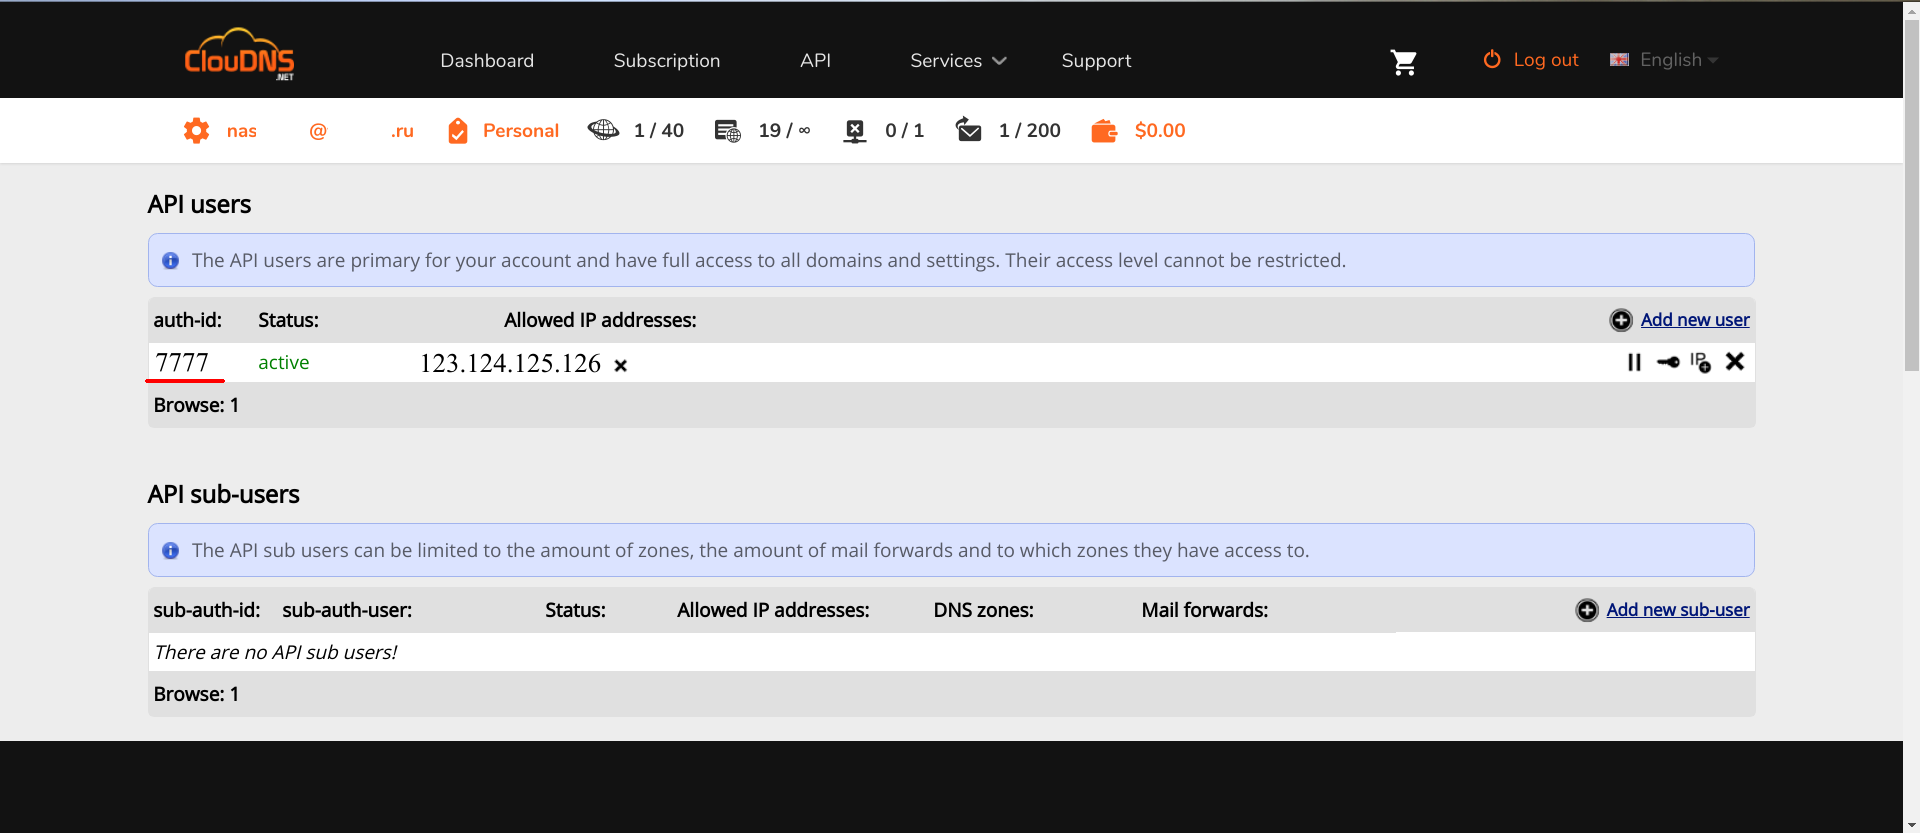
ClouDNS .
Docker
openmediavault-docker-gui, docker-ce .
, docker-compose , :
apt-get install docker-compose
:
zfs create -p /tank0/docker/services
, /var/lib/docker . ( , SSD), , , .
..,
. .

, .
, GUI , : , .. , .
/var/lib :
service docker stop zfs create -o com.sun:auto-snapshot=false -p /tank0/docker/lib rm -rf /var/lib/docker ln -s /tank0/docker/lib /var/lib/docker service docker start
As a result:
$ ls -l /var/lib/docker lrwxrwxrwx 1 root root 17 Apr 7 12:35 /var/lib/docker -> /tank0/docker/lib
:
docker network create docker0
Docker .
nginx-reverse-proxy
Docker , .
, .
: nginx-proxy letsencrypt-dns .
, OMV 10080 10443, 80 443.
/tank0/docker/services/nginx-proxy/docker-compose.yml version: '2' networks: docker0: external: name: docker0 services: nginx-proxy: networks: - docker0 restart: always image: jwilder/nginx-proxy ports: - "80:80" - "443:443" volumes: - ./certs:/etc/nginx/certs:ro - ./vhost.d:/etc/nginx/vhost.d - ./html:/usr/share/nginx/html - /var/run/docker.sock:/tmp/docker.sock:ro - ./local-config:/etc/nginx/conf.d - ./nginx.tmpl:/app/nginx.tmpl labels: - "com.github.jrcs.letsencrypt_nginx_proxy_companion.nginx_proxy=true" letsencrypt-dns: image: adferrand/letsencrypt-dns volumes: - ./certs/letsencrypt:/etc/letsencrypt environment: - "LETSENCRYPT_USER_MAIL=MAIL@MAIL.COM" - "LEXICON_PROVIDER=cloudns" - "LEXICON_OPTIONS=--delegated NAS.cloudns.cc" - "LEXICON_PROVIDER_OPTIONS=--auth-id=CLOUDNS_ID --auth-password=CLOUDNS_PASSWORD"
:
- nginx-reverse-proxy — c .
- letsencrypt-dns — ACME Let's Encrypt.
nginx-reverse-proxy jwilder/nginx-proxy .
docker0 — , , docker-compose.
nginx-proxy — , . docker0. , 80 443 ports (, , docker0, ).
restart: always , .
:
certs /etc/nginx/certs — , , Let's Encrypt. ACME ../vhost.d:/etc/nginx/vhost.d — . ../html:/usr/share/nginx/html — . ./var/run/docker.sock , /tmp/docker.sock — Docker . docker-gen ../local-config , /etc/nginx/conf.d — nginx. , ../nginx.tmpl , /app/nginx.tmpl — nginx, docker-gen .
letsencrypt-dns adferrand/letsencrypt-dns . ACME Lexicon, DNS .
certs/letsencrypt /etc/letsencrypt .
, :
LETSENCRYPT_USER_MAIL=MAIL@MAIL.COM — Let's Encrypt. , .LEXICON_PROVIDER=cloudns — Lexicon. — cloudns .LEXICON_PROVIDER_OPTIONS=--auth-id=CLOUDNS_ID --auth-password=CLOUDNS_PASSWORD --delegated=NAS.cloudns.cc — CLOUDNS_ID ClouDNS . CLOUDNS_PASSWORD — , API. NAS.cloudns.cc, NAS — DNS . cloudns , (cloudns.cc), ClouDNS API .
: .
, , , , Let's encrypt:
$ ls ./certs/letsencrypt/ accounts archive csr domains.conf keys live renewal renewal-hooks
, , .
/tank0/docker/services/nginx-proxy/nginx.tmpl {{ $CurrentContainer := where $ .Docker.CurrentContainerID | first }} {{ define }} {{ if .Address }} {{/* If we got the containers from swarm and this container's port is published to host, use host IP:PORT */}} {{ if and .Container.Node.ID .Address.HostPort }} # {{ .Container.Node.Name }}/{{ .Container.Name }} server {{ .Container.Node.Address.IP }}:{{ .Address.HostPort }}; {{/* If there is no swarm node or the port is not published on host, use container's IP:PORT */}} {{ else if .Network }} # {{ .Container.Name }} server {{ .Network.IP }}:{{ .Address.Port }}; {{ end }} {{ else if .Network }} # {{ .Container.Name }} {{ if .Network.IP }} server {{ .Network.IP }} down; {{ else }} server 127.0.0.1 down; {{ end }} {{ end }} {{ end }} # If we receive X-Forwarded-Proto, pass it through; otherwise, pass along the # scheme used to connect to this server map $http_x_forwarded_proto $proxy_x_forwarded_proto { default $http_x_forwarded_proto; '' $scheme; } # If we receive X-Forwarded-Port, pass it through; otherwise, pass along the # server port the client connected to map $http_x_forwarded_port $proxy_x_forwarded_port { default $http_x_forwarded_port; '' $server_port; } # If we receive Upgrade, set Connection to ; otherwise, delete any # Connection header that may have been passed to this server map $http_upgrade $proxy_connection { default upgrade; '' close; } # Apply fix for very long server names server_names_hash_bucket_size 128; # Default dhparam {{ if (exists ) }} ssl_dhparam /etc/nginx/dhparam/dhparam.pem; {{ end }} # Set appropriate X-Forwarded-Ssl header map $scheme $proxy_x_forwarded_ssl { default off; https on; } gzip_types text/plain text/css application/javascript application/json application/x-javascript text/xml application/xml application/xml+rss text/javascript; log_format vhost '$host $remote_addr - $remote_user [$time_local] ' '"$request" $status $body_bytes_sent ' '"$http_referer" "$http_user_agent"'; access_log off; {{ if $.Env.RESOLVERS }} resolver {{ $.Env.RESOLVERS }}; {{ end }} {{ if (exists ) }} include /etc/nginx/proxy.conf; {{ else }} # HTTP 1.1 support proxy_http_version 1.1; proxy_buffering off; proxy_set_header Host $http_host; proxy_set_header Upgrade $http_upgrade; proxy_set_header Connection $proxy_connection; proxy_set_header X-Real-IP $remote_addr; proxy_set_header X-Forwarded-For $proxy_add_x_forwarded_for; proxy_set_header X-Forwarded-Proto $proxy_x_forwarded_proto; proxy_set_header X-Forwarded-Ssl $proxy_x_forwarded_ssl; proxy_set_header X-Forwarded-Port $proxy_x_forwarded_port; # Mitigate httpoxy attack (see README for details) proxy_set_header Proxy ; {{ end }} {{ $enable_ipv6 := eq (or ($.Env.ENABLE_IPV6) ) }} server { server_name _; # This is just an invalid value which will never trigger on a real hostname. listen 80; {{ if $enable_ipv6 }} listen [::]:80; {{ end }} access_log /var/log/nginx/access.log vhost; return 503; } {{ if (and (exists ) (exists )) }} server { server_name _; # This is just an invalid value which will never trigger on a real hostname. listen 443 ssl http2; {{ if $enable_ipv6 }} listen [::]:443 ssl http2; {{ end }} access_log /var/log/nginx/access.log vhost; return 503; ssl_session_tickets off; ssl_certificate /etc/nginx/certs/default.crt; ssl_certificate_key /etc/nginx/certs/default.key; } {{ end }} {{ range $host, $containers := groupByMulti $ }} {{ $host := trim $host }} {{ $is_regexp := hasPrefix $host }} {{ $upstream_name := when $is_regexp (sha1 $host) $host }} # {{ $host }} upstream {{ $upstream_name }} { {{ range $container := $containers }} {{ $addrLen := len $container.Addresses }} {{ range $knownNetwork := $CurrentContainer.Networks }} {{ range $containerNetwork := $container.Networks }} {{ if (and (ne $containerNetwork.Name ) (or (eq $knownNetwork.Name $containerNetwork.Name) (eq $knownNetwork.Name ))) }} ## Can be connected with network {{/* If only 1 port exposed, use that */}} {{ if eq $addrLen 1 }} {{ $address := index $container.Addresses 0 }} {{ template (dict $container $address $containerNetwork) }} {{/* If more than one port exposed, use the one matching VIRTUAL_PORT env var, falling back to standard web port 80 */}} {{ else }} {{ $port := coalesce $container.Env.VIRTUAL_PORT }} {{ $address := where $container.Addresses $port | first }} {{ template (dict $container $address $containerNetwork) }} {{ end }} {{ else }} # Cannot connect to network of this container server 127.0.0.1 down; {{ end }} {{ end }} {{ end }} {{ end }} } {{ $default_host := or ($.Env.DEFAULT_HOST) }} {{ $default_server := index (dict $host $default_host ) $host }} {{/* Get the VIRTUAL_PROTO defined by containers w/ the same vhost, falling back to */}} {{ $proto := trim (or (first (groupByKeys $containers )) ) }} {{/* Get the NETWORK_ACCESS defined by containers w/ the same vhost, falling back to */}} {{ $network_tag := or (first (groupByKeys $containers )) }} {{/* Get the HTTPS_METHOD defined by containers w/ the same vhost, falling back to */}} {{ $https_method := or (first (groupByKeys $containers )) }} {{/* Get the SSL_POLICY defined by containers w/ the same vhost, falling back to */}} {{ $ssl_policy := or (first (groupByKeys $containers )) }} {{/* Get the HSTS defined by containers w/ the same vhost, falling back to */}} {{ $hsts := or (first (groupByKeys $containers )) }} {{/* Get the VIRTUAL_ROOT By containers w/ use fastcgi root */}} {{ $vhost_root := or (first (groupByKeys $containers )) }} {{/* Get the first cert name defined by containers w/ the same vhost */}} {{ $certName := (first (groupByKeys $containers )) }} {{/* Get the best matching cert by name for the vhost. */}} {{ $vhostCert := (closest (dir ) (printf $host))}} {{/* vhostCert is actually a filename so remove any suffixes since they are added later */}} {{ $vhostCert := trimSuffix $vhostCert }} {{ $vhostCert := trimSuffix $vhostCert }} {{/* Use the cert specified on the container or fallback to the best vhost match */}} {{ $cert := (coalesce $certName $vhostCert) }} {{ $is_https := (and (ne $https_method ) (ne $cert ) (or (and (exists (printf $cert)) (exists (printf $cert))) (and (exists (printf $cert)) (exists (printf $cert)))) ) }} {{ if $is_https }} {{ if eq $https_method }} server { server_name {{ $host }}; listen 80 {{ $default_server }}; {{ if $enable_ipv6 }} listen [::]:80 {{ $default_server }}; {{ end }} access_log /var/log/nginx/access.log vhost; return 301 https://$host$request_uri; } {{ end }} server { server_name {{ $host }}; listen 443 ssl http2 {{ $default_server }}; {{ if $enable_ipv6 }} listen [::]:443 ssl http2 {{ $default_server }}; {{ end }} access_log /var/log/nginx/access.log vhost; {{ if eq $network_tag }} # Only allow traffic from internal clients include /etc/nginx/network_internal.conf; {{ end }} {{ if eq $ssl_policy }} ssl_protocols TLSv1.2; ssl_ciphers 'ECDHE-ECDSA-AES256-GCM-SHA384:ECDHE-RSA-AES256-GCM-SHA384:ECDHE-ECDSA-CHACHA20-POLY1305:ECDHE-RSA-CHACHA20-POLY1305:ECDHE-ECDSA-AES128-GCM-SHA256:ECDHE-RSA-AES128-GCM-SHA256:ECDHE-ECDSA-AES256-SHA384:ECDHE-RSA-AES256-SHA384:ECDHE-ECDSA-AES128-SHA256:ECDHE-RSA-AES128-SHA256'; {{ else if eq $ssl_policy }} ssl_protocols TLSv1 TLSv1.1 TLSv1.2; ssl_ciphers 'ECDHE-ECDSA-CHACHA20-POLY1305:ECDHE-RSA-CHACHA20-POLY1305:ECDHE-ECDSA-AES128-GCM-SHA256:ECDHE-RSA-AES128-GCM-SHA256:ECDHE-ECDSA-AES256-GCM-SHA384:ECDHE-RSA-AES256-GCM-SHA384:DHE-RSA-AES128-GCM-SHA256:DHE-RSA-AES256-GCM-SHA384:ECDHE-ECDSA-AES128-SHA256:ECDHE-RSA-AES128-SHA256:ECDHE-ECDSA-AES128-SHA:ECDHE-RSA-AES256-SHA384:ECDHE-RSA-AES128-SHA:ECDHE-ECDSA-AES256-SHA384:ECDHE-ECDSA-AES256-SHA:ECDHE-RSA-AES256-SHA:DHE-RSA-AES128-SHA256:DHE-RSA-AES128-SHA:DHE-RSA-AES256-SHA256:DHE-RSA-AES256-SHA:AES128-GCM-SHA256:AES256-GCM-SHA384:AES128-SHA256:AES256-SHA256:AES128-SHA:AES256-SHA:!DSS'; {{ else if eq $ssl_policy }} ssl_protocols SSLv3 TLSv1 TLSv1.1 TLSv1.2; ssl_ciphers 'ECDHE-ECDSA-CHACHA20-POLY1305:ECDHE-RSA-CHACHA20-POLY1305:ECDHE-RSA-AES128-GCM-SHA256:ECDHE-ECDSA-AES128-GCM-SHA256:ECDHE-RSA-AES256-GCM-SHA384:ECDHE-ECDSA-AES256-GCM-SHA384:DHE-RSA-AES128-GCM-SHA256:DHE-DSS-AES128-GCM-SHA256:kEDH+AESGCM:ECDHE-RSA-AES128-SHA256:ECDHE-ECDSA-AES128-SHA256:ECDHE-RSA-AES128-SHA:ECDHE-ECDSA-AES128-SHA:ECDHE-RSA-AES256-SHA384:ECDHE-ECDSA-AES256-SHA384:ECDHE-RSA-AES256-SHA:ECDHE-ECDSA-AES256-SHA:DHE-RSA-AES128-SHA256:DHE-RSA-AES128-SHA:DHE-DSS-AES128-SHA256:DHE-RSA-AES256-SHA256:DHE-DSS-AES256-SHA:DHE-RSA-AES256-SHA:ECDHE-RSA-DES-CBC3-SHA:ECDHE-ECDSA-DES-CBC3-SHA:EDH-RSA-DES-CBC3-SHA:AES128-GCM-SHA256:AES256-GCM-SHA384:AES128-SHA256:AES256-SHA256:AES128-SHA:AES256-SHA:AES:DES-CBC3-SHA:HIGH:SEED:!aNULL:!eNULL:!EXPORT:!DES:!RC4:!MD5:!PSK:!RSAPSK:!aDH:!aECDH:!EDH-DSS-DES-CBC3-SHA:!KRB5-DES-CBC3-SHA:!SRP'; {{ else if eq $ssl_policy }} ssl_protocols TLSv1.2; ssl_ciphers 'ECDHE-ECDSA-AES128-GCM-SHA256:ECDHE-RSA-AES128-GCM-SHA256:ECDHE-ECDSA-AES128-SHA256:ECDHE-RSA-AES128-SHA256:ECDHE-ECDSA-AES256-GCM-SHA384:ECDHE-RSA-AES256-GCM-SHA384:ECDHE-ECDSA-AES256-SHA384:ECDHE-RSA-AES256-SHA384:AES128-GCM-SHA256:AES128-SHA256:AES256-GCM-SHA384:AES256-SHA256'; {{ else if eq $ssl_policy }} ssl_protocols TLSv1.1 TLSv1.2; ssl_ciphers 'ECDHE-ECDSA-AES128-GCM-SHA256:ECDHE-RSA-AES128-GCM-SHA256:ECDHE-ECDSA-AES128-SHA256:ECDHE-RSA-AES128-SHA256:ECDHE-ECDSA-AES128-SHA:ECDHE-RSA-AES128-SHA:ECDHE-ECDSA-AES256-GCM-SHA384:ECDHE-RSA-AES256-GCM-SHA384:ECDHE-ECDSA-AES256-SHA384:ECDHE-RSA-AES256-SHA384:ECDHE-RSA-AES256-SHA:ECDHE-ECDSA-AES256-SHA:AES128-GCM-SHA256:AES128-SHA256:AES128-SHA:AES256-GCM-SHA384:AES256-SHA256:AES256-SHA'; {{ else if eq $ssl_policy }} ssl_protocols TLSv1 TLSv1.1 TLSv1.2; ssl_ciphers 'ECDHE-ECDSA-AES128-GCM-SHA256:ECDHE-RSA-AES128-GCM-SHA256:ECDHE-ECDSA-AES128-SHA256:ECDHE-RSA-AES128-SHA256:ECDHE-ECDSA-AES128-SHA:ECDHE-RSA-AES128-SHA:ECDHE-ECDSA-AES256-GCM-SHA384:ECDHE-RSA-AES256-GCM-SHA384:ECDHE-ECDSA-AES256-SHA384:ECDHE-RSA-AES256-SHA384:ECDHE-RSA-AES256-SHA:ECDHE-ECDSA-AES256-SHA:AES128-GCM-SHA256:AES128-SHA256:AES128-SHA:AES256-GCM-SHA384:AES256-SHA256:AES256-SHA'; {{ else if eq $ssl_policy }} ssl_protocols TLSv1 TLSv1.1 TLSv1.2; ssl_ciphers 'ECDHE-ECDSA-AES128-GCM-SHA256:ECDHE-RSA-AES128-GCM-SHA256:ECDHE-ECDSA-AES128-SHA256:ECDHE-RSA-AES128-SHA256:ECDHE-ECDSA-AES128-SHA:ECDHE-RSA-AES128-SHA:ECDHE-ECDSA-AES256-GCM-SHA384:ECDHE-RSA-AES256-GCM-SHA384:ECDHE-ECDSA-AES256-SHA384:ECDHE-RSA-AES256-SHA384:ECDHE-RSA-AES256-SHA:ECDHE-ECDSA-AES256-SHA:AES128-GCM-SHA256:AES128-SHA256:AES128-SHA:AES256-GCM-SHA384:AES256-SHA256:AES256-SHA:DES-CBC3-SHA'; {{ else if eq $ssl_policy }} ssl_protocols TLSv1 TLSv1.1 TLSv1.2; ssl_ciphers 'ECDHE-ECDSA-AES128-GCM-SHA256:ECDHE-RSA-AES128-GCM-SHA256:ECDHE-ECDSA-AES128-SHA256:ECDHE-RSA-AES128-SHA256:ECDHE-ECDSA-AES128-SHA:ECDHE-RSA-AES128-SHA:DHE-RSA-AES128-SHA:ECDHE-ECDSA-AES256-GCM-SHA384:ECDHE-RSA-AES256-GCM-SHA384:ECDHE-ECDSA-AES256-SHA384:ECDHE-RSA-AES256-SHA384:ECDHE-RSA-AES256-SHA:ECDHE-ECDSA-AES256-SHA:AES128-GCM-SHA256:AES128-SHA256:AES128-SHA:AES256-GCM-SHA384:AES256-SHA256:AES256-SHA:DHE-DSS-AES128-SHA:DES-CBC3-SHA'; {{ else if eq $ssl_policy }} ssl_protocols TLSv1 TLSv1.1 TLSv1.2; ssl_ciphers 'ECDHE-ECDSA-AES128-GCM-SHA256:ECDHE-RSA-AES128-GCM-SHA256:ECDHE-ECDSA-AES128-SHA256:ECDHE-RSA-AES128-SHA256:ECDHE-ECDSA-AES128-SHA:ECDHE-RSA-AES128-SHA:DHE-RSA-AES128-SHA:ECDHE-ECDSA-AES256-GCM-SHA384:ECDHE-RSA-AES256-GCM-SHA384:ECDHE-ECDSA-AES256-SHA384:ECDHE-RSA-AES256-SHA384:ECDHE-RSA-AES256-SHA:ECDHE-ECDSA-AES256-SHA:AES128-GCM-SHA256:AES128-SHA256:AES128-SHA:AES256-GCM-SHA384:AES256-SHA256:AES256-SHA:DHE-DSS-AES128-SHA'; {{ end }} ssl_prefer_server_ciphers on; ssl_session_timeout 5m; ssl_session_cache shared:SSL:50m; ssl_session_tickets off; {{ if (and (exists (printf $cert)) (exists (printf $cert))) }} ssl_certificate /etc/nginx/certs/letsencrypt/live/{{ (printf $cert) }}; ssl_certificate_key /etc/nginx/certs/letsencrypt/live/{{ (printf $cert) }}; {{ else if (and (exists (printf $cert)) (exists (printf $cert))) }} ssl_certificate /etc/nginx/certs/{{ (printf $cert) }}; ssl_certificate_key /etc/nginx/certs/{{ (printf $cert) }}; {{ end }} {{ if (exists (printf $cert)) }} ssl_dhparam {{ printf $cert }}; {{ end }} {{ if (exists (printf $cert)) }} ssl_stapling on; ssl_stapling_verify on; ssl_trusted_certificate {{ printf $cert }}; {{ end }} {{ if (and (ne $https_method ) (ne $hsts )) }} add_header Strict-Transport-Security always; {{ end }} {{ if (exists (printf $host)) }} include {{ printf $host }}; {{ else if (exists ) }} include /etc/nginx/vhost.d/default; {{ end }} location / { {{ if eq $proto }} include uwsgi_params; uwsgi_pass {{ trim $proto }}://{{ trim $upstream_name }}; {{ else if eq $proto }} root {{ trim $vhost_root }}; include fastcgi.conf; fastcgi_pass {{ trim $upstream_name }}; {{ else }} proxy_pass {{ trim $proto }}://{{ trim $upstream_name }}; {{ end }} {{ if (exists (printf $host)) }} auth_basic ; auth_basic_user_file {{ (printf $host) }}; {{ end }} {{ if (exists (printf $host)) }} include {{ printf $host}}; {{ else if (exists ) }} include /etc/nginx/vhost.d/default_location; {{ end }} } } {{ end }} {{ if or (not $is_https) (eq $https_method ) }} server { server_name {{ $host }}; listen 80 {{ $default_server }}; {{ if $enable_ipv6 }} listen [::]:80 {{ $default_server }}; {{ end }} access_log /var/log/nginx/access.log vhost; {{ if eq $network_tag }} # Only allow traffic from internal clients include /etc/nginx/network_internal.conf; {{ end }} {{ if (exists (printf $host)) }} include {{ printf $host }}; {{ else if (exists ) }} include /etc/nginx/vhost.d/default; {{ end }} location / { {{ if eq $proto }} include uwsgi_params; uwsgi_pass {{ trim $proto }}://{{ trim $upstream_name }}; {{ else if eq $proto }} root {{ trim $vhost_root }}; include fastcgi.conf; fastcgi_pass {{ trim $upstream_name }}; {{ else }} proxy_pass {{ trim $proto }}://{{ trim $upstream_name }}; {{ end }} {{ if (exists (printf $host)) }} auth_basic ; auth_basic_user_file {{ (printf $host) }}; {{ end }} {{ if (exists (printf $host)) }} include {{ printf $host}}; {{ else if (exists ) }} include /etc/nginx/vhost.d/default_location; {{ end }} } } {{ if (and (not $is_https) (exists ) (exists )) }} server { server_name {{ $host }}; listen 443 ssl http2 {{ $default_server }}; {{ if $enable_ipv6 }} listen [::]:443 ssl http2 {{ $default_server }}; {{ end }} access_log /var/log/nginx/access.log vhost; return 500; ssl_certificate /etc/nginx/certs/default.crt; ssl_certificate_key /etc/nginx/certs/default.key; } {{ end }} {{ end }} {{ end }}
, nginx /etc/nginx/certs/%s.crt /etc/nginx/certs/%s.pem , %s — ( — , ).
/etc/nginx/certs/letsencrypt/live/%s/{fullchain.pem, privkey.pem} , :
{{ $is_https := (and (ne $https_method "nohttps") (ne $cert "") (or (and (exists (printf "/etc/nginx/certs/letsencrypt/live/%s/fullchain.pem" $cert)) (exists (printf "/etc/nginx/certs/letsencrypt/live/%s/privkey.pem" $cert)) ) (and (exists (printf "/etc/nginx/certs/%s.crt" $cert)) (exists (printf "/etc/nginx/certs/%s.key" $cert)) ) ) ) }}
, domains.conf .
/tank0/docker/services/nginx-proxy/certs/letsencrypt/domains.conf *.NAS.cloudns.cc NAS.cloudns.cc
. , , , client_max_body_size 20, .
/tank0/docker/services/nginx-proxy/local-config/max_upload_size.conf client_max_body_size 20G;
, :
docker-compose up
( ), Ctrl+C :
docker-compose up -d
— nginx, . , , .
, NAS.
.
docker-compose :
/tank0/docker/services/test_nginx/docker-compose.yml version: '2' networks: docker0: external: name: docker0 services: nginx-local: restart: always image: nginx:alpine expose: - 80 - 443 environment: - "VIRTUAL_HOST=test.NAS.cloudns.cc" - "VIRTUAL_PROTO=http" - "VIRTUAL_PORT=80" - CERT_NAME=NAS.cloudns.cc networks: - docker0
:
docker0 — . .expose — , . , 80 HTTP 443 HTTPS.VIRTUAL_HOST=test.NAS.cloudns.cc — , nginx-reverse-proxy .VIRTUAL_PROTO=http — nginx-reverse-proxy . , HTTP.VIRTUAL_PORT=80 — nginx-reverse-proxy.CERT_NAME=NAS.cloudns.cc — . , , . NAS — DNS .networks — , nginx-reverse-proxy docker0 .
, . docker-compose up , test.NAS.cloudns.cc .
:
$ docker-compose up Creating testnginx_nginx-local_1 Attaching to testnginx_nginx-local_1 nginx-local_1 | 172.22.0.5 - - [29/Jul/2018:15:32:02 +0000] "GET / HTTP/1.1" 200 612 "-" "Mozilla/5.0 (X11; Linux x86_64) AppleWebKit/537 (KHTML, like Gecko) Chrome/67.0 Safari/537" "192.168.2.3" nginx-local_1 | 2018/07/29 15:32:02 [error] 8
:

, , , , : .
, Ctrl+C, docker-compose down .
local-rpoxy
, nginx-default , nas, omv 10080 10443 .
.
/tank0/docker/services/nginx-local/docker-compose.yml version: '2' networks: docker0: external: name: docker0 services: nginx-local: restart: always image: nginx:alpine expose: - 80 - 443 environment: - "VIRTUAL_HOST=NAS.cloudns.cc,nas,nas.*,www.*,omv.*,nas-controller.nas" - "VIRTUAL_PROTO=http" - "VIRTUAL_PORT=80" - CERT_NAME=NAS.cloudns.cc volumes: - ./local-config:/etc/nginx/conf.d networks: - docker0
docker-compose , .
, , , NAS.cloudns.cc . , NAS DNS , .
/tank0/docker/services/nginx-local/local-config/default.conf # If we receive X-Forwarded-Proto, pass it through; otherwise, pass along the # scheme used to connect to this server map $http_x_forwarded_proto $proxy_x_forwarded_proto { default $http_x_forwarded_proto; '' $scheme; } # If we receive X-Forwarded-Port, pass it through; otherwise, pass along the # server port the client connected to map $http_x_forwarded_port $proxy_x_forwarded_port { default $http_x_forwarded_port; '' $server_port; } # Set appropriate X-Forwarded-Ssl header map $scheme $proxy_x_forwarded_ssl { default off; https on; } access_log on; error_log on; # HTTP 1.1 support proxy_http_version 1.1; proxy_buffering off; proxy_set_header Host $http_host; proxy_set_header Upgrade $http_upgrade; proxy_set_header X-Real-IP $remote_addr; proxy_set_header X-Forwarded-For $proxy_add_x_forwarded_for; proxy_set_header X-Forwarded-Proto $proxy_x_forwarded_proto; proxy_set_header X-Forwarded-Ssl $proxy_x_forwarded_ssl; proxy_set_header X-Forwarded-Port $proxy_x_forwarded_port; # Mitigate httpoxy attack (see README for details) proxy_set_header Proxy ""; server { server_name _; # This is just an invalid value which will never trigger on a real hostname. listen 80; return 503; } server { server_name www.* nas.* omv.* ""; listen 80; location / { proxy_pass https:
172.21.0.1 — . 443, OMV HTTPS. .https://nas-controller/ — -, IPMI, nas, nas-controller.nas, nas-controller. .
LDAP
LDAP-
LDAP- — .
Docker . , , .
LDIF- .
/tank0/docker/services/ldap/docker-compose.yml version: "2" networks: ldap: docker0: external: name: docker0 services: open-ldap: image: "osixia/openldap:1.2.0" hostname: "open-ldap" restart: always environment: - "LDAP_ORGANISATION=NAS" - "LDAP_DOMAIN=nas.nas" - "LDAP_ADMIN_PASSWORD=ADMIN_PASSWORD" - "LDAP_CONFIG_PASSWORD=CONFIG_PASSWORD" - "LDAP_TLS=true" - "LDAP_TLS_ENFORCE=false" - "LDAP_TLS_CRT_FILENAME=ldap_server.crt" - "LDAP_TLS_KEY_FILENAME=ldap_server.key" - "LDAP_TLS_CA_CRT_FILENAME=ldap_server.crt" volumes: - ./certs:/container/service/slapd/assets/certs - ./ldap_data/var/lib:/var/lib/ldap - ./ldap_data/etc/ldap/slapd.d:/etc/ldap/slapd.d networks: - ldap ports: - 172.21.0.1:389:389 - 172.21.0.1::636:636 phpldapadmin: image: "osixia/phpldapadmin:0.7.1" hostname: "nas.nas" restart: always networks: - ldap - docker0 expose: - 443 links: - open-ldap:open-ldap-server volumes: - ./certs:/container/service/phpldapadmin/assets/apache2/certs environment: - VIRTUAL_HOST=ldap.* - VIRTUAL_PORT=443 - VIRTUAL_PROTO=https - CERT_NAME=NAS.cloudns.cc - "PHPLDAPADMIN_LDAP_HOSTS=open-ldap-server" #- "PHPLDAPADMIN_HTTPS=false" - "PHPLDAPADMIN_HTTPS_CRT_FILENAME=certs/ldap_server.crt" - "PHPLDAPADMIN_HTTPS_KEY_FILENAME=private/ldap_server.key" - "PHPLDAPADMIN_HTTPS_CA_CRT_FILENAME=certs/ldap_server.crt" - "PHPLDAPADMIN_LDAP_CLIENT_TLS_REQCERT=allow" ldap-ssp: image: openfrontier/ldap-ssp:https volumes: #- ./ssp/mods-enabled/ssl.conf:/etc/apache2/mods-enabled/ssl.conf - /etc/ssl/certs/ssl-cert-snakeoil.pem:/etc/ssl/certs/ssl-cert-snakeoil.pem - /etc/ssl/private/ssl-cert-snakeoil.key:/etc/ssl/private/ssl-cert-snakeoil.key restart: always networks: - ldap - docker0 expose: - 80 links: - open-ldap:open-ldap-server environment: - VIRTUAL_HOST=ssp.* - VIRTUAL_PORT=80 - VIRTUAL_PROTO=http - CERT_NAME=NAS.cloudns.cc - "LDAP_URL=ldap://open-ldap-server:389" - "LDAP_BINDDN=cn=admin,dc=nas,dc=nas" - "LDAP_BINDPW=ADMIN_PASSWORD" - "LDAP_BASE=ou=users,dc=nas,dc=nas" - "MAIL_FROM=admin@nas.nas" - "PWD_MIN_LENGTH=8" - "PWD_MIN_LOWER=3" - "PWD_MIN_DIGIT=2" - "SMTP_HOST=" - "SMTP_USER=" - "SMTP_PASS="
:
LDAP- , :
LDAP_ORGANISATION=NAS — . .LDAP_DOMAIN=nas.nas — . . , .LDAP_ADMIN_PASSWORD=ADMIN_PASSWORD — .LDAP_CONFIG_PASSWORD=CONFIG_PASSWORD — .
-, " ", .
:
/container/service/slapd/assets/certs certs — . ../ldap_data/ — , . LDAP .
ldap , 389 ( LDAP) 636 (LDAP SSL, ) .
PhpLdapAdmin : LDAP ldap 443 docker0 , , nginx-reverse-proxy.
Settings:
VIRTUAL_HOST=ldap.* — , nginx-reverse-proxy .VIRTUAL_PORT=443 — nginx-reverse-proxy.VIRTUAL_PROTO=https — nginx-reverse-proxy.CERT_NAME=NAS.cloudns.cc — , .
SSL .
SSP HTTP .
, , .
— LDAP.
LDAP_URL=ldap://open-ldap-server:389 — LDAP (. links ).LDAP_BINDDN=cn=admin,dc=nas,dc=nas — .LDAP_BINDPW=ADMIN_PASSWORD — , , open-ldap.LDAP_BASE=ou=users,dc=nas,dc=nas — , .
LDAP LDAP :
apt-get install ldap-utils ldapadd -x -H ldap://172.21.0.1 -D "cn=admin,dc=nas,dc=nas" -W -f ldifs/inititialize_ldap.ldif ldapadd -x -H ldap://172.21.0.1 -D "cn=admin,dc=nas,dc=nas" -W -f ldifs/base.ldif ldapadd -x -H ldap://172.21.0.1 -D "cn=admin,cn=config" -W -f ldifs/gitlab_attr.ldif
gitlab_attr.ldif , Gitlab ( ) .
.
LDAP $ ldapsearch -x -H ldap://172.21.0.1 -b dc=nas,dc=nas -D "cn=admin,dc=nas,dc=nas" -W Enter LDAP Password:
LDAP . WEB-.
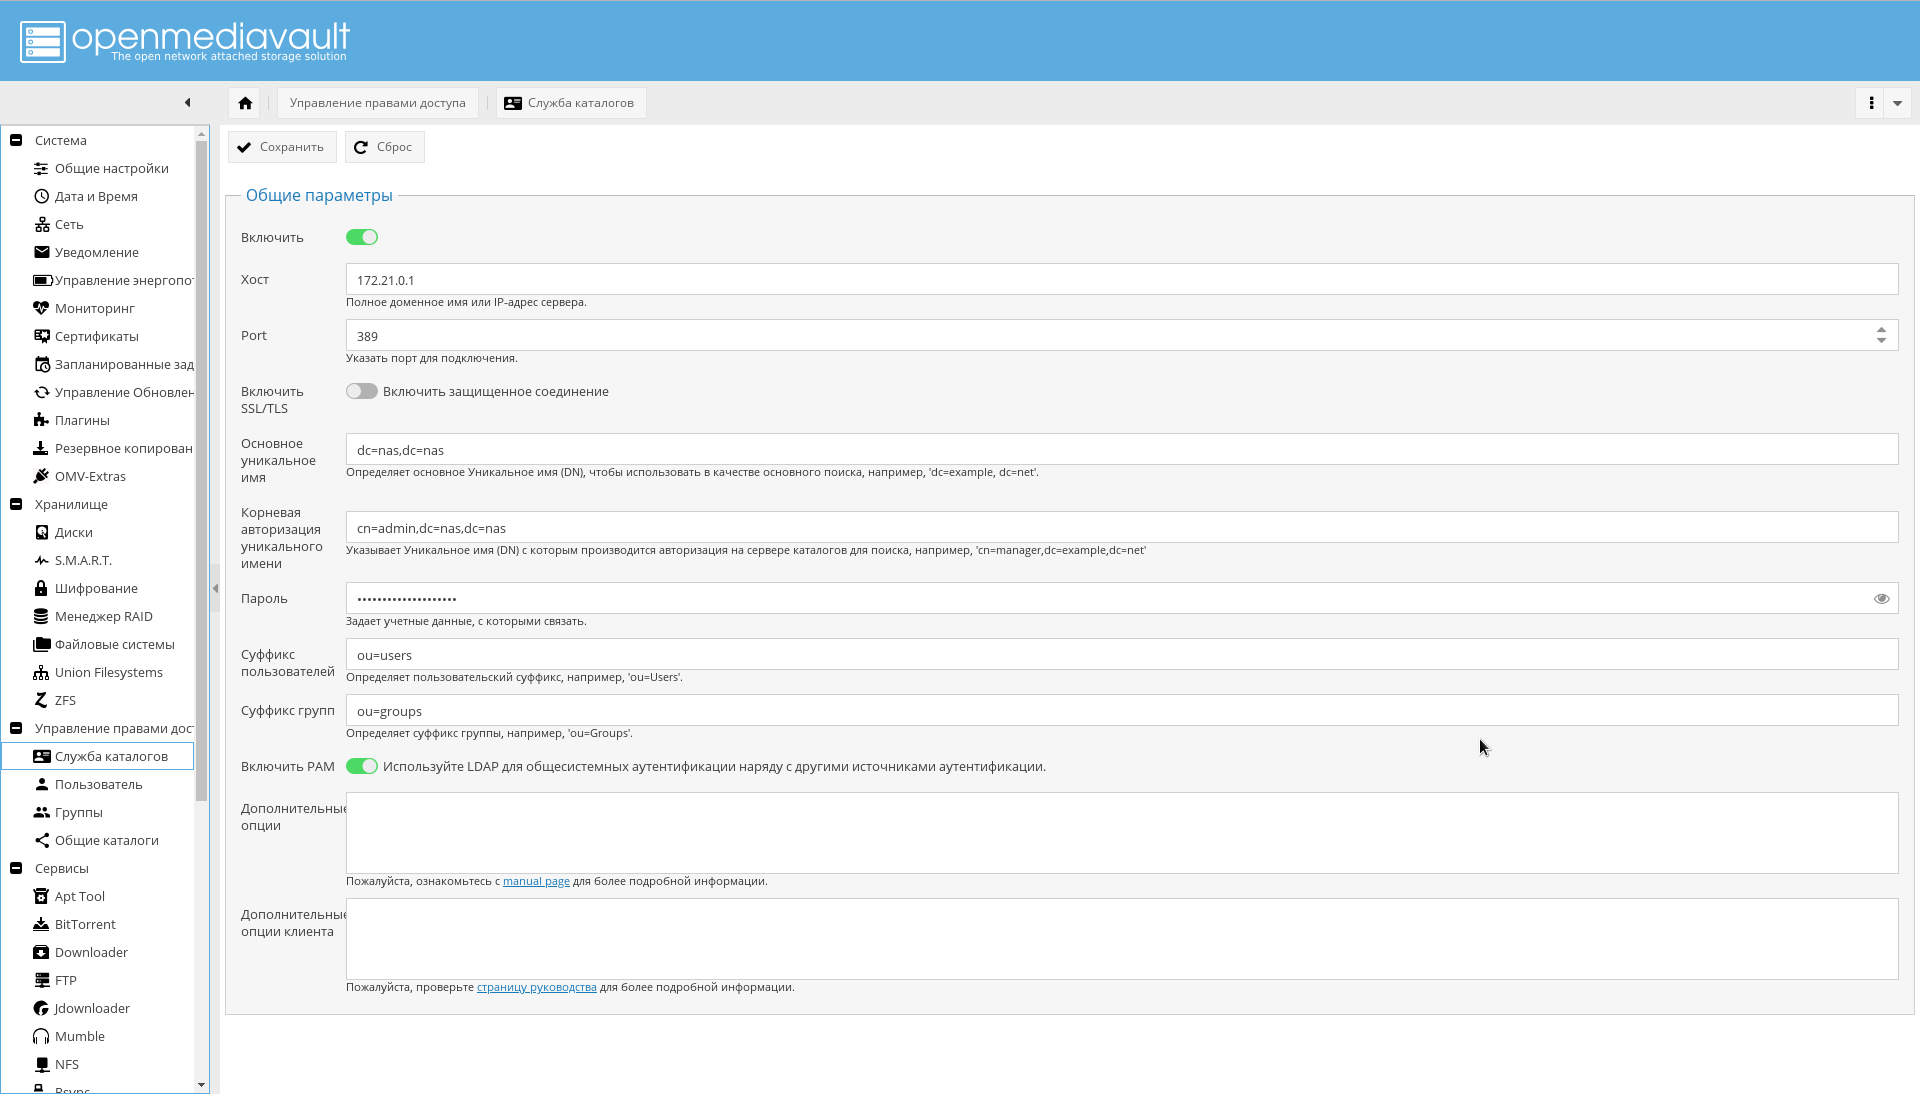
OMV LDAP
LDAP , OMV : , , , , — .
LDAP .
:
, , NAS USB.
.
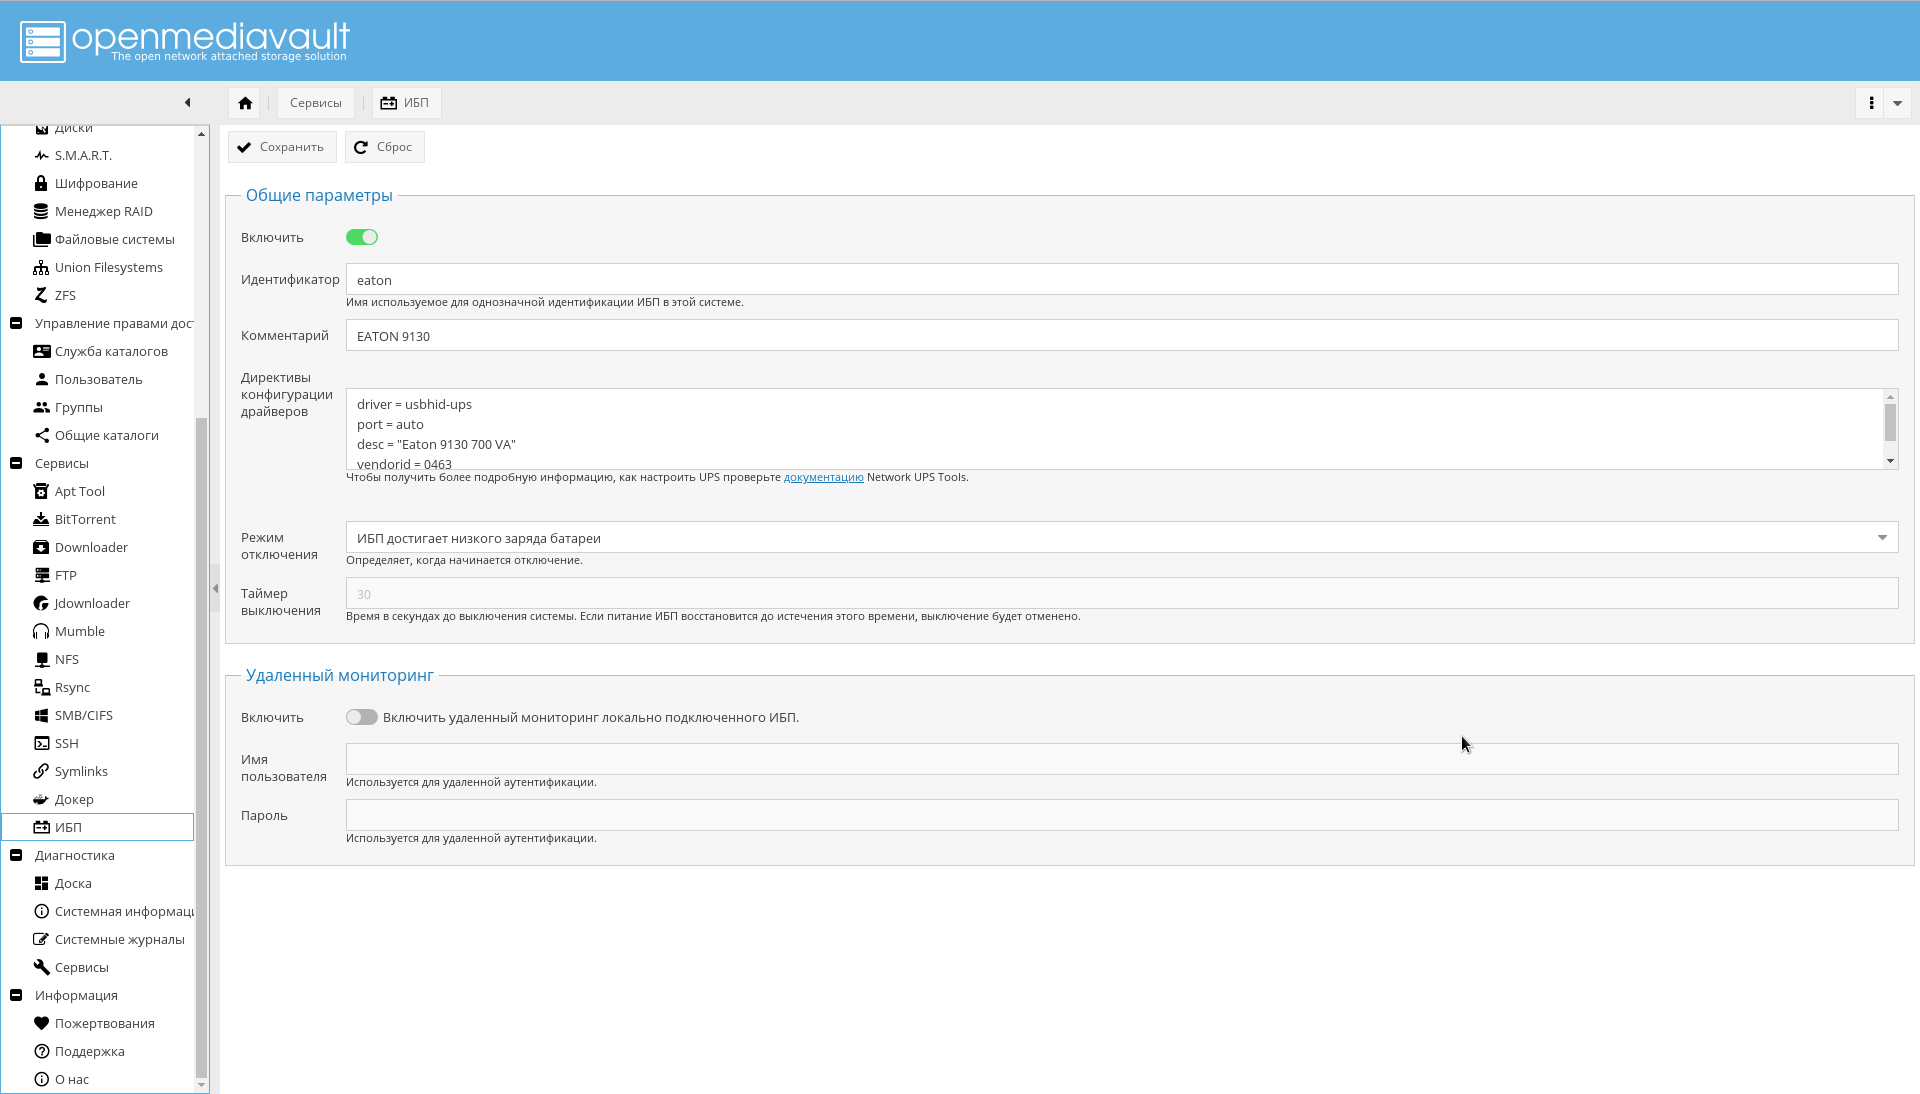
NUT GUI OMV.
"->" , , , , "eaton".
" " :
driver = usbhid-ups port = auto desc = "Eaton 9130 700 VA" vendorid = 0463 pollinterval = 10
driver = usbhid-ups — USB, USB HID.vendorid — , lsusb .pollinterval — c.
.
lsusb , :
" " " ".
, :
. , .
.
Conclusion
. , , , , .
— .
-, OMV .
WEB-, , :

Docker WEB-:
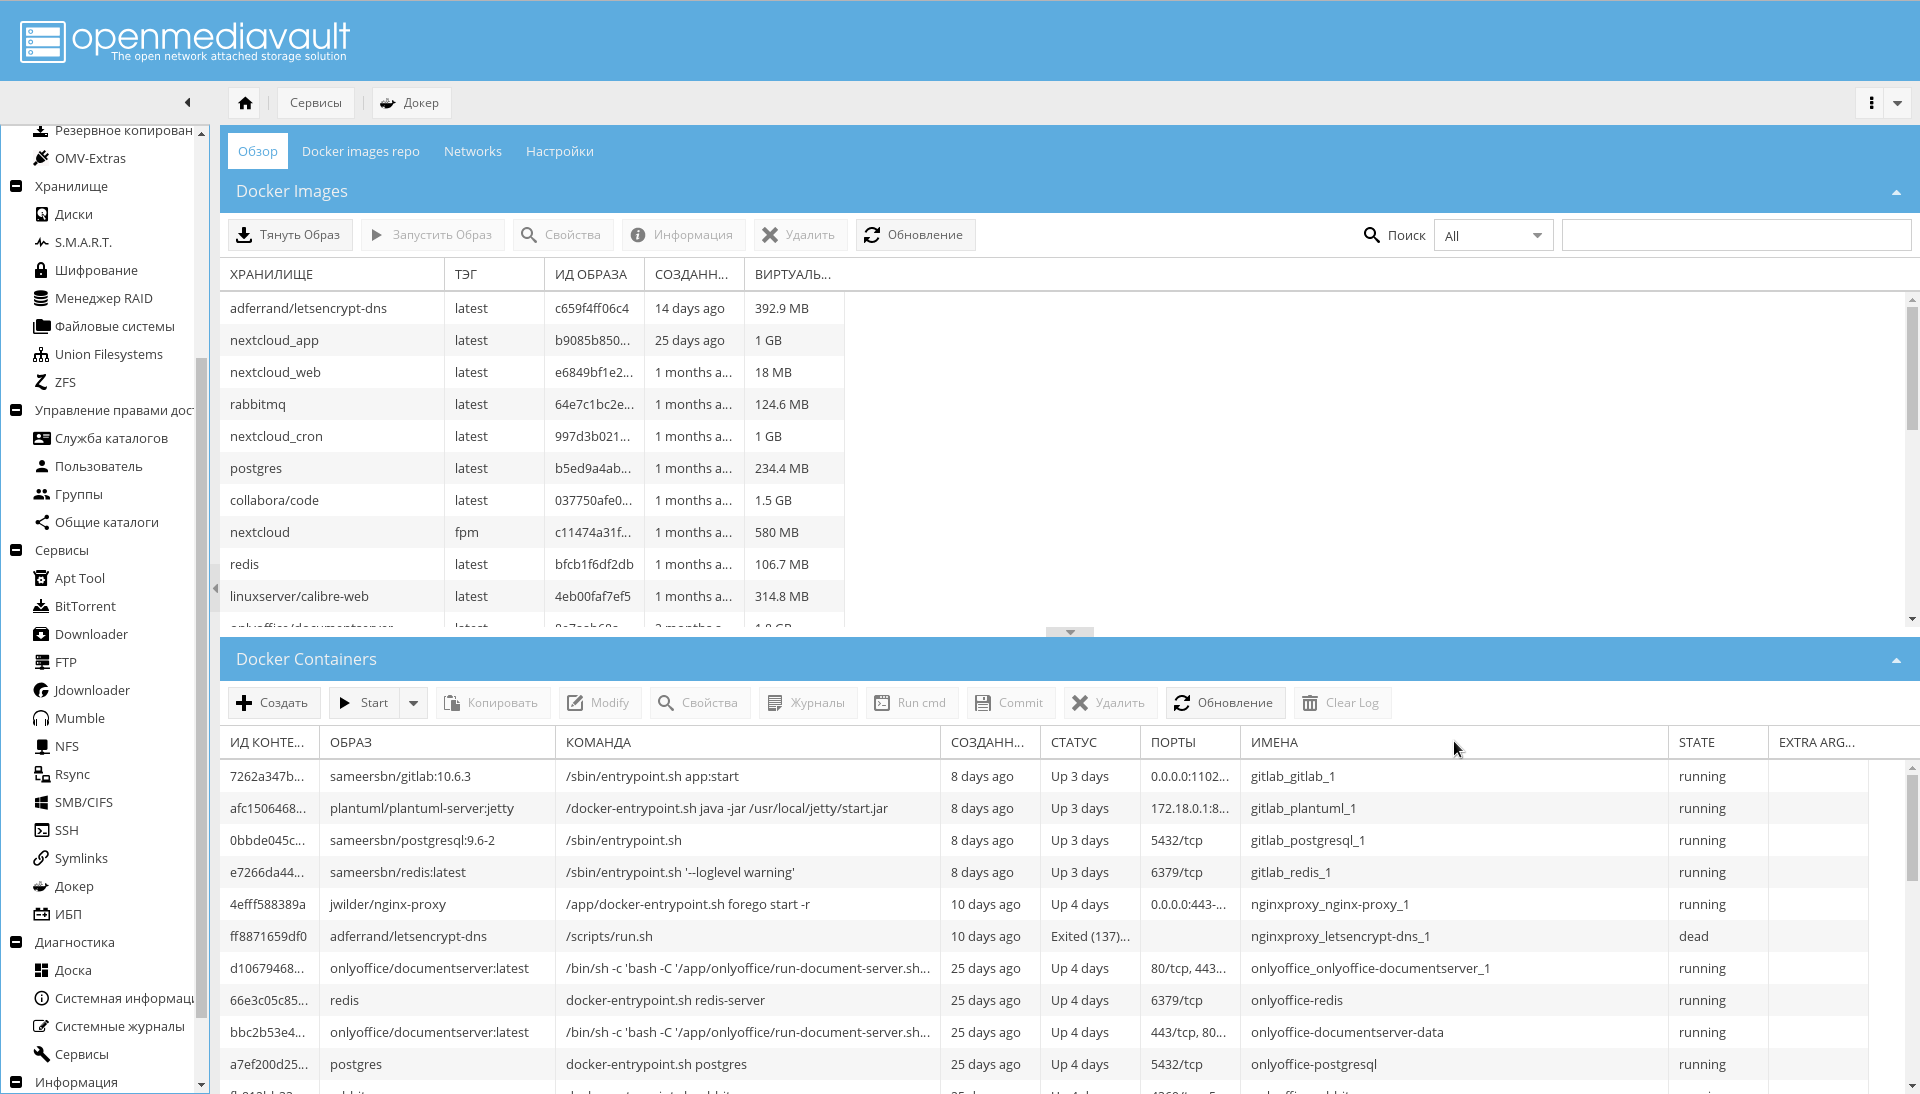
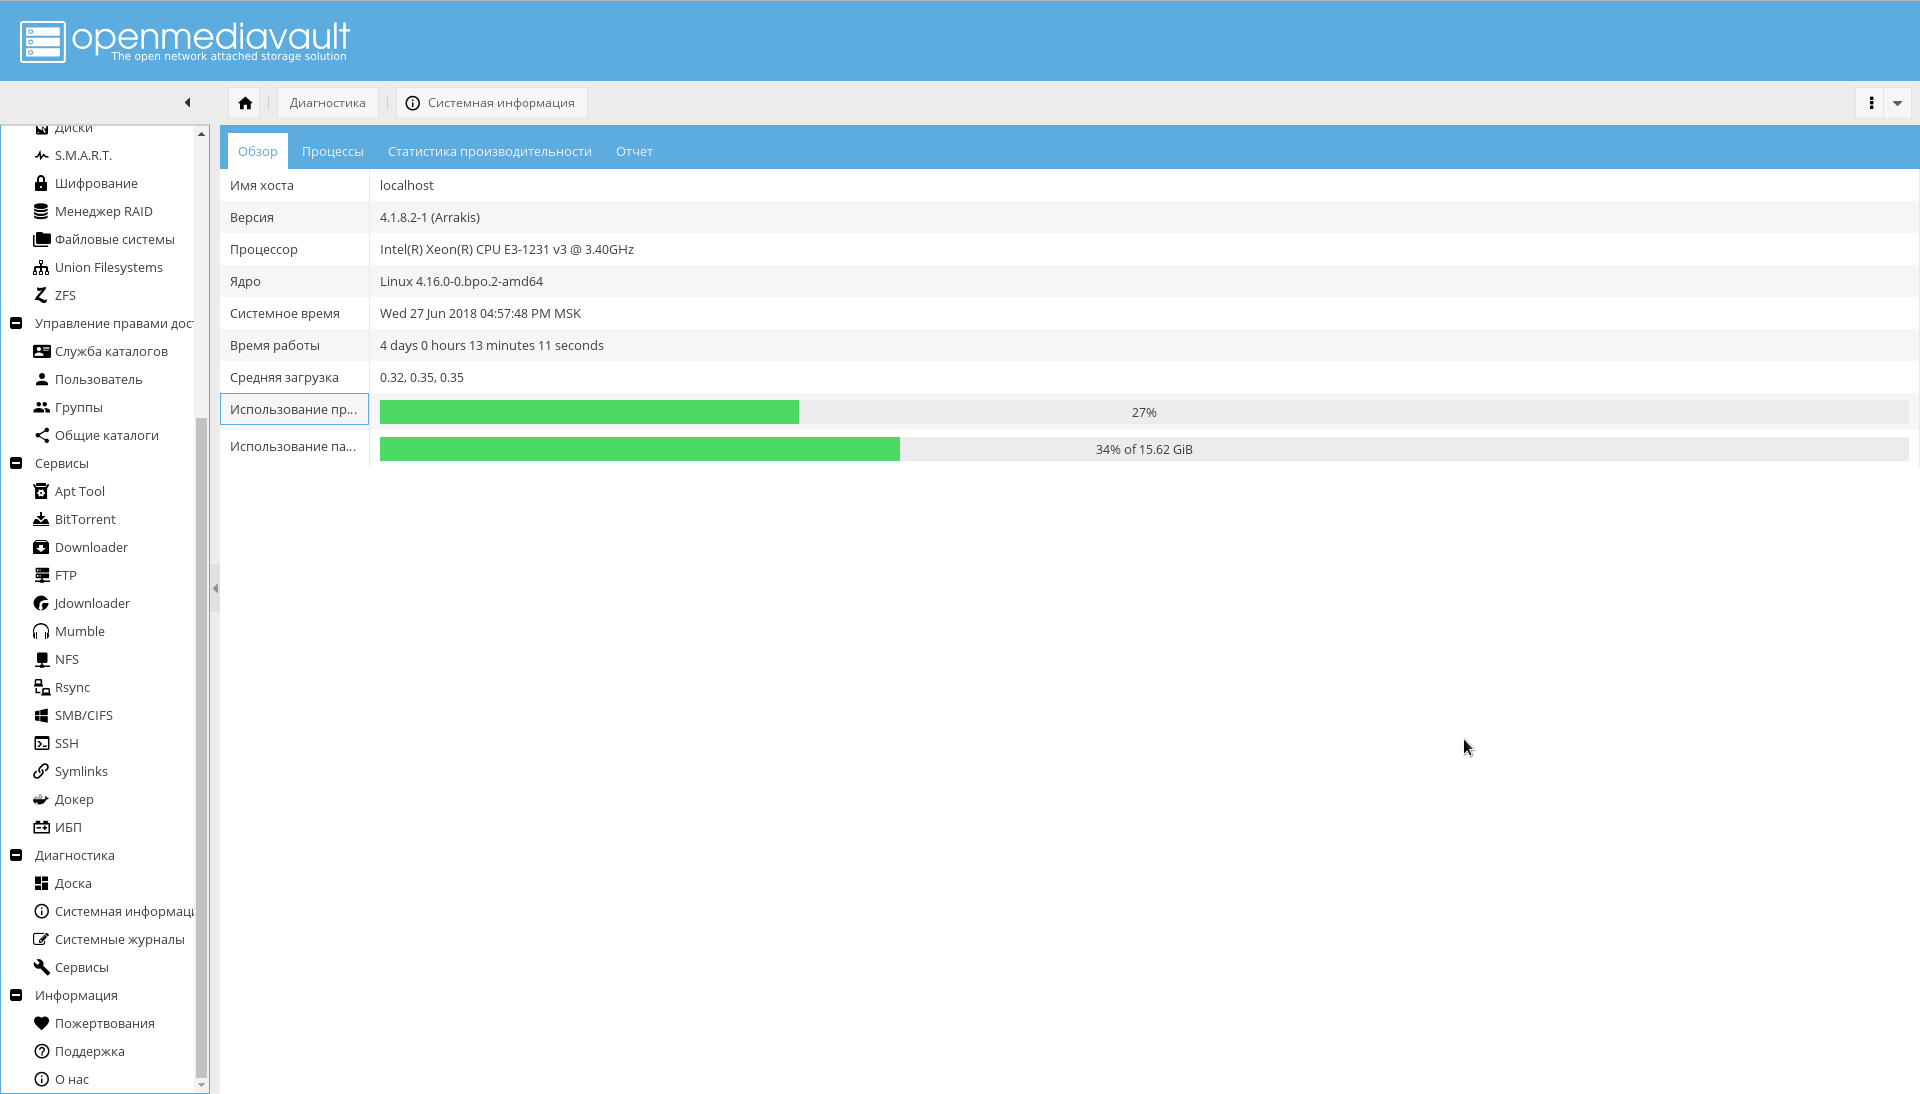
, OMV .
:
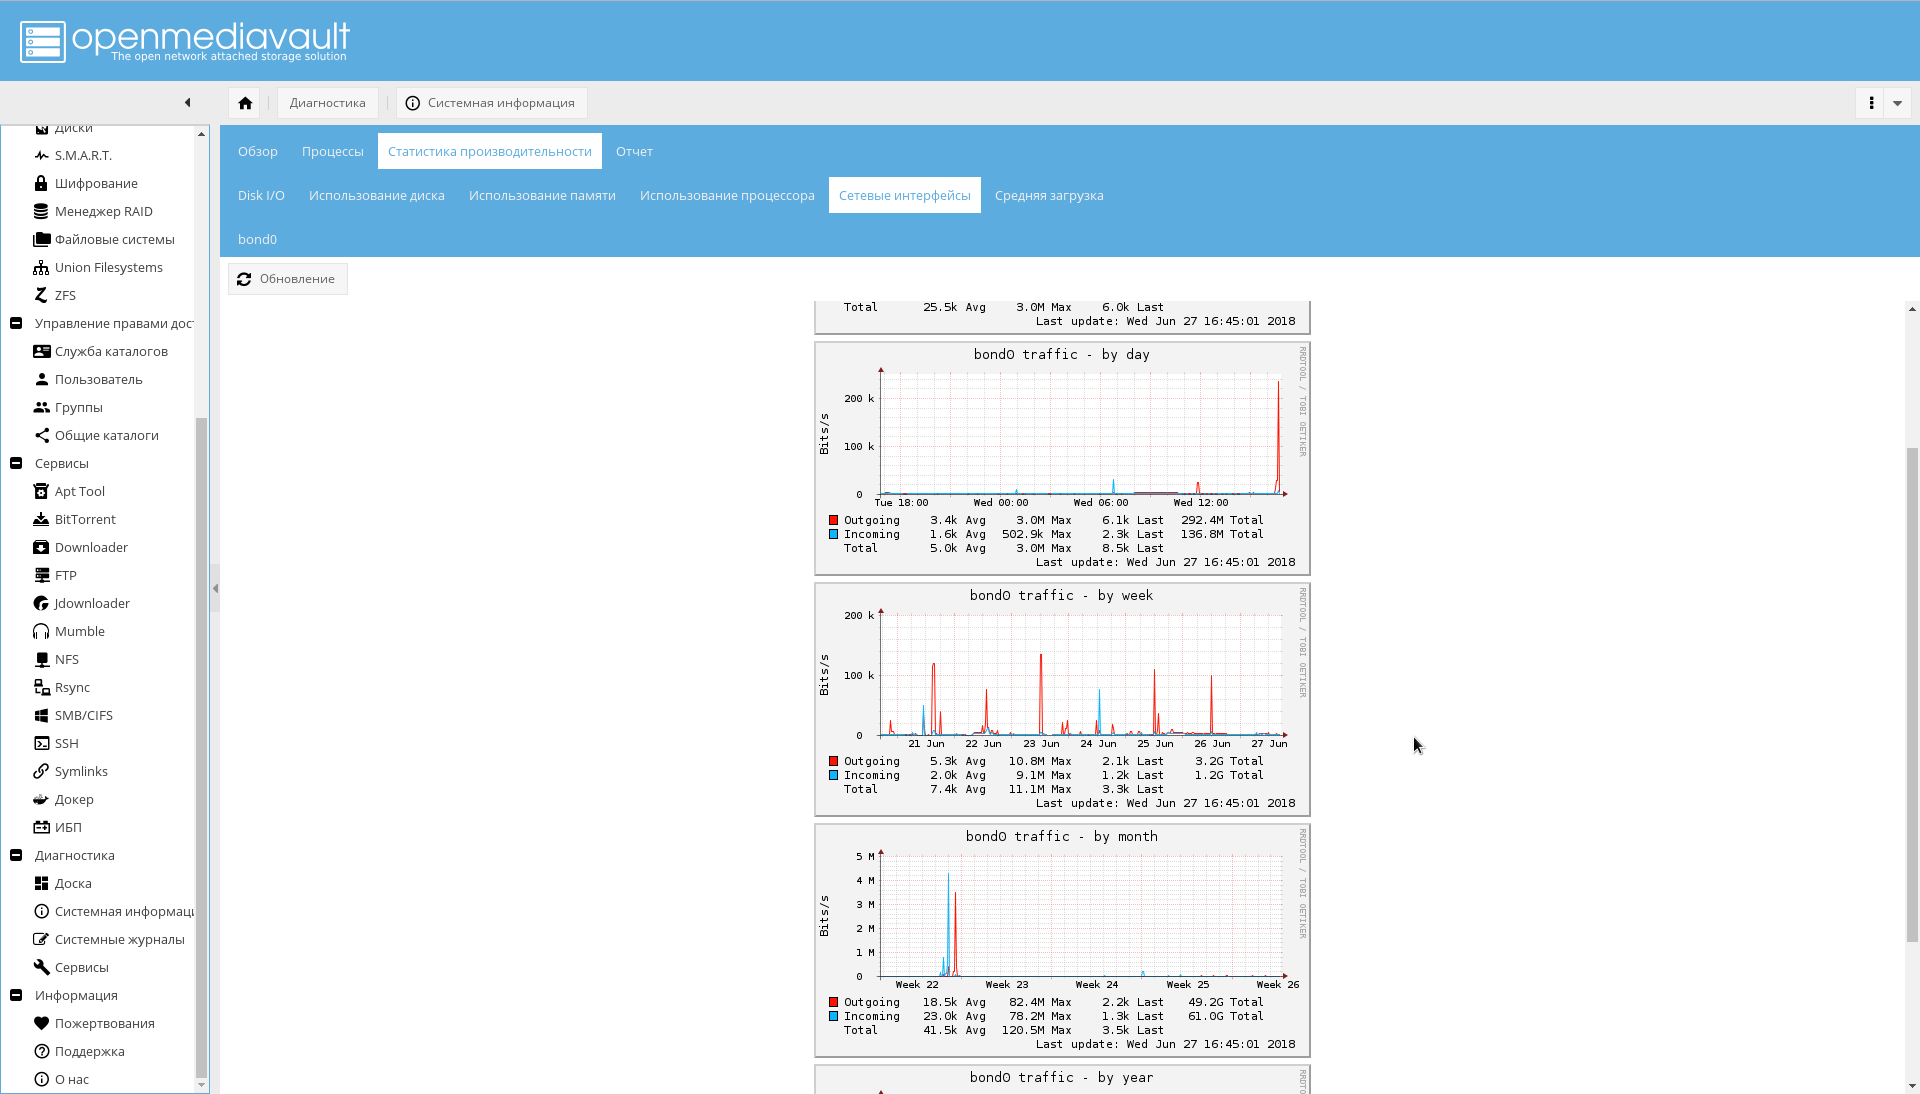
:
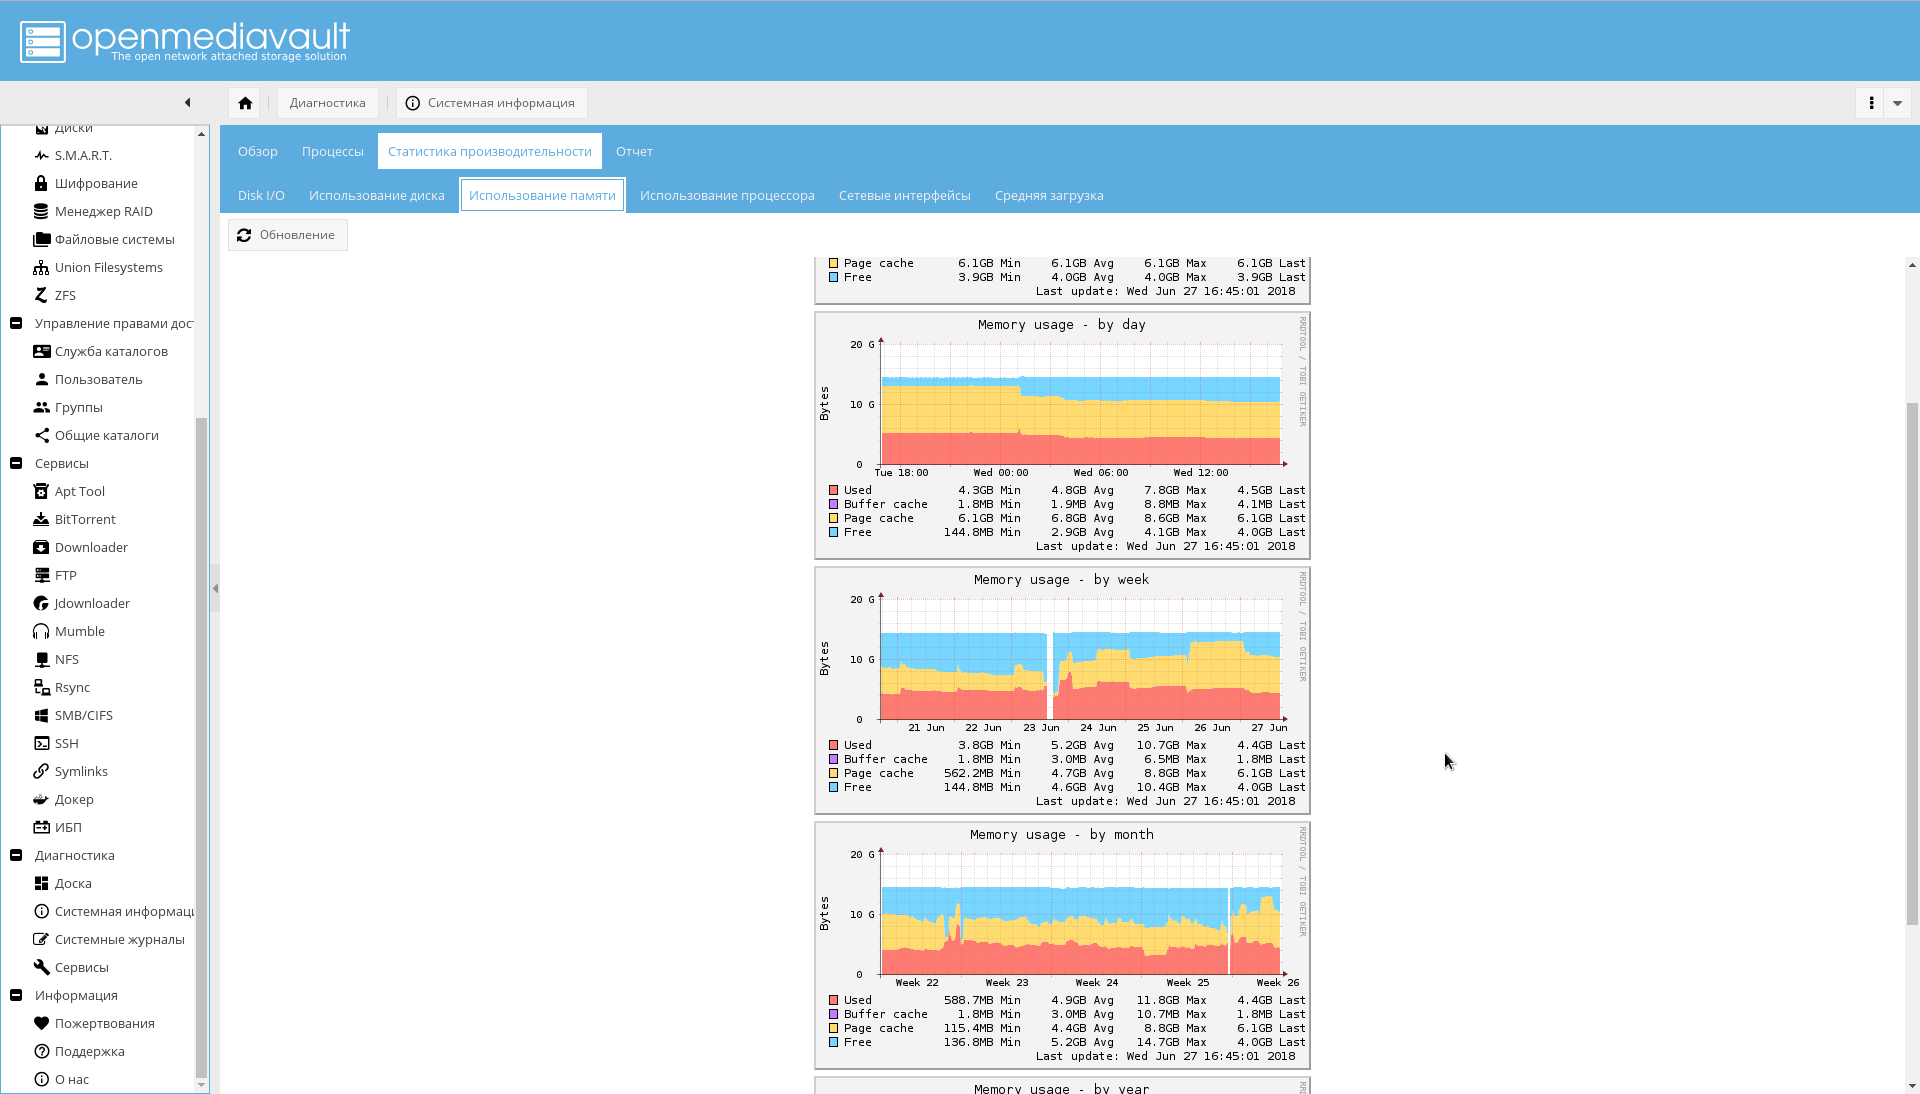
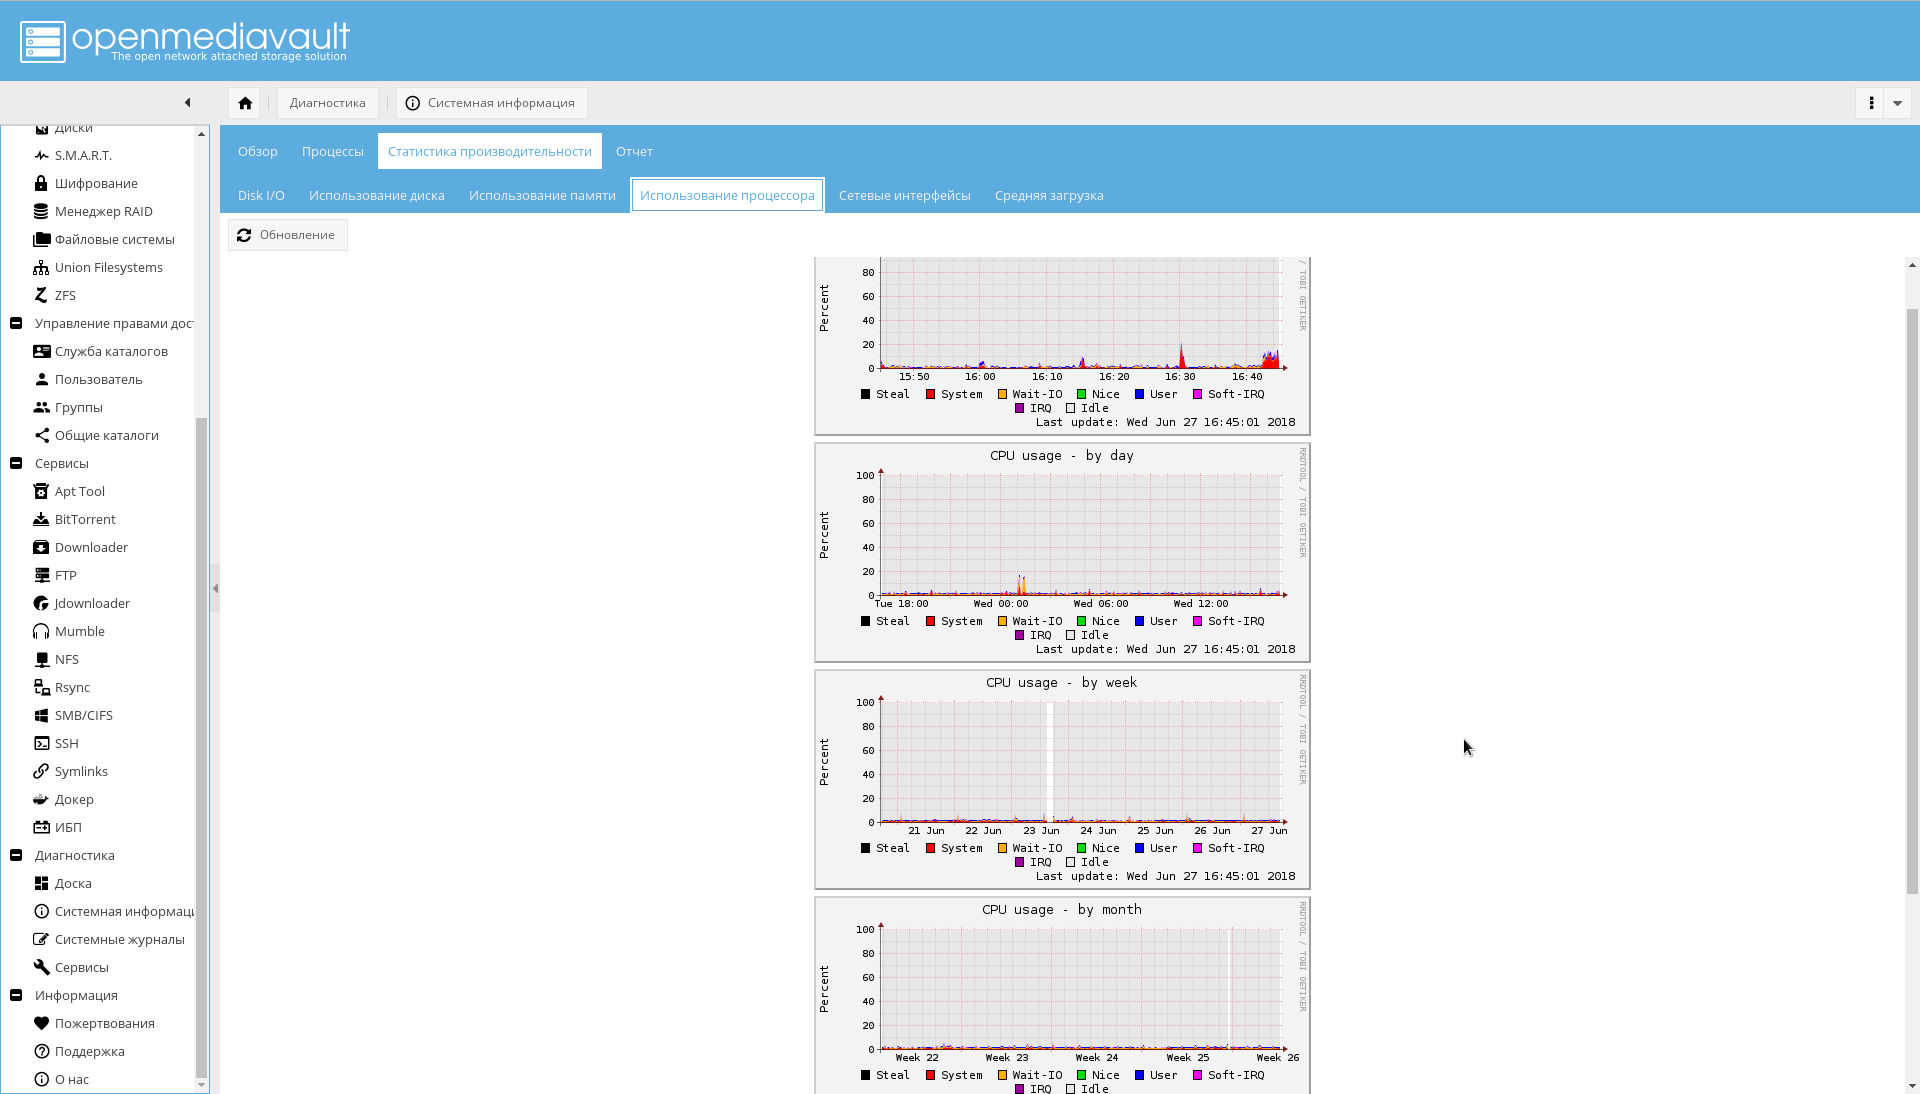
CPU:
That's all.
!
