This article is a continuation of the article
Interaction with the server through the API in iOS on Swift 3. Part 1 and updating the
old article written in Objective-C on swift 3.
Brief theory
GET request
GET is the simplest HTTP request method, and it is the browser that uses it to load web pages. It is used to request content located at a specific URL. The content may be, for example, a web page, a drawing or an audio file. By convention, GET requests are read only and, in accordance with the W3C standard, should not be used in operations that change the server side. For example, we will not use a GET request to send a form or send a photo, because these operations require some changes on the server side (we will use POST in these cases).
POST request
POST sends data for further processing to the URL. Parameters are included in the body of the request, using the same format as GET. For example, if we want to post a form that contains two fields, a name and an age, then we will send something similar to name = Martin & age = 29 in the request body.
This method of sending parameters is widely used in web pages. The most popular cases are forms. When we fill out the form on the site and click Submit, most likely the request will be POST.
In our application, we use POST for rating jokes. We will send votes (or +1, or -1) to a remote server.
POST request data can be structured using different formats. Parameters are usually formatted in accordance with the form-url-coding standards (in accordance with the W3C HTML standard). This is the default format and is widely used in many browsers. Our method accepts a Dictionary as an argument, but we cannot send a Dictionary over an HTTP connection, because it is an internal Swift type. To send over an HTTP connection, we need to create a recognizable dictionary representation. It is like communicating with a foreigner. We translate our message into a universal language, and it translates from a universal language into its own. The universal language in HTTP is the W3C standard, our language is Swift, the language of the recipient is unknown to us.
The W3C standard defines rules that determine what a recognizable representation means for each case. In our case, we need to provide the parameters following the form-url-coded part of the standard (for example, param1 = var1 & param2 = var2).
Webview
With the help of programming language tools we can send requests to a remote server. This is what browsers do before displaying a web page. The only difference is in the content of the answer. Web pages are formatted using the HTML standard, which defines a set of rules on how to graphically define various markup tags. These rules seem simple, but displaying the whole page, following the W3C standard is a complex task. Fortunately, iOS has a built-in UIWebView component that uses the well-known WebKit engine, interprets HTML / CSS / JavaScript, and displays entire web pages within UIView.
There are several cases when we want to control the flow of navigation. For example, we want to know when certain content or a specific URL is loaded.
Or maybe we are implementing a safe browser for children, we want to block the user from loading pages that fall under certain criteria, like sex or drugs. For all these types of customization, we create an instance of a class that implements the UIWebViewDelegate protocol as a delegate to the UIWebView. We can implement the following methods:
webView:shouldStartLoadWithRequest:navigationType: webViewDidStartLoad: webViewDidFinishLoad: webView:didFailLoadWithError:
Using the first method, we can control the flow of navigation by allowing or blocking specific requests. The remaining three methods are informational events (method names give a good idea of the event).
Implementing a vote through a POST request
We will
append the MainViewController.swift and
HTTPCommunication.swift files , and create a new
WebViewController.swift file in which we define our webView.
First, create a new WebViewController.swift file and define the WebViewController class in it:
WebViewController.swift import UIKit class WebViewController: UIViewController { } extension WebViewController { }
Now we are implementing the functionality for making POST requests in the class responsible for all our HTTP operations: HTTPCommunication class. To do this, add a new postURL method (_: params: completionHandler :) to HTTPCommunication.swift, which is similar to the previous retrieveURL (_: completionHandler :) method.
HTTPCommunication.swift class HTTPCommunication: NSObject { … func retrieveURL(_ url: URL, completionHandler: @escaping ((Data) -> Void)) { … }
Method Code
func postURL(_ url: URL, params: [String: Int], completionHandler: @escaping ((Data) -> Void)) { // (K.1) self.completionHandler = completionHandler // (K.2) func postBody(params: [String: Int]) -> Data? { // (K.3) var paramsArr: [String] = [] for (key, value) in params { paramsArr.append("\(key)=\(value)") } let postBodyString: String = paramsArr.joined(separator: "&") let postBodyData: Data? = postBodyString.data(using: .utf8) return postBodyData } var request: URLRequest = URLRequest(url: url) // (K.4) request.httpMethod = "POST" request.httpBody = postBody(params: params) let session: URLSession = URLSession(configuration: .default, delegate: self, delegateQueue: nil) // (K.5) let task: URLSessionDownloadTask = session.downloadTask(with: request) task.resume() }
(K.1) With a closure, we will work outside this function, so we denote it by @escaping.
(K.2) We save the passed closure to the completionHandler property.
(K.3) We write the method, which we convert the dictionary of the passed parameters into string form, and then we encode this string into the Data type in the utf8 encoding.
(K.4) We create a request with the passed url and set it up: we set POST as the method, and make our Data type parameters with utf8 as the request body.
(K.5) Finally, create a session with a default configuration and delegate as ourselves. And we create a task (task) to load the result of this query into the temporary storage. At the end, defreeze the task.
Now we add the necessary interface in MainViewController.swift. Add two buttons for voting voteUp and voteDown, which respectively will raise or lower the rating of the current joke. We will also add the “Chuck Who?” Button, which we will fill with functionality in the section about web view.
In the MainViewController.swift we insert the voteUpButton, voteDownButton and chuckWhoButton initialization code.
MainViewController.swift lazy var jokeLabel: UILabel! = … var jokeID: Int! lazy var activityView: UIActivityIndicatorView! = …
Button Initialization Code
lazy var voteUpButton: UIButton! = { // (L.1) let button: UIButton = UIButton(type: .system) // (L.2) button.setTitle("Vote Up", for: .normal) button.sizeToFit() button.addTarget(self, action: #selector(self.voteUp), for: .touchUpInside) // (L.3) self.view.addSubview(button) // (L.4) return button // (L.5) }() lazy var voteDownButton: UIButton! = { let button: UIButton = UIButton(type: .system) button.setTitle("Vote Down", for: .normal) button.sizeToFit() button.addTarget(self, action: #selector(self.voteDown), for: .touchUpInside) self.view.addSubview(button) return button }() lazy var chuckWhoButton: UIButton! = { let button: UIButton = UIButton(type: .system) button.setTitle("Chuck Who?", for: .normal) button.sizeToFit() button.addTarget(self, action: #selector(self.chuckWho), for: .touchUpInside) self.view.addSubview(button) return button }()
The initialization code for all three buttons is the same.
(L.1) We declare a lazy variable and initialize it with a closure.
(L.2) Inside the closure, we define a local variable for the button, the system type, set the name and size.
(L.3) Associate with the button the corresponding action when pressed.
(L.4) Add views to the hierarchy.
(L.5) And assign this local variable to our lazy variable.
Next, in the MainViewController.swift insert the method code for the buttons
MainViewController.swift class MainViewController: UIViewController { … func retrieveRandomJokes() { … }
Method code for buttons
func voteUp() { let http: HTTPCommunication = HTTPCommunication() // (M.1) let params: [String: Int] = ["joke_id": self.jokeID, "vote": 1] // (M.2) if let url = URL(string: "http://example.com/rater/vote") { // (M.3) http.postURL(url, params: params) { (data) in // (M.4) print("\(data). Voted Up") } } } func voteDown() { let http: HTTPCommunication = HTTPCommunication() let params: [String: Int] = ["joke_id": self.jokeID, "vote": -1] if let url = URL(string: "http://example.com/rater/vote") { http.postURL(url, params: params) { (data) in print("\(data). Voted Down") } } } func chuckWho() { }
The code of the methods for voting up and down is the same.
(M.1) Create a class object to communicate with the server.
(M.2) Create a parameter dictionary that includes the id of the joke for which we are voting, and the actual value of the vote is +1 or -1.
(M.3) Then, safely, we get the url from the address line of our training domain
http://example.com/rater/vote.(M.4) And send through POST a request to the url of our parameters. And we print to the console a line indicating the execution of the request.
Next, in MainViewController.swift, we rewrite the code of the configStackView method with the changes made in the UI.
MainViewController.swift func configStackView() -> UIStackView { let innerStackView: UIStackView = UIStackView(arrangedSubviews: [self.voteUpButton, self.voteDownButton])
(N.1) Create an innerStackView containing two buttons for voting.
(N.2) We set the axles vertical; the distribution is the same.
(N.3) Add the innerStackView and the Chuck Norris button to the main main StackView to the label from the last part.
(N.4) Customize mainStackView.
(N.5) Add mainStackView to the view hierarchy.
We start our application and see the interface as in Fig. one
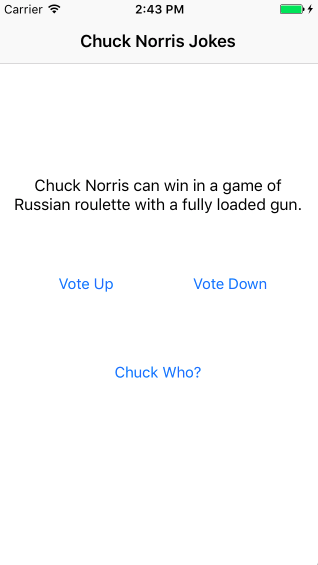 Fig.1 Interface of our application with added voting buttons
check that when voting for a joke or against it, the following messages are displayed in the console:
345 bytes. Voted Upor
345 bytes. Voted Downindicating a successful POST request to the server.
We wrote an application to get jokes using the icndb API and the HTTP verb GET. We were able to show these jokes on UIView and every joke can be appreciated. These actions send a POST request to the remote server, which should save our evaluation.
Use webViews to display web pages
We will add a webView to display the Wake page on Chuck Norris. She gets tangled by pressing a button.
In the WebViewController.swift file, we write the following stub functions:
WebViewController.swift import UIKit class WebViewController: UIViewController { lazy var webView: UIWebView = { // (O.1) self.configWebView() }() lazy var toolbar: UIToolbar = { // (O.2) self.configToolbar() }() override func viewDidLoad() { super.viewDidLoad() } func back() { // (O.3) self.webView.goBack() } func forward() { self.webView.goForward() } } extension WebViewController { func configWebView() -> UIWebView { // (O.4) } func configToolbar() -> UIToolbar { // (O.5) } func configConstraints() { // (O.6) } }
(O.1) We create lazy variables for webView
(O.2) and toolbar.
(O.3) Create back and forward methods to navigate through the history of visiting links.
(O.4) We add webView initialization methods to the extension.
(O.5) and toolBar
(O.6) and constraints for the interface.
Now paint the code for each function:
func configWebView() -> UIWebView { let webView: UIWebView = UIWebView()
(P.1) We initialize webView and add views to the hierarchy.
func configToolbar() -> UIToolbar { let toolbar: UIToolbar = UIToolbar(frame: CGRect.zero) // (Q.1) let backButton: UIBarButtonItem = UIBarButtonItem(title: , style: .plain, target: self, action: #selector(self.back)) // (Q.2) let forwardButton: UIBarButtonItem = UIBarButtonItem(title: , style: .plain, target: self, action: #selector(self.forward)) toolbar.setItems([backButton, forwardButton], animated: false) // (Q.3) toolbar.backgroundColor = UIColor.lightGray // (Q.4) self.view.addSubview(toolbar) return toolbar }
(Q.1) Create a toolbar with a zero frame.
(Q.2) Create two buttons to navigate through the history of visiting links. With the names “<“ and “>” and actions related to the corresponding method in the webView.
(Q.3) Add these buttons to the toolbar.
(Q.4) Set the background color, like that of the navigationBar, light gray. And we add views to the hierarchy.
func configConstraints() { self.webView.translatesAutoresizingMaskIntoConstraints = false // (R.1) NSLayoutConstraint.activate([ // (R.2) self.webView.topAnchor.constraint(equalTo: self.topLayoutGuide.topAnchor), self.webView.leadingAnchor.constraint(equalTo: self.view.leadingAnchor), self.webView.trailingAnchor.constraint(equalTo: self.view.trailingAnchor), self.webView.bottomAnchor.constraint(equalTo: self.toolbar.topAnchor) ]) self.toolbar.translatesAutoresizingMaskIntoConstraints = false NSLayoutConstraint.activate([ // (R.3) self.toolbar.leadingAnchor.constraint(equalTo: self.view.leadingAnchor), self.toolbar.trailingAnchor.constraint(equalTo: self.view.trailingAnchor), self.toolbar.bottomAnchor.constraint(equalTo: self.view.bottomAnchor), self.toolbar.heightAnchor.constraint(equalToConstant: 44.0) ]) }
(R.1) Disable autoresizing masks so that they do not conflict with our constraints.
(R.2) For webView, we configure all four sides of the view.
(R.3) For the toolbar, we configure three sides of the view, except for the top, but additionally set the height to the standard size 44.0.
And rewrite the code ViewDidLoad () as follows:
override func viewDidLoad() { super.viewDidLoad() self.configConstraints()
(S.1) Call the setting of constraints (constraints).
(S.2) Safely get the url from the address bar of the Wikipedia page
en.wikipedia.org/wiki/Chuck_Norris(S.3) Create a request from url.
(S.4) And execute this request in webView.
We return to MainViewController and fill it with the method of invoking information about Chuck Norris.
MainViewController.swift func chuckWho() { self.navigationController?.show(WebViewController(), sender: self)
(T.1) When you click on this button on the navigation navigation stack we put a new webView instance.
Fig. 2 shows how webView looks in our application.
 Fig. 2. The final view of our webView