The previous article caused quite a heated discussion and this circumstance convinced me of the need to continue what we call “sharing experience”. So, we stopped at the fact that after the appearance of alternative energy sources in the house, primarily the solar collector, we wanted to measure the parameters accompanying their work. For example, in order to see how the temperature of the solar coolant changes, whether the water in the boiler does not overheat, etc. It is clear that by itself the measurement of something and even the transfer of this information to the place of consumption (telemetry) does not increase comfort or safety, therefore, immediately the item on the remote control of various actuators is added to the TK. In this article I will not provide code listings, detail all technical solutions. My goal is to show the train of thought and the technical decisions made, as well as their result. Anyone who wants to go the same way will still have to solve many problems on their own.
A small lyrical digression.In 2010, together with an inverter / battery, a universal GSM controller-alarm system of the Russian company RADS Electronics appeared in the house. This remarkable universal device was used in addition to alarm functions with GSM notification, also to control the light in the living room, and, most importantly, to control the electric boiler. So, to control the temperature, maintain the temperature, and also to warm up the house in advance, before arrival, I learned a long time ago. The convenience of such systems is quite obvious. However, the controller's capabilities are limited, so the creation of a parallel system was initially laid out in the new “TZ”, even with partially repetitive functions and, of course, with access to information from sensors and control via the Internet.
So the initial requirements emerged:
- Measure the temperature on all 8 boiler pipes and 2 boiler pipes.
- Measure the temperature and humidity of the air in the boiler room where the equipment is mounted.
- Measure the temperature and humidity of the air outside. Someday in the future to implement weather-dependent heating control.
- Manage electric boiler, keeping the old system. The boiler is three-stage, with adjustment of the heating temperature and feedback on the coolant temperature. However, for the purposes of remote control, it is sufficient to turn on / off the heating stages.
- Manage the boiler heater.
- To lay a minimum of wires. Not so much so as not to bother, but because the decoration in the house has already been done.
- Have a user-friendly interface for managing and working with sensor readings. The interface must be available on mobile devices.
And one more small digression.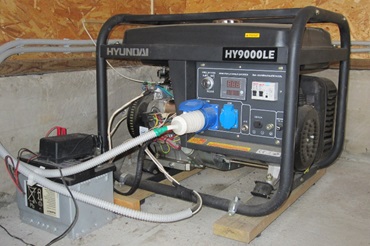 In the photo - a generator with electric starter. For the winter start had to put the car battery and charger. And use synthetic oil.
All in the same 2010 settled in the garage gasoline generator. And an autorun controller added to it shortly, made independently on the basis of an Arduino microcontroller. The controller looks not only at the availability of 220V, but also at the signal from the inverter about the discharge of batteries, and the inverter itself provides automatic input of the generator. All this allowed us to implement a fairly intelligent generator control algorithm. In general, there was no fear of using microcontrollers, both in terms of connecting peripherals, and in terms of programming. In the past, I programmed a lot in C / C ++.
Requirements, in general, are simple, if not trivial. There are thousands of different ways to implement them. And that is why the cornerstone is the choice of architecture and technology stack, on which the new system will be built. Here a systemic approach is just important, an understanding of the fact that individual technical solutions must be linked to each other, an understanding that the system will certainly expand further, as has already happened with the house's power supply system. And more important is the understanding of their own capabilities. Therefore, I had to google, to take "the help of the hall" and "call a friend."
On the photo of Arduino Nano and nRF24L01 + with antenna
 Watching started with systems based on the widely accepted standard Z-Wave, this greatly influenced further decisions, although Z-Wave was at first discarded. Since Z-Wave is an obvious choice for requirements that are close to mine, it is important to understand why it was dropped. First, of course, the cost of one sensor. And I only need to measure the temperature on the boiler at 8 points, each point is obtained at 3000+ rubles. Secondly, the form factor of standard sensors, which does not allow to apply them on the boiler pipes. Thirdly, the limited choice of control systems and remote access, which, moreover, are all proprietary (should be read: “limited”) and paid. However, the very idea of a self-organizing network with the possibility of both peer-to-peer communications (associations), a sensor-actuator, and a centralized server-client management system is very attractive. On the advice of a friend, I entered an interesting project , which initially looked like an extension of the functionality of Z-Wave systems based on Vera controllers, but using a DIY approach. The project used Arduino, 2.4GHz wireless transceivers nRF24L01 + and the corresponding library. All together is just what you need under my requirements. Using the Arduino opens up virtually limitless home automation for money, an order of magnitude (!) Less than in the case of Z-Wave. It is also important that the Arduino is an exceptionally stable platform. The generator automatic start controller, which was once assembled on the Arduino, has been working flawlessly for 7 years. Given the experience of development, soldering and programming, I stopped at this project.
And even went further. The code generally refused to bind to Vera. Instead, he chose one of the program controllers recommended by the author of the library mysensors. He, after studying the forums and websites of manufacturers, became open source project openHAB . The decisive factor, in addition to openness, cross-platform, embedded powerful rules language, the presence of mobile customers, was the following claimed property: “a vendor and technology agnostic”. This is exactly what a system-thinking IT specialist needs: the possibility of expanding the system in the future, the use of components from different manufacturers and standards, with the most suitable for specific purposes. Those. from the very beginning there was an understanding that not everything needs to be done on the Arduino and not everything is possible within the boundaries of Z-Wave. At the same time, I decided to adhere to the centralized control logic, which is quite natural for a start. Those. on terminal devices assembled on the Arduino, there will be minimal business logic: turning on / off the light from antique conventional mechanical switches, which become simply sensors, reading and converting information from sensors of physical parameters, transferring data to the server, receiving and executing commands from the server. I do not plan a direct interaction between the nodes of the network of devices. All real business management logic is based on openHAB rules. Now there are mere trifles - to choose a hardware platform and an operating system for the server part, under openHAB.
Many DIY developers use openHAB Raspberry Pi. And this is an excellent solution, cost-effective, compact and silent. However, it seemed to me to limit myself in computing power, because I immediately decided to use the future server as a multifunctional device, for example, on it I wanted to deploy the Kodi media center and, possibly in the future, something else, for example, a software DVR. Looking ahead, I will say that as a result, Kodi is integrated with the smart home, when you start the video - the lights go out, when stopped - it lights up. Yes, and the DVR also appeared and also integrated. At the same time, I have no special requirements for multimedia components, it is enough that the server has HDMI and S / PDIF. In general, in the fall of 2015, the choice fell on Hystou's fanless nettop (see AliExpress): Intel Core i7, 8GB, 256GB SSD, 8 USB ports, including 4 3.0, 2 LAN, WiFi, 2 HDMI, S / PDIF, Card reader in general, everything you need for the happiness of DIY-box. Then he cost about 24 tr. I have never regretted my choice, although I must say that WiFi does not work very well for him. But the experience that followed all this confidently says: wherever it is possible to lay wires - to lay wires. The radio channel, regardless of the standard and frequency (WiFi, Z-Wave, 433 MHz, 869 MHz, 2.4 GHz, etc.) is always worse than the wire. Therefore, the nettop is eventually connected to the home LAN with a wire. And several more different systems settled on it.
As for the server OS, I would recommend stability and predictability. Linux distributions with a large community have this feature. I am accustomed to Ubuntu. Although, thanks to cross-platform, everything can be done on Windows.
So, the architecture and stack are selected. We act.
 Task 1. Select sensors and actuators. The temperature of the coolants and water will be measured on the pipes of the boiler and boiler. To do this, we take the DS18B20 1-wire sensors in a metal sealed case, it is convenient to mount them directly on the pipes, from the outside. And the pipes themselves with the sensors on top cover foam insulation for pipes. When there are many sensors of the same type, the 1-wire bus is very convenient. To measure the air temperature and humidity in the boiler room and on the street, choose DHT22, simply because it is the standard DIY choice. Manage the boiler separately by steps - using ordinary five-volt mechanical relays, also familiar to DIY-boxes. It is important to note that these relays are connected in parallel to the stage switches on the boiler, and not the relays of heating elements that are controlled by the automation of the boiler. All of the selected peripherals are either directly programmed directly, like a relay, for example, or have the appropriate libraries for Arduino, like 1-wire / DS18B20 / DHT22. No complications.
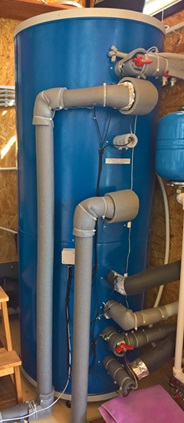
In the photo the boiler 300l. It can be seen that a black wire with a sensor at the end fits into each nipple, they are combined in the white box and the common white wire 1-wire goes to the controller.
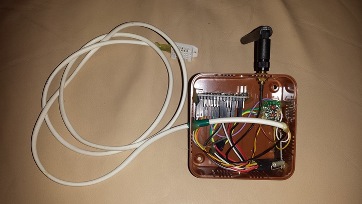
Task 2. Exchange of data and commands with openHAB. I had to tinker a bit, because I’ve never had an openHAB with you. The mysensors architecture implies the presence of a gateway (gateway) to connect to the central controller / server, i.e. to openHAB.  CAM gateway is a physically separate controller on the Arduino / nRF24L01 + and can connect to the server via LAN / WiFi or Serial. Since I am at the beginning of the journey, I select Serial and place the gateway next to the server. Gateway is used to route messages sent over the mysensors network through the gateway and directly communicate with the central controller, openHAB. Messages mysensors have a fixed format and easily parted. Add to openHAB binding Serial to connect the gateway via USB and write a rule for parsing messages from devices on the mysensors network received via USB from the gateway. The basis of the openHAB rule, which parses messages, is the code found on the mysensors forum. Next, we write the rules for the actuators - the relay controlling the boiler, boiler heating element, light, etc.
In the photo - gateway, a small brown box with an antenna on the speaker.
About openHABopenHAB is an open solution; it is expanded with the help of the community by developing bindings to specific devices with which openHAB will interact. For example, for interaction with devices via USB there is a binding serial. Similarly for other devices or protocols, such as Modbus, NTP, HTTP, Squeezebox, Kodi / XBMC, Z-Wave, ZigBee, Nest, and so on. I myself participated in the development as an active tester of Modbus binding.
 While fiddling with connecting the gateway to the openHAB server, I decided to modify the gateway code (and the gateway itself) taken from mysensors.org and add the DHT22 temperature and humidity sensor and the BMP180 atmospheric pressure sensor to it, and at the same time found the source code to predict the weather from the atmospheric dynamics pressure. All these measurements and predictions are passed to openHAB.
In the photo gateway from the inside. On a white wire - DHT22, a board with loose pins - Arduino, on the bottom right - nRF24L01 + and BMP180.
Task 3. Interface and remote access. openHAB is a fully customizable system, including interface markup. And this markup is the same, both for normal access through a browser, and through a mobile application. Universal markup, of course, can not be perfect, but on the smartphone it looks good, and this is important. It remains to decide how to access the openHAB server outside the local network. First, you can (and what is important, optional) use the myopenhab.org cloud. The openHAB server connects to the cloud directly using special binding. This solution is the simplest and provides the full functionality of system management, except perhaps the transfer of video from ip-cameras. Secondly, for those who do not like the cloud, and I am one of them, there are the usual means of remote access, for example, a combination of VPN + VNC, etc. I will not disclose details for understandable reasons, especially since this question does not relate directly to the topic of the article. I note only that the openHAB mobile client is configured for two addresses. It goes to the first one if it sees the openHAB server at this address, and the second if it doesn’t. This is a very convenient feature of the interface. For example, you can specify a cloud address as the second address, and then openHAB is always available without additional manipulations with the VPN connection. Or specify a virtual address obtained using a VPN solution. Or something else.
| Interface home screen | Scrolling down the start screen | Open menu item "Light" |
|---|
 |  |  |
The markup allows you to do conditional formatting, for example, to highlight the red temperature when it exceeds the value specified in the markup. Some items are opened by pressing, for example, "Heating", "Light", "Siren", etc.
That's all. We take in hands one by one, a soldering iron, then a keyboard. And gradually, the first version of the system takes shape. As you know, the appetite comes with eating. As a result, new sensors and even new controllers are added to the first version of the system, for example, to automate a guest house. As a result, at the first stage, a system was introduced that:
- Measures temperature at 16 points.
- Measures humidity at 4 points.
- Measures the voltage of 220V at the entrance to the house, to the stabilizer.
- Measures the illumination on the street. Illumination is used to automatically turn on the light.
- Measures atmospheric pressure and makes weather predictions based on pressure dynamics.
- Detects motion at several points.
- Manages all the lights in the guest house. Switches turned into sensors.
- Manages the sirens.
- Manages separately 3 steps of electric boiler, retaining the functionality of the old system. Manages the boiler heater.
- Checks the presence of voltage on the boiler and boiler heating element, as well as reads the facts of the inclusion of boiler boiler heaters. This is important because, firstly, the boiler has feedback on the coolant temperature and is able to disconnect the heating elements itself, and secondly, a two-stage load limiting relay is installed in the dashboard, disconnecting the boiler and the boiler in series when the consumption threshold in the house is exceeded. These data will be further used in smart home algorithms. But at this stage I did not know exactly how, only I felt that they would be needed.
- Reads on and off the solar circuit pump.
- Builds temperature charts for the week, day and hour.
- Send push notifications about various events. Events can be practically any, for example, movement on the porch, temperature exceeding a predetermined threshold, loss / appearance of electricity, etc. Made also SMS notification.
- The old system remains physically and logically separated from the new one, although the same sensors are partially reused in the new one. The old system retained the functions of protection and backup monitoring / control system.
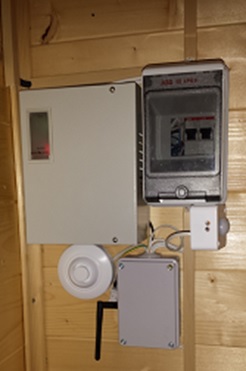
In the photo electrical guest house. A box with an antenna is a controller, a round "washer" is a siren, between them is a DHT22 sensor, under the shield is a motion sensor, on the left is a 12V uninterruptible power supply unit.
An example of the systemEvery 30 seconds, the controller polls the temperature sensors. In case of a change in readings or on request from the server, it sends data to the gateway separately for each sensor. Gateway receives data and sends it via USB to openHAB. In openHAB, the rule is triggered, the message is parsed, the resulting temperature value is assigned to the corresponding item (the basic concept of openHAB). The rule that is configured to change this item is triggered. If any reaction is provided by the logic, for example “if the temperature fell below a certain level”, an action is taken, for example, “to turn on the boiler heating element”. This command is sent via USB to the gateway. Gateway sends a command to the controller over the air, the controller receives the command and turns on the corresponding relay. Returns confirmation of receipt of the command. Something like this is the general scheme of interaction of system components.
Total. The original goals are achieved and even more. Temperatures are measured and visualized on graphs and in the interface. According to the results of observations, it became clear that the temperature of hot water never rises above 55 degrees, and the coolant in the solar circuit is 60, and one does not have to worry about overheating. It is seen that the air temperature in the boiler room sometimes exceeds 30 degrees and the air conditioner must be installed. It has become convenient to control the heating, just touch the virtual switches on the smartphone screen. Further. The light on the porch of the guest house now lights up automatically. But, only if movement is recorded, it is dark enough and the house is disarmed. And if not filmed, then the siren turns on and a picture of the offender is sent to the post office. Similarly inside the house. There were other useful "chips", but more on that in the next article.
A few words about pricing. The most expensive component of the system has become a nettop, around 24 tons. If we restrict ourselves to monitoring and management, Raspberry Pi for 2500r is enough. Arduino on AliExpress costs around 200r, most of the peripheral components (nRF24L01 +, sensors) have the same price scale. The software is free. Although in the future I had to buy some licenses, but more on that in the next article. Those. In general, all this is very accessible.
That for which everything was started.Temperature graph measured on the boiler nozzles. Date - 05/11/2018. It is seen that the temperature in the solar circuit reached 49 degrees. The temperature of hot water up to 38, the temperature of the heating medium heating circuit to 35 degrees. All this is only due to the sun. The facts of turning on the solar circuit pump are fixed on the lower graph in yellow. Other heating equipment was not used. 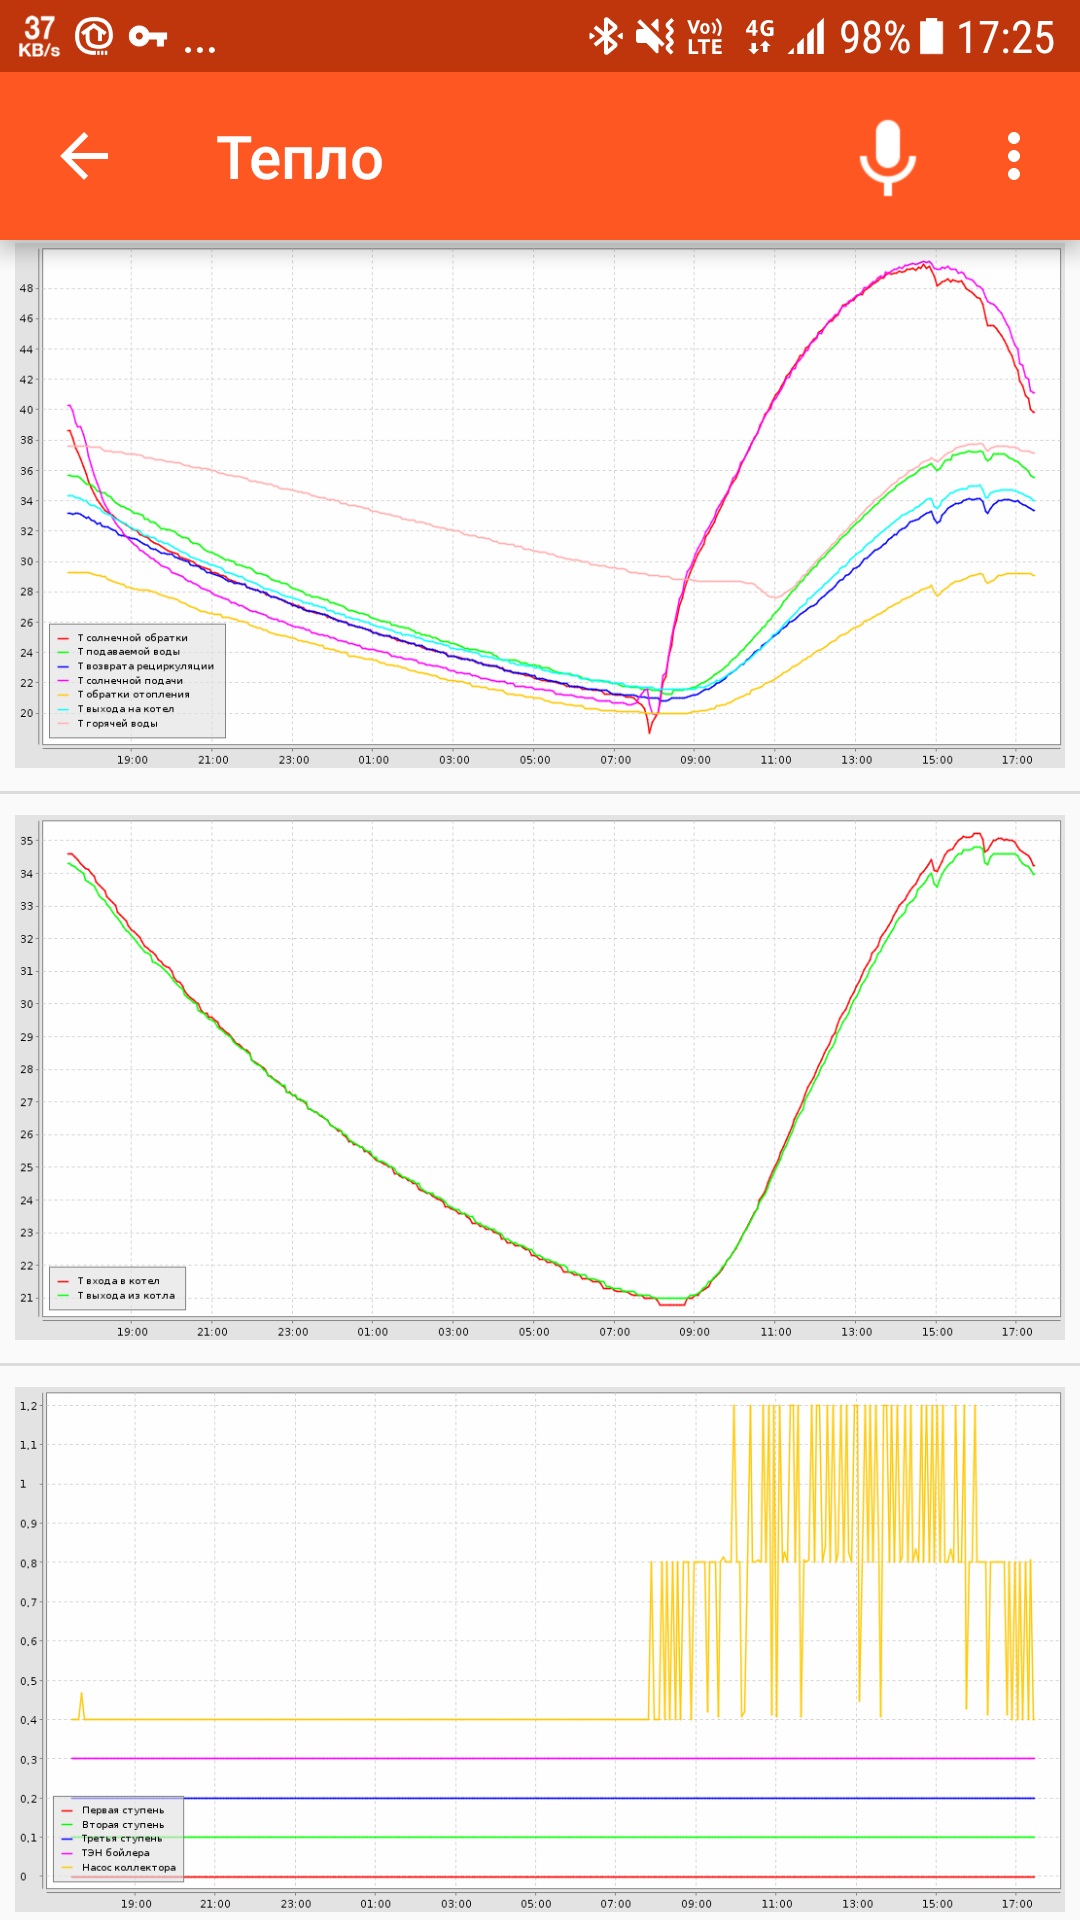
Conclusion There is nothing difficult or incomprehensible to what has been done for an engineer with a broad outlook. Although, some specific skills, such as programming in C ++, are needed for Arduino. But all this can be mastered, just as it is necessary to master the rule language in openHAB. The only resource that is always not enough for such undertakings is time. I win time with seasonality. In the summer and autumn I think what else is missing in a house that has become smart. Come up with or get "order". In the winter evenings I collect a prototype, program, integrate with a smart home. In the spring I physically install and debug. After that - enjoy the result. The described cycle for several years entered the phase of stability.