Note : This tutorial is intended for advanced and advanced users, and it does not cover such topics as adding components, creating new GameObject scripts and C # syntax. If you need to improve your Unity skills, then learn our tutorials Getting Started with Unity and Introduction to Unity Scripting .
In the
first part of the tutorial, we learned how to create a hook-cat with the mechanics of wrapping the rope around obstacles. However, we want more: the rope can turn around objects at the level, but does not come off when you come back.
Getting Started
Open the finished project from the first part in Unity, or download the
project blank for this part of the tutorial, then open
2DGrapplingHook-Part2-Starter . As in the first part, we will use Unity version 2017.1 or higher.
Open the
Game scene from the
Scenes project folder in the editor.
Launch the Game scene and try to hook the cat hook to the stones above the character, and then swing, so that the rope turns around a pair of stone edges.
When returning back, you will notice that the points of the stone through which the rope had previously turned around do not come off again.
Think about the point at which the rope should unfold. To simplify the task, it is better to use the case when the rope is wrapped around the edges.
If a slug, clinging to a stone above its head, swings to the right, then the rope will be bent after the threshold, in which it crosses a corner point of 180 degrees with an edge, to which the slug is currently attached. In the figure below it is shown highlighted green point.
When the slug swings back in a different direction, the rope must again unhook at the same point (highlighted in red above):
Unwinding logic
To calculate the moment when you need to unwind the rope at the points about which it was wrapped earlier, we will need knowledge of geometry. In particular, we can use a comparison of the angles to determine when the rope should be detached from the rib.
This task may seem a bit intimidating. Mathematics can strike terror and despair even in the most courageous.
Fortunately, Unity has excellent math support functions that can simplify our lives a bit.
Open the
RopeSystem script in the IDE and create a new method called
HandleRopeUnwrap() .
private void HandleRopeUnwrap() { }
Go to
Update() and add at the very end a call to our new method.
HandleRopeUnwrap();
While
HandleRopeUnwrap() does nothing, but now we can process the logic associated with the entire edge detachment process.
As you remember from the first part of the tutorial, we kept the position of wrapping the rope in a collection called
ropePositions , which is a collection of
List<Vector2> . Each time the rope wraps around an edge, we save the position of this wrapping point to this collection.
To make the process more efficient, we will not execute any logic in
HandleRopeUnwrap() if the number of positions stored in the collection is equal to or less than 1.
In other words, when the slug clings to the starting point and its rope has not yet been wrapped around the ribs, the number of
ropePositions will be 1, and we will not perform the spin processing logic.
Add this simple
return to the top of
HandleRopeUnwrap() to save precious CPU cycles, because this method is called from
Update() many times a second.
if (ropePositions.Count <= 1) { return; }
Adding new variables
Under this new test, we will add several dimensions and references to the various angles needed to implement the basic unwinding logic. Add the following code to
HandleRopeUnwrap() :
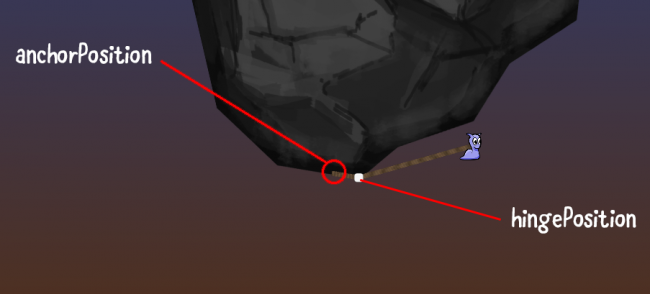
There are a lot of variables here, so I will explain each of them, and also add a handy illustration that will allow you to understand their purpose.
anchorIndex is the index in the ropePositions collection at two positions from the end of the collection. We can consider it as a point in two positions on the rope from the position of the slug. In the figure below, this is the first point of hook attachment to the surface. In the process of filling the collection of ropePositions with new wrapping points, this point will always remain a wrapping point at a distance of two positions from the slug.hingeIndex is the index of the collection in which the current hinge point is stored; in other words, the position in which the rope is currently wrapped around the point closest to the end of the rope from the side of the slug. She is always at the same position until the slug, so we use ropePositions.Count - 1 .anchorPosition computed by executing the anchorPosition reference in the anchorIndex collection and is a simple Vector2 value of this position.hingePosition computed by executing a reference to the hingeIndex place in the ropePositions collection and is a simple Vector2 value of this position.hingeDir is a vector directed from anchorPosition to hingePosition . It is used in the following variable to get the angle.hingeAngle - the useful helper function Vector2.Angle() is used here to calculate the angle between the anchorPosition and the hinge point.playerDir is a vector directed from anchorPosition to the current position of the slug (playerPosition)- Then, using the angle between the reference point and the player (slug),
playerAngle calculated.
All of these variables are calculated using the positions saved as Vector2 values in the
ropePositions collection and comparing these positions with other positions or the current player (slug) position.
The two important variables used for comparison are
hingeAngle and
playerAngle .
The value stored in
hingeAngle should remain static, because it is always a constant angle between a point at a distance of two “rope folds” from the slug and the current “rope fold” closest to the slug that does not move until the rope is unwound or after the fold is not a new fold point will be added.
When swinging a slug
playerAngle changes. By comparing this angle with
hingeAngle , and also checking whether the slug is to the left or right of this angle, we can determine whether the current bend point closest to the slug should be uncoupled.
In the first part of this tutorial, we saved the fold positions in a dictionary called
wrapPointsLookup . Each time we save a fold point, we add it to the dictionary with the position as the key and with 0 as the value. However, this value of 0 was rather mysterious, right?
We will use this value to store the position of the slug relative to its angle with the point of the hinge (the current point of the fold nearest the slug).
If you set the value to
-1 , then the angle of the slug (
playerAngle ) is less than the hinge angle (
hingeAngle ), and with a value of
1, the angle of the
playerAngle greater than
hingeAngle .
Due to the fact that we save the values in the dictionary, each time we compare
playerAngle with
hingeAngle , we can understand if the slug just passed through the limit after which the rope should be unhooked.
This can be explained differently: if the slug angle was just checked and it is less than the hinge angle, but the last time it was saved in the dictionary of fold points it was marked with a value denoting that it was on the other side of that angle, then the point should be deleted immediately !
Rope release
Look at the screenshot below with notes. Our slug clung to the rock, swung up, wrapped the rope around the edge of the rock on the way up.
You can see that at the highest swinging position, where the slug is opaque, its current closest bend point (marked with a white dot) will be stored in the
wrapPointsLookup dictionary with a value of
1 .
On the way down, when
playerAngle becomes less than
hingeAngle (two dotted green lines), as indicated by the blue arrow, a check is performed, and if the last (current) value of the bend point was
1 , then the bend point needs to be removed.
Now let's implement this logic in the code. But before we begin, let's create a blank of the method that we will use for unwinding. Due to this, after creating the logic, it will not lead to an error.
Add a new
UnwrapRopePosition(anchorIndex, hingeIndex) method by inserting the following lines:
private void UnwrapRopePosition(int anchorIndex, int hingeIndex) { }
Having done that,
HandleRopeUnwrap() go back to
HandleRopeUnwrap() . Under the newly added variables, add the following logic, which will handle two cases:
playerAngle less
hingeAngle and
playerAngle more
hingeAngle :
if (playerAngle < hingeAngle) {
This code should correspond to the explanation of the logic described above for the first case (when
playerAngle <
hingeAngle ), but also handles the second case (when
playerAngle >
hingeAngle ).
- If the current bend point closest to the slug is set to 1 at the point where
playerAngle < hingeAngle , then we remove this point and perform a return so that the rest of the method is not executed. - Otherwise, if the bend point was not last marked with the value 1 , but the
playerAngle less than hingeAngle , then the value -1 is assigned. - If the current bend point closest to the slug is -1 at the point where
playerAngle > hingeAngle , then remove the point and return. - Otherwise, we assign the dictionary entries of the points of the folds in the hinge position the value 1 .
This code ensures that the
wrapPointsLookup dictionary
wrapPointsLookup always updated, ensuring that the value of the current fold point (closest to the slug) matches the current slug angle relative to the fold point.
Keep in mind that the value is -1 when the slug angle is smaller than the hinge angle (relative to the reference point), and 1 when the slug angle is larger than the hinge angle.
Now we will add
UnwrapRopePosition() in the
RopeSystem script
with the code that will be directly engaged in uncoupling, moving the reference position and assigning the distance value of the Rope DistanceJoint2D to the new distance value. Add the following lines to the previously created disc of the method:
- The index of the current reference point (the second position of the rope from the slug) becomes the new position of the hinge, and the old position of the hinge is removed (the one that was previously closest to the slug and which we are now "spinning"). The variable
newAnchorPosition assigned the value anchorIndex in the list of positions of the rope. Further it will be used for the location of the updated position of the reference point. - The RigidBody2D of the rope joint (to which the DistanceJoint2D of the rope is attached) changes its position to the new position of the reference point. This ensures a smooth, continuous movement of the slug on the rope when it is connected to DistanceJoint2D, and this connection should allow it to continue to swing relative to the new position that has become the reference position — in other words, relative to the next point down the rope from its position.
- Then you need to update the DistanceJoint2D distance value to take into account the sharp change in the distance from the slug to the new reference point. If this has not yet been done, a quick check of the
distanceSet flag is performed, and the distance is assigned the value of the calculated distance between the slug and the new position of the reference point.
Save the script and return to the editor. Start the game again and watch the rope unhook from the ribs when the slug passes the threshold values of each fold point!
Although the logic is ready, we will add some helper code to
HandleRopeUnwrap() right before comparing
playerAngle with
hingeAngle (
if (playerAngle < hingeAngle) ).
if (!wrapPointsLookup.ContainsKey(hingePosition)) { Debug.LogError("We were not tracking hingePosition (" + hingePosition + ") in the look up dictionary."); return; }
In fact, this should not happen, because we redefine and detach the cat hook when it wraps around one edge twice, but if it does happen, it’s not difficult for us to exit this method with a simple
return and an error message in the console.
In addition, thanks to this, we will more conveniently handle such limiting cases; moreover, we get our own error message when something unnecessary happens.
Where to go next?
Here is a
link to the finished draft of this second and last part of the tutorial.
Congratulations on this tutorial series! When it came to comparing angles and positions, everything became quite difficult, but we survived it and now we have a great cat-hook and rope system that is capable of being wound on objects in the game.
Did you know that our Unity development team wrote a book? If not, look at
Unity Games By Tutorials . This game will teach you to create four ready-made games from scratch:
- Two shooter shooter
- First Person Shooter
- Tower defense game (with VR support!)
- 2D Platformer
After reading this book, you will learn how to create your own games for Windows, macOS, iOS and other platforms!
This book is intended both for beginners and for those who want to improve their skills in Unity to the professional level. To master the book you need to have programming experience (in any language).