This is the second part of the story (mixed with a story about my mistakes and their solutions) about how I (about two years in my spare time) developed a mobile application (for iOS / Android) that would motivate my daughter to solve math examples. In the end, it turned out the application that allows the child to make money with his mind.
Read the first part here .
Second part plan
- About writing code
- About version control
- About voice acting
- About icon
- About the Android build and size
- About the iOS build and size
- About the name and promotion
- Statistics
- What regret
- What did you understand
- Links
Little things in programming that make my life easier
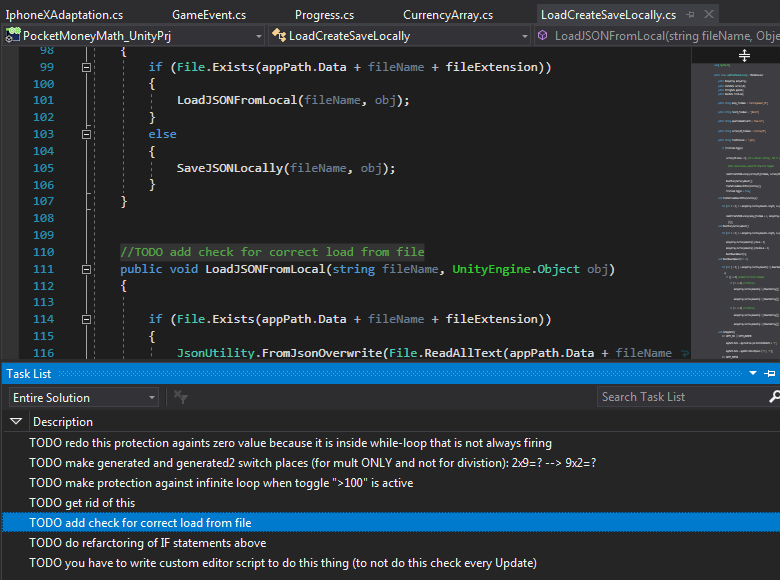
- Even with Mono I continue to use // TODO (in the comments) for marking places that need to be improved. Then, all these places can be conveniently monitored on the Task List tab (Ctrl + \, T is called):
- Recently, I started using such a feature as #region to, for example, hide areas of variable enumeration:

- it is convenient to wrap a part of the code with some constructions using the hotkey sequence Ctrl + K, Ctrl + S. For example, I select a part of the code that I need to put inside if and press Ctrl + K, and then immediately Ctrl + S, I enter the name I need the operator (if) and press Enter.
- very easy to work with the code, if you follow a single style, for example, as here - C # Style Guide with Unity in mind .
- I am very glad that I made friends with Coroutine (Coroutine) - if it is rough, such functions that stretch their execution into several frames. Those. they do not attempt to perform any task in one frame (calculating it for half a second, thereby lowering the speed to 2 FPS), but do a little in the first frame, a little in the second and so on, so that the game does not slow down. Their other purpose is to do something that you don’t need to do right in each frame (for example, to check something 3 times a second).
The example below shows a traffic light corute, which infinitely (every ten seconds) lights up yellow, red, green light in turn:
IEnumerator TrafficLights() { while (true) { yield return new WaitForSeconds(10f); yield StartCoroutine(this.GetComponent<Lamp>().BlinkYellow()); yield StartCoroutine(this.GetComponent<Lamp>().BlinkRed()); yield StartCoroutine(this.GetComponent<Lamp>().BlinkGreen()); } }
If it is in human language, the yield instruction tells Unity to transfer the execution of the function to the next frame (as many times as necessary) until it is executed, and then proceed to the next yield instruction. So Korutina TrafficLights will run like this:
- first waiting 10 seconds (first yield)
- then BlinkYellow's corutin starts (second yield) and until it completes, BlinkRed's corutin does not start,
- on completion of BlinkYellow BlinkRed is launched,
- on completion of BlinkRed BlinkGreen is launched,
- then the cycle repeats from the beginning (see point 1).
Version control, well, just really necessary!
The video that helped me start using GitHub in conjunction with Unity - How to use GitHub with Unity .
Despite the fact that I myself (alone, without a command) write code, I realized that I simply need to control the versioning of the code:
- I stopped being afraid to make some dramatic changes in the code that could mess up the project.
- It is very easy to return to the previous working condition.
- Conveniently compare files with code.
- You can clearly see what has changed in the code.
- No matter what happens to my computer - I always have a backup version in the cloud.
That's just when working with version control, you need to train yourself to commit (post updates) in very small portions. So that I didn’t have my first, I changed 20 files, added a ton of new functionality and zakomitil it all at once under the name “Fuh, now it finally works”.
It is good that I once figured out that it is better not to add cache files (Library folder), temporary files (tmp folder, obj folder) to the repository, and all that Unity generates on the fly. In fact, only the Assets and ProjectSettings folders had to be added to the repository.
It is not necessary to use GitHub, because its disadvantage is that in a free account it is impossible to make the code private (visible only for yourself). But there is a GitLab or Bitbucket , where possible.
How I tprprrruhal into the microphone
I perceive my application as educational and try, if possible, not to use distractions. Therefore, sometimes users complain, for example, about the lack of music or a very simple interface (although a simple interface is not because I wanted it, but more because I don’t know how to do it better). With music, I’m a bit at a crossroads now: and I want to add and prick (it’s unlikely teachers would approve homework in math to music).
Music, music, but without voice acting is impossible. At first, I searched for the sounds I wanted among free-of-charge, but then I realized that it took longer to search than if I did them myself. Therefore, I simply created most of the sounds with my mouth into a telephone microphone, and then processed it with Audacity (a free multiplatform software for recording and editing audio, which I used to convert audio from one format to another).
Most often, the sound effect creation logic in Audacity was as follows:
- Cut off all unnecessary.
- Used effect Noise Reduction (to remove noise from the recording).
- Added wahwah effect to cartoony sound.
- The effects of Bass and Treble played with frequencies, so that the sound sounded more delicious on the speakers of smartphones.
- If I said something, then by the effects of Change Pitch, Speed and Tempo changed the sound of your voice to Chipmunk.
At first, my sound was far behind the event (not in the editor, but on the smartphone). The DSP Buffer Size option set to Best latency mode (Edit -> Project Settings -> Audio) and these tips helped (both in the question and in the answer).
How Daughter Generated Icon Ideas
While I was developing the application, I tried to create the icons myself several times, but none of them got accustomed (and in truth, some sort of dimness came out). Therefore, when it came to open publication, I commissioned the development of an icon for my daughter. I explained to her that the icon should be attractive and explain the meaning of the application. She came up with great enthusiasm and instantly drew a completely unsuitable picture. I rejected it and explained what exactly needs to be improved or not to use at all. Then everything went as expected - she was offended and stopped drawing icons.
After half a month, the insult passed and she approached the task more thoroughly: she cut squares from a notebook into a cell (in size as an icon on the screen of her iPod) and started drawing options one by one:
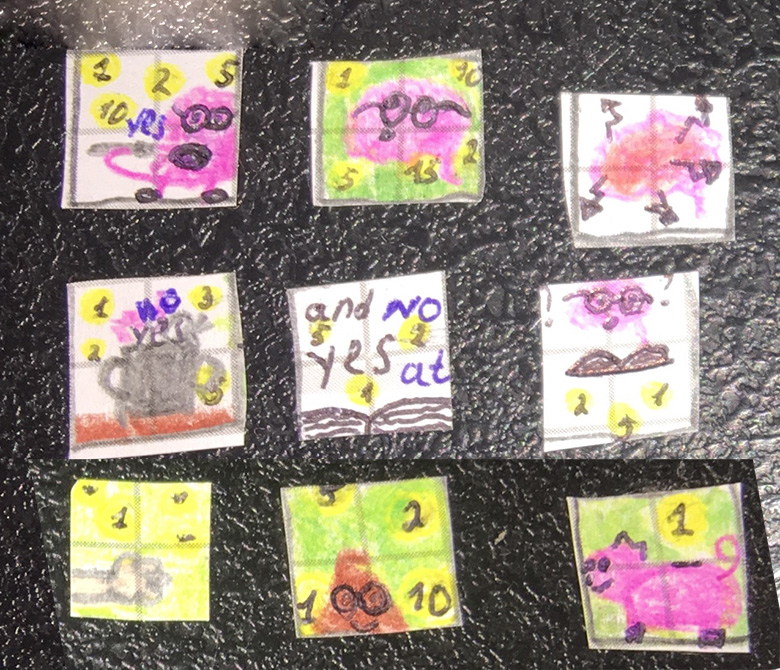
Brought me. I chose the ideas I liked. He said in which direction to move on. She went to draw the following options. Two days and three dozen options, we stopped at the lower right (photo above).
Next, I asked my daughter to draw an enlarged version of the icon (the first on the left in the figure below), which I digitized (the second on the left) and ... called a familiar artist to help me with the color selection. As a result, the central version was obtained. Then I gradually began to grind the icon (second from right) throughout the life of the application in stores. And now it looks like the extreme right:

Build under Android
With the creation of my first apk-file, this Unity Android Build-How to video helped me figure it out, which tells you how to set everything up without installing a heavy Android Studio.
I repeat that I do not have devices with Android (I just ask my friends to test after the new build) and therefore there were no errors with the devices shown in the video.
But without a hitch it still wasn’t. I had to tinker with the update of the Android SDK for a long time, since Unity did not want to work with the latest updates. As a result, it turned out that it was necessary to allow Unity to choose and install the necessary version of the update. Those. I just clicked the Update Android SDK button in Unity itself, and did not try to update everything myself, as shown in the video.
Problem when updating the Android SDK manuallyUntil I figured out that I needed to be updated from under Unity, I suffered for a long time, manually updating using the sdkmanager.bat script (you need to use this script with the --update parameter, and not the android.bat that is specified in the video). During the update, he complained that he could not overwrite the tools folder (from which he himself started). I tried a bunch of tips and I do not even remember what helped, it seems like some kind of solution with symboli links.
I also got strange errors related to java. It turned out that the problem with the version of Java Development Kit - it also did not need to install the latest version. I tried a few old ones and on one of them the errors disappeared and it all worked.
With the signature of apk-ashk for publication on Google Play, I was helped by the video How to sign a Unity app for the android market . I saved and saved these two passwords well, because they need to be entered each time you create a new build. And if you lose them, you will not be able to update the application (just release a new one with new keys).
The icon, unlike the iOS version, needs to be initially made with rounded corners, otherwise on some devices, it will remain perfectly square.
Android build size
Now my apk-file size is 22MB.
I have well reduced the size of the assembly using a lossy texture / sprite compression format — RGBA Crunched ETC2 (for alpha sprites) and RGB Crunched ETC (for textures without an alpha channel). The main thing was to set Compressor Quality = 100 (this parameter does not affect the speed of the textures on the end device, but only on the quality of the texture and the speed of compression in the editor).
Any other dances with tambourines did not allow me to achieve any significant reduction in the size of the apk-file (except for some of the nuances described below).
Now I use the following ..
.. settings from Player Settings ..
.. for the minimum size on the one hand and the maximum coverage of devices on the other:
- Unity 2018.1 (the newer the version, the better it packs and the more all sorts of goodies).
- Auto Graphics API (Unity chooses OpenGLES2 and 3 itself).
- Scripting Backend - Mono (it may not be faster than the IL2CPP, but the assembly is unambiguously smaller).
- Target Architectures - ARMv7 and x86. By removing support for Intel x86, I reduced the size of apk by another 10MB (it would be 12MB). But I do not know how many devices I cut off by removing this checkmark. What I know is that for this architecture, phones have not been produced for two years already. And those that were can be counted on the fingers of one hand (the last ones that I know are Asus Zenfone, Lenovo K 900, Xolo x1000 and there may still be some). Correct me, please, in the comments, if I carry nonsense.
- Stirpping Level - Strip Assemblies - safely cuts off unnecessary code. Other options can and do some gain for the size (I did not notice at home), but not so safe.
- Build System - Gradle (allows you to activate the Minify option).
- Minify - Proguard - shortens the names of all classes and variables to save on the amount of miserable bytes, but, as a bonus, makes the code less readable for the obstacle of reverse engineering.
Build under iOS
I collect the application on my wife's MacBook (I remember, they took the cheapest MacBook Air of 2015).
To compile under iOS 7 even in XCode version 9.3, it was enough to manually drive in the value 7.0 in the Deployment Target field (on the General tab).
To add languages (to which I transferred the application using Lean Localization) to the application description in the AppStore, you had to add the following lines to the info.plist file (at any place, for example, immediately after <dict>):
<key>CFBundleLocalizations</key> <array> <string>English</string> <string>Russian</string> </array>
Now I use Unity 2017.4 for building on iOS (as I wrote above, I need iOS 7 support, otherwise I would use 2018.1).
IOS build size
Now the size of the downloaded file under my iPhone is 44 MB.
Unfortunately, under iOS, I cannot use Crunched sprites, as they are not supported on devices older than iPhone 5s ( without the support of Metal and OpenGL ES 3.0 ).
When I tried to reduce the size of the build at any cost, the smallest size (34 MB) was obtained if:
- use Unity 2018 (i.e., the minimum supported version is iOS 8),
- Graphics API select only Metal,
- leave Target Architectures only x64,
- use crunched textures.
But I still haven’t figured out at all how to work with app thinning - this is such a thing that allows appstore to automatically build my application for a specific end-user’s iPhone / iPad / iPod (which reduces the size of the downloaded file). I just managed to bookmark my articles to jot down:
My Player Settings I want to share:
- It’s convenient to enter the Automatic Signing Team ID once (you can get it on the Apple Developer website here Account> Membership ) and tick Automatically Sign to not do this every time in XCode.
- I set the Accelerometer Frequency to Disabled (I disabled the accelerometer), since I do not use it. Can save people a little battery.
- Behavior in Background - Suspend - this way the application does not close when you press the Home button, but continues to work in the background (you can catch this event using OnApplicationPause to save the game, for example).
How I chose the name and what I used to promote
How many used Booking and TripAdvisor, but never noticed that their name in the AppStore is not just Booking, but “Booking.com Travel Deals” and “TripAdvisor Hotels Restaurants” (the name is diluted by keywords so that these keywords found in search of an apstor). So I decided not to use the old name Math4Ami, but for a long time I played with different wording to include the keywords I needed. As a result, I first came to Pocket Money: Math, and later to Learn Math & Earn Pocket Money. In Russian, these options sounded like "Pocket money for mathematics" and "Pocket money and mathematics: learn and earn."
I promoted my application by sending / publishing links to it to friends and acquaintances, I wrote two articles on my blog and hung up the banner there.
By the way, if you put this line in the <head> web page:
<meta name="apple-itunes-app" content="app-id=1372434662" />
.. then, opening this page on the iPhone, everyone will see at the top of the banner of your application.
Download statistics
First I released the iOS version.

Many people talked about dislike for apple devices and convinced that Android is much cooler. I decided to check and, after 20 days of proceedings with the assembly of the apk-file, made a release on Google Play.
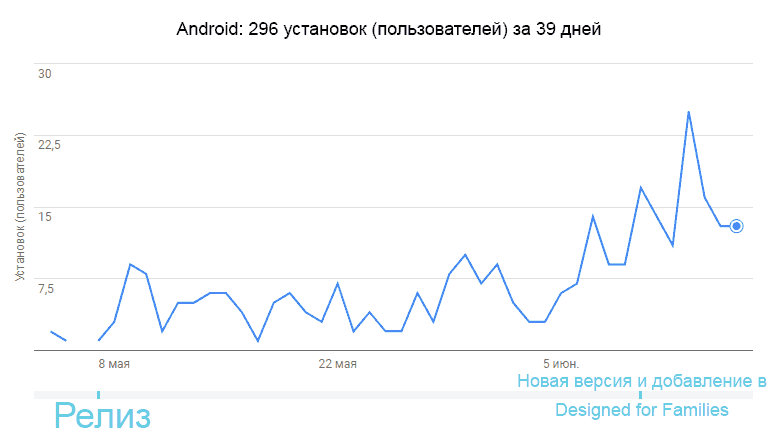
Objective conclusions can not be made here (or none at all), but purely subjective - I expected more from the Google platform, but at the moment it turned out to be half as bad as Apple.
I regret that:
- did not make backups when upgrading to a new version of Unity,
- did not use a version control system (like git),
- tried to work with Perforce (just a terrible system - it unrealistically slows down the development),
- haven't used ScriptableObject (SO) before - this is so cool
- I wrote the code in one long sheet (it’s scary to remember how I refactor this sheet),
- I did not know what code smells are , but oh, how it was necessary to know about them,
- I tried to use global variables everywhere, not local ones (paranoidly thinking that if I frequently request a function, the local variable inside the function will be created again and again, and there would be only one global variable. As a result, after hundreds of function calls with local variables, I would have a lot of wasted memory and performance loss due to the Garbage Collector),
- He did not always adhere to a single style in the code and in the name of all assets. Here is a good role model for UE4 (there are a lot of useful things about asset naming and I also use it in Unity),
- I forgot that I am writing an application primarily for my daughter, and not for the sake of beautiful code or for the sake of other users.
I realized that:
- the children are very easy to sit down on my application (immediately after installing the application, they can hang for hours in it until the battery on the phone sits down),
- children are demanding to do math in my application, even if they don’t talk about money. If there are two children in the family, it even reached the fights for the phone, in order to solve examples,
- Children are very bored with my application. The next day, rarely anyone played in the application, even if the child knew that he would receive money for it,
- poor retention of the user / child is not exactly the problem of my application specifically, but the specificity of teaching children (this was told to me by the school teachers). The application should be very diverse, in order to keep the interest of the children at all times,
- quite often, parents and children misinterpret the principle of the application and think that by solving examples they will receive money from me (from the developer). I received various letters with questions like: how to withdraw money, whether it is possible to withdraw to webmoney or paypal, where to indicate the address for sending money by check, etc.,
- if in responses to bad reviews apologize for their mistakes and oversights (and also to explain how it should work in reality), then people tend to forgive mistakes and remove bad grades,
- on your own free promotion you will not go far,
- Children grow up very quickly and while I was writing the app - my daughter had already outgrown it. But, my new “tester” is growing up!
Links
List of links from the article in the order of their mention:
+ How to keep a single code style C # Style Guide with Unity in mind .
+ GitHub and a video on how to tie git to Unity .
+ Free private repository is on GitLab or Bitbucket .
+ Free Audacity to record and edit audio.
+ How to remove the delay sound .
+ Unity video tutorial Android Build - How to .
+ Video How to sign a Unity app for the android market .
+ Apple devices supporting Metal / OpenGL ES 3 .
+ App thinning (Apple documentation).
+ App thinning (Unity help).
+ AssetBundle Workflow (Unity documentation).
+ Team ID .
+ .
+ / UE4 .
, !