
One of the useful (in my opinion) features of iOS 12 presented at WWDC 2018 is Siri Shortcuts .
Shortcut ( English shortcut ) - a quick command, a short way to perform any action to bypass the standard script.
In your applications, you can attach shortcuts for some actions. Learning how and when the user performs them, Siri starts rationally, at the right time and place, offering him these shortcuts and, what is the coolest, the user will be able to call them with phrases that he will tie to them! Under the cut more.
How it works
We use applications that, under certain actions, create and deliver shortcuts to the system.
You can see these shortcuts in " Settings → Siri and search ."
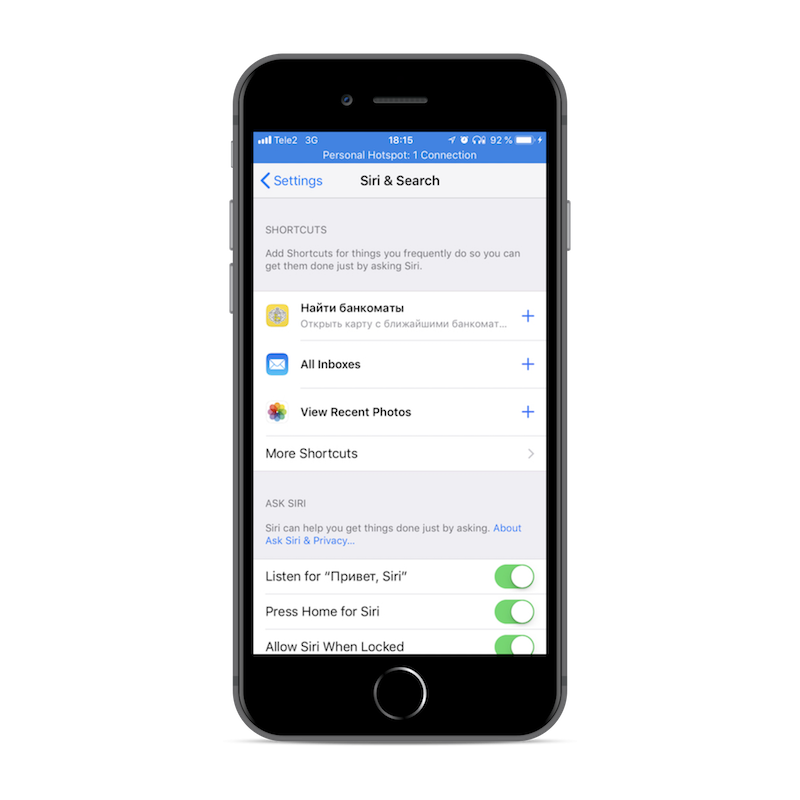
The screenshot above shows the last three shortcuts that the system has caught from different applications. If we click on the “More shortcuts” button, we will see all shortcuts delivered to the system by each application.
With certain settings in the shortcut creation code, Siri will offer these shortcuts to the user on a locked screen, in the notification center and search, focusing on how often we use these actions, at what time, on what days of the week, and on other factors.
For example, if on Friday evening you usually look for ATMs, then having studied, on Friday evenings Siri will offer you a shortcut with this action.

To each shortcut, we can add our own voice command, if we click on the " + " icon.
We pronounce the voice command, click "Done", and now we can perform the action behind the shortcut with the help of voice through Siri. It turns out that the user can perform part of the functionality of your application through Siri, without opening the application itself. The shortcut with the phrase is preserved in "My shortcuts".
Creating shortcuts
For development, we need Xcode 10 and iOS 12. At the time of this writing, both of them are at the Beta stage.
Shortcuts can be created either through NSUserActivity , or through Intent .
The first case:
The user clicks on the shortcut, which sends the command with parameters ( NSUserActivity ) to our application, and it decides how this command should be processed (open the current USD NSUserActivity rate window, or our favorite pizza order window). This is the good old Spotlight shortcut, which we all know, but cleverly suggested by Siri.
Second case:
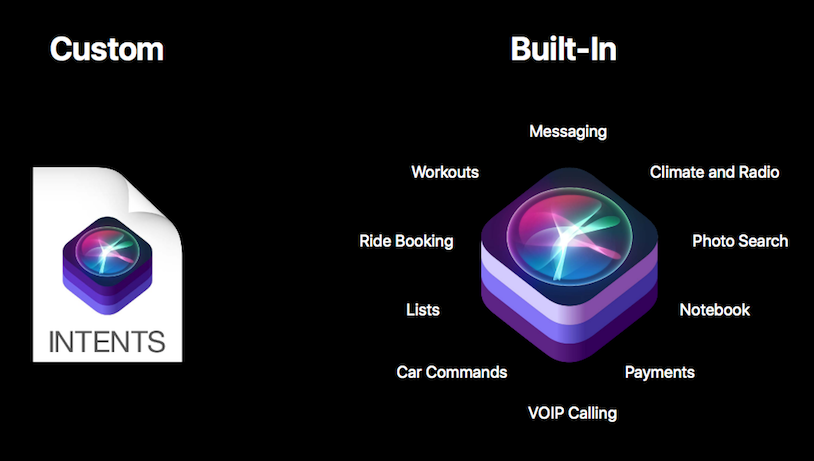
Shortcuts created via Intent more interesting - they allow you to execute the command immediately in the Siri interface, without launching your application. Previously, the set of Intent was hard-coded by Apple: money transfer, message sending, and others . Now, we, developers, have the opportunity to create our own Intent 's!
Regardless of how the shortcut was created - it goes through 3 stages of its life cycle:
- Announcement ( Define )
- Delivery to the system ( Donate )
- Application Processing ( Handle )

My research has shown that one application can deliver no more than 20 shortcuts to the system.
Next, we consider how to bestow our application with the ability to create shorts and how to work with them within it.
Creating shortcuts through NSUserActivity
Let's sort the first, simple type of shortcuts which open through NSUserActivity .
For example, in the mobile bank application we have an ATM search screen and I often search for them. In order to get to the screen with an ATM card, I have to start the application, go to the "More" tab in the tabbara, select the "Info" section and already there click on the "ATMs" button.
If we create a shortcut that immediately leads to this screen - the user will be able to get into it with one touch, when Siri offers him, for example, on a locked screen.
Declare a shortcut (Declare)
The first step is to declare the type of our NSUserActivity (we can say that this is its identifier) in info.playlist :
<key>NSUserActivityTypes</key> <array> <string>ru.tinkoff.demo.show-cashMachine</string> </array>
Announced.
We deliver shortcuts to the system (Donate)
After the announcement, we can create NSUserActivity in the code of our application with the type we set above in info.playlist :
let activity = NSUserActivity(activityType: "ru.tinkoff.demo.show-cashMachine")
To activate it, it needs to set the title , and set the isEligibleForSearch property to true . Other properties are not necessary for adding to shortcuts, but their presence makes the shortcut more readable and user friendly.
The fire! NSUserActivity is there to deliver it to the system, it remains to take the last step.
ViewConroller has a userActivity property to which we need to assign the activity created above:
self.userActivity = activity
As soon as this line is executed, a shortcut is created from this activity. It will be delivered to the system and displayed in the Siri settings ( Settings → Siri and search ). After that, Siri will be able to offer it to the user, and the user will be able to assign him his voice command.
Note : Apple documentation says that instead of assigning an activation to a view controller, it is enough to call becomeCurrent() method. However, for me this action did not deliver the activation to the system and the shortcut did not appear in the list
Next, call it current, make it possible. Alternatively, you can attach a UIViewController or UIResponder object, which can be marks as activity.
To check that everything worked, open Settings> Siri and search - a shortcut on the basis of our activation should be on the list.
Shortcut processing by application (Handle)
When a user navigates through the shortcut from the notification center or has activated it with his voice, the application is launched, and we must process this shortcut.
activity forwarded to us in the AppDelegate 'a method:
func application(_ application: UIApplication, continue userActivity: NSUserActivity, restorationHandler: @escaping ([UIUserActivityRestoring]?) -> Void) -> Bool { if userActivity.activityType == "ru.tinkoff.demo.show-cashMachine" {
Total
A shortcut based on NSUserActivity is created as follows:
- We declare the type (identifier) of
NSUserActivity in NSUserActivity . - Create
NSUserActivity in code and customize viewController' .
Creating voice commands from the application
So, if the user opens Settings> Siri and Search , he will see a list of his shortcuts, which was created by various applications, including ours. By clicking on the " + ", the user will be able to create any voice command and associate it with the selected shortcut. However, every time it is inconvenient for the user to enter the settings, many do not even realize this possibility.
It's cool that you can attach a voice command to a specific action right inside the application.
Suppose a user has committed an action, it has been delivered to the system, he wants to save it. We can add the button " add an action to Siri " (you can name and draw the button as you please) on the screen of our application, then the user, by clicking on it, will be able to associate this action with the voice command from inside the application, without going into the settings.
By clicking on the button, you should modally open the screen for adding a voice command to the shortcut in Siri INUIAddVoiceShortcutViewController , or the screen for editing the voice command INUIEditVoiceShortcutViewController , if one has already been created. Unreflected action such a button will be approximately as follows:
@IBAction func addToSiriAction() { // 1. , INVoiceShortcutCenter.shared.getAllVoiceShortcuts { (shortcuts, error) in guard error == nil, let shortcuts = shortcuts else { // TODO: Handle error return } // 2. , let donatedShortcut: INVoiceShortcut? = shortcuts.first(where: { (shorcut) -> Bool in return shorcut.__shortcut.userActivity?.activityType == "com.ba" }) if let shortcut = donatedShortcut { // 3. - . // let editVoiceShortcutViewController = INUIEditVoiceShortcutViewController(voiceShortcut: shortcut) editVoiceShortcutViewController.delegate = self self.present(editVoiceShortcutViewController, animated: true, completion: nil) } else { // 4. let shortcut = INShortcut(userActivity: self.userActivity!) let addVoiceShortcutViewController = INUIAddVoiceShortcutViewController(shortcut: shortcut) addVoiceShortcutViewController.delegate = self } } }
So, the screens for adding and editing voice commands for Siri shortcuts look like:

We must also implement the delegate methods of these viewControllers, in which they need to hide dismiss(animated: true, completion: nil) and, if necessary, update the current screen. For example, if earlier there was a "add voice command" button on the screen, then after adding a voice command, this button should either disappear or change to "edit voice command".
Shortcuts created with Intent
So far, we have only talked about shortcuts that open an application, and pass NSUserActivity data to NSUserActivity .
But back to the shortcuts created through Intent , which allow you to perform some actions without opening the application. This is where the fun begins.
Imagine a user ordering their favorite pizza. He will order it many times when he wants, and he even added a voice command to the shortcut of this pizza - and this simplifies his life. But we can do more for him - we can do so by submitting a voice command to Siri, the system does not throw it into the app, but shows information about the order and ordered pizza right away on the Siri interface! This is the case when the user does not need to open the application itself to perform some kind of action.
First, go to the project settings, select the main target, the Capabilities tab and enable access to Siri.
Our application can interact with Siri, but this happens not in the main application code, but in a separate Intent Extensions target-expansion.
First, you need to create this target: File → New → Target , select Intents Extensions . Xcode will offer to create another target-extension for the display window of your action in Siri, if there is a need for this, then we agree.

Declare a shortcut (Declare)
The main innovation of SiriKit'a in iOS 12 - the ability to create your own Inetnts , to those that already existed.
To do this, create a new file: File → New → File , selecting from the Resource section the type of SiriKit Intent Definition File .
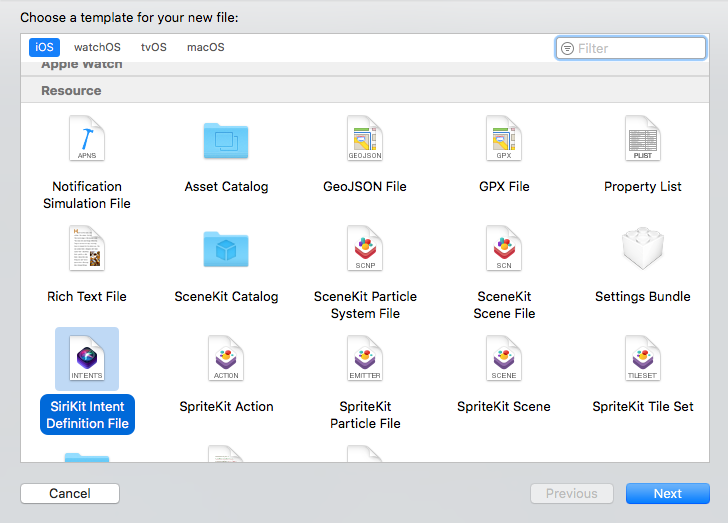
As a result, a file with the .intentdefinition extension appears , in which you can create your Intents . Open the file, and where it says " No Intents " at the bottom there is an icon " + " - click on it. " New Intent ". An intent appears in the list where you can add parameters. In the case of an action with a pizza order, you can add the number of pizzas as parameters, and the type of pizza to order. For the quantity, select the Integer type, and for the pizza type, select the Custom type, which will be represented in the code by the INObject class.
Now a couple of lines of frustration:
The user will not be able to transfer different parameters to the same saved voice command. Alas!

What are the parameters for:
Suppose you create an entity "Show %currency rate", where currency is an entity parameter. This does not mean that the user can say the phrase "Show the dollar rate", "Show the rate of bitcoin", etc. Out of the box it will not work like that. But this means that if the user watched the dollar exchange rate, then a shortcut “Show the USD exchange rate” was created, then when he viewed the bitcoin exchange rate, the shortcut “Show the BTC exchange rate” is created, etc. In other words, it may have several shorts, which are based on the same intent, but with different parameters. Each of the shortcuts, the user can set their own voice command.
Well, creating an intent in the file .intentdefinition , Xcode will automatically generate a class for this intent (note: it will not appear in project files, but will be available for use). This auto-generated file will be only in those targets that own the .intentdefinition file.
After creating an intent in the .intentdefinition file , we can create our intent in the code.
let intent = OrderPizzaIntent()
We deliver shortcuts to the system (Donate)
In order for this entity to be included in the list of shortcuts - you need to zadonatit. To do this, an INInteraction object is created with an instance of your intent, and the .donate method is called on this interaction .donate
let intent = OrderPizzaIntentf() // ... let interaction = INInteraction(intent: intent, response: nil) interaction.donate { (error) in // ... / }
After executing this code, the shortcut on the basis of the intent is delivered to the system and displayed in Siri Settings.
We process shortcuts by the application (Handle)
The next step is to process the intent when the user clicks on it in the sj siri or calls it with a voice command.
We have already created a target extension for Siri and it has a pre-created class IntentHandler , which has one single method - `handle (for intent)` `
class IntentHandler: INExtension { override func handler(for intent: INIntent) -> Any { guard intent is OrderPizzaIntent else { fatalError("Unhandled intent type: \(intent)") } return OrderPizzaIntentHandler() } }
Note: If the compiler does not see the class of your intent, then you have not added a target extension for Siri to the .intentdefinition file.
In this method, we define the type of incoming intensity and for each type we create a handler object that will handle this intensity. Create a handler for our OrderPizzaIntent , and implement the OrderPizzaIntentHandling protocol in it, which has already been autogenerated after creating your Intent in .intentdefinition .
The protocol contains two methods confirm and handle . First, confirm is called where all data is checked and the availability of the action is checked. Then the handle will work in short time.
public class OrderPizzaIntentHandler: NSObject, OrderPizzaIntentHandling { public func confirm(intent: OrderPizzaIntent, completion: @escaping (OrderPizzaIntentResponse) -> Void) {
Both of these methods must invoke the completion with the OrderPizzaIntentResponse response (it is also autogenerated), otherwise Siri will just wait for a long time before generating an error.
More detailed answers from Siri
There is a standard, auto-generated set of response codes - enum OrderPizzaIntentResponseCode , but for a friendly interface they may not be enough. For example, at the stage of confirm , several different errors can occur - the pizza is out, the pizzeria is not working at this time, etc. and the user should learn about these facts, instead of the standard message "Error in the application." Remember we created an intent in the file .intentdefinition ? Together with the intent itself, he also created his Response in which you can add your own variants of errors and successful answers, and customize them with the following parameters:
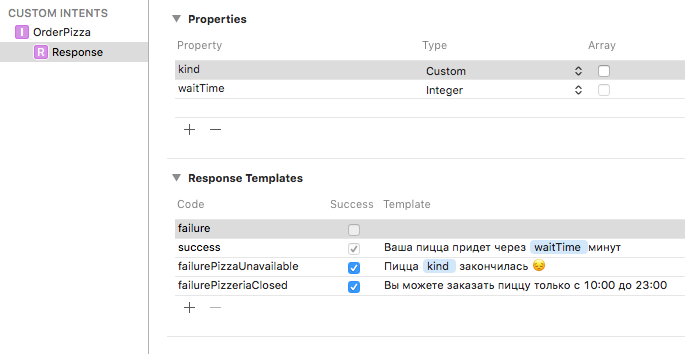
Now we can inform the user more informative errors and answers:
public func confirm(intent: OrderPizzaIntent, completion: @escaping (OrderPizzaIntentResponse) -> Void) { guard let pizzaKindId = intent.kind?.identifier else { // - completion(OrderPizzaIntentResponse(code: .failure, userActivity: nil)) return } if pizzeriaManager.isPizzeriaClosed == true { /// - completion(OrderPizzaIntentResponse(code: .failurePizzeriaClosed, userActivity: nil)) return } else if pizzeriaManager.menu.isPizzaUnavailable(identifier: pizzaKindId) { /// - completion(OrderPizzaIntentResponse(code: .failurePizzaUnavailable(kind: intent.kind), userActivity: nil)) return } // - completion(OrderPizzaIntentResponse(code: .ready, userActivity: nil)) }
Drawing Intent
If we created the Intent Extension UI target extension, then we can draw a custom view in Siri for the intents we need. We have MainInterface.storyboard and IntentViewController in which we can sketch their design. This view controller implements the INUIHostedViewControlling protocol and the view configuration occurs in the configureView method.
// Prepare your view controller for the interaction to handle. func configureView(for parameters: Set<INParameter>, of interaction: INInteraction, interactiveBehavior: INUIInteractiveBehavior, context: INUIHostedViewContext, completion: @escaping (Bool, Set<INParameter>, CGSize) -> Void) { // Do configuration here, including preparing views and calculating a desired size for presentation. completion(true, parameters, self.desiredSize) } var desiredSize: CGSize { return self.extensionContext!.hostedViewMaximumAllowedSize }
In order for this method to be invoked, it is necessary in info.plist , which belongs to the target extension Intents UI, to add the name of our intensity to the array NSExtension -> NSExtensionAttributes -> IntentsSupported
<key>NSExtension</key> <dict> <key>NSExtensionAttributes</key> <dict> <key>IntentsSupported</key> <array> <string>OrderPizzaIntent</string> </array> </dict>
Depending on the design of your view in Siri and on interaction.intent , which is in the method, you can draw this view as you want. Below are the screenshots of how our intent looks in Siri, in the search and on the locked screen.

It is worth considering that the user will not be able to interact with buttons, scrolling and other controls on your view, since the method will be called with the interactiveBehavior = .none , this certainly imposes a number of restrictions.
Total
Intent-based shortcuts can be rendered in the Siri interface or in the notification center and perform an action without opening the application. To create it you need:
- Enable Capabilities to use Siri
- Create Intents Extensions and Intents Extensions UI Targets
- Create a SiriKit Intent Definition File
- Create your own
Intent in this file and assign parameters to it. - Create an
IntentHandler in which we implement the confirm and hanlde
Recommendations
The general code in the Siri expansion tag and in the main application
If you have a code that is used both in the target for Siri and in the target project of the main project - there are 2 ways to solve this issue:
- Select common classes to add them to both targets. ( View → Utilites → Show File Inspector 'e, in the Target Membership section add ticks to targets that need access to the selected file)
- Create one or more target frameworks and carry the common code there.
The latter method is preferable, because you can then use these frameworks in other extensions and projects. It is also worth noting that for these frameworks, it is desirable to set the Allow app extension API only flag Allow app extension API only , then while developing the framework, the compiler will swear if you try to use an invalid API in developing extensions (for example, UIApplication ).
Shared resources can be fumbled between targets through App Groups
Debugging
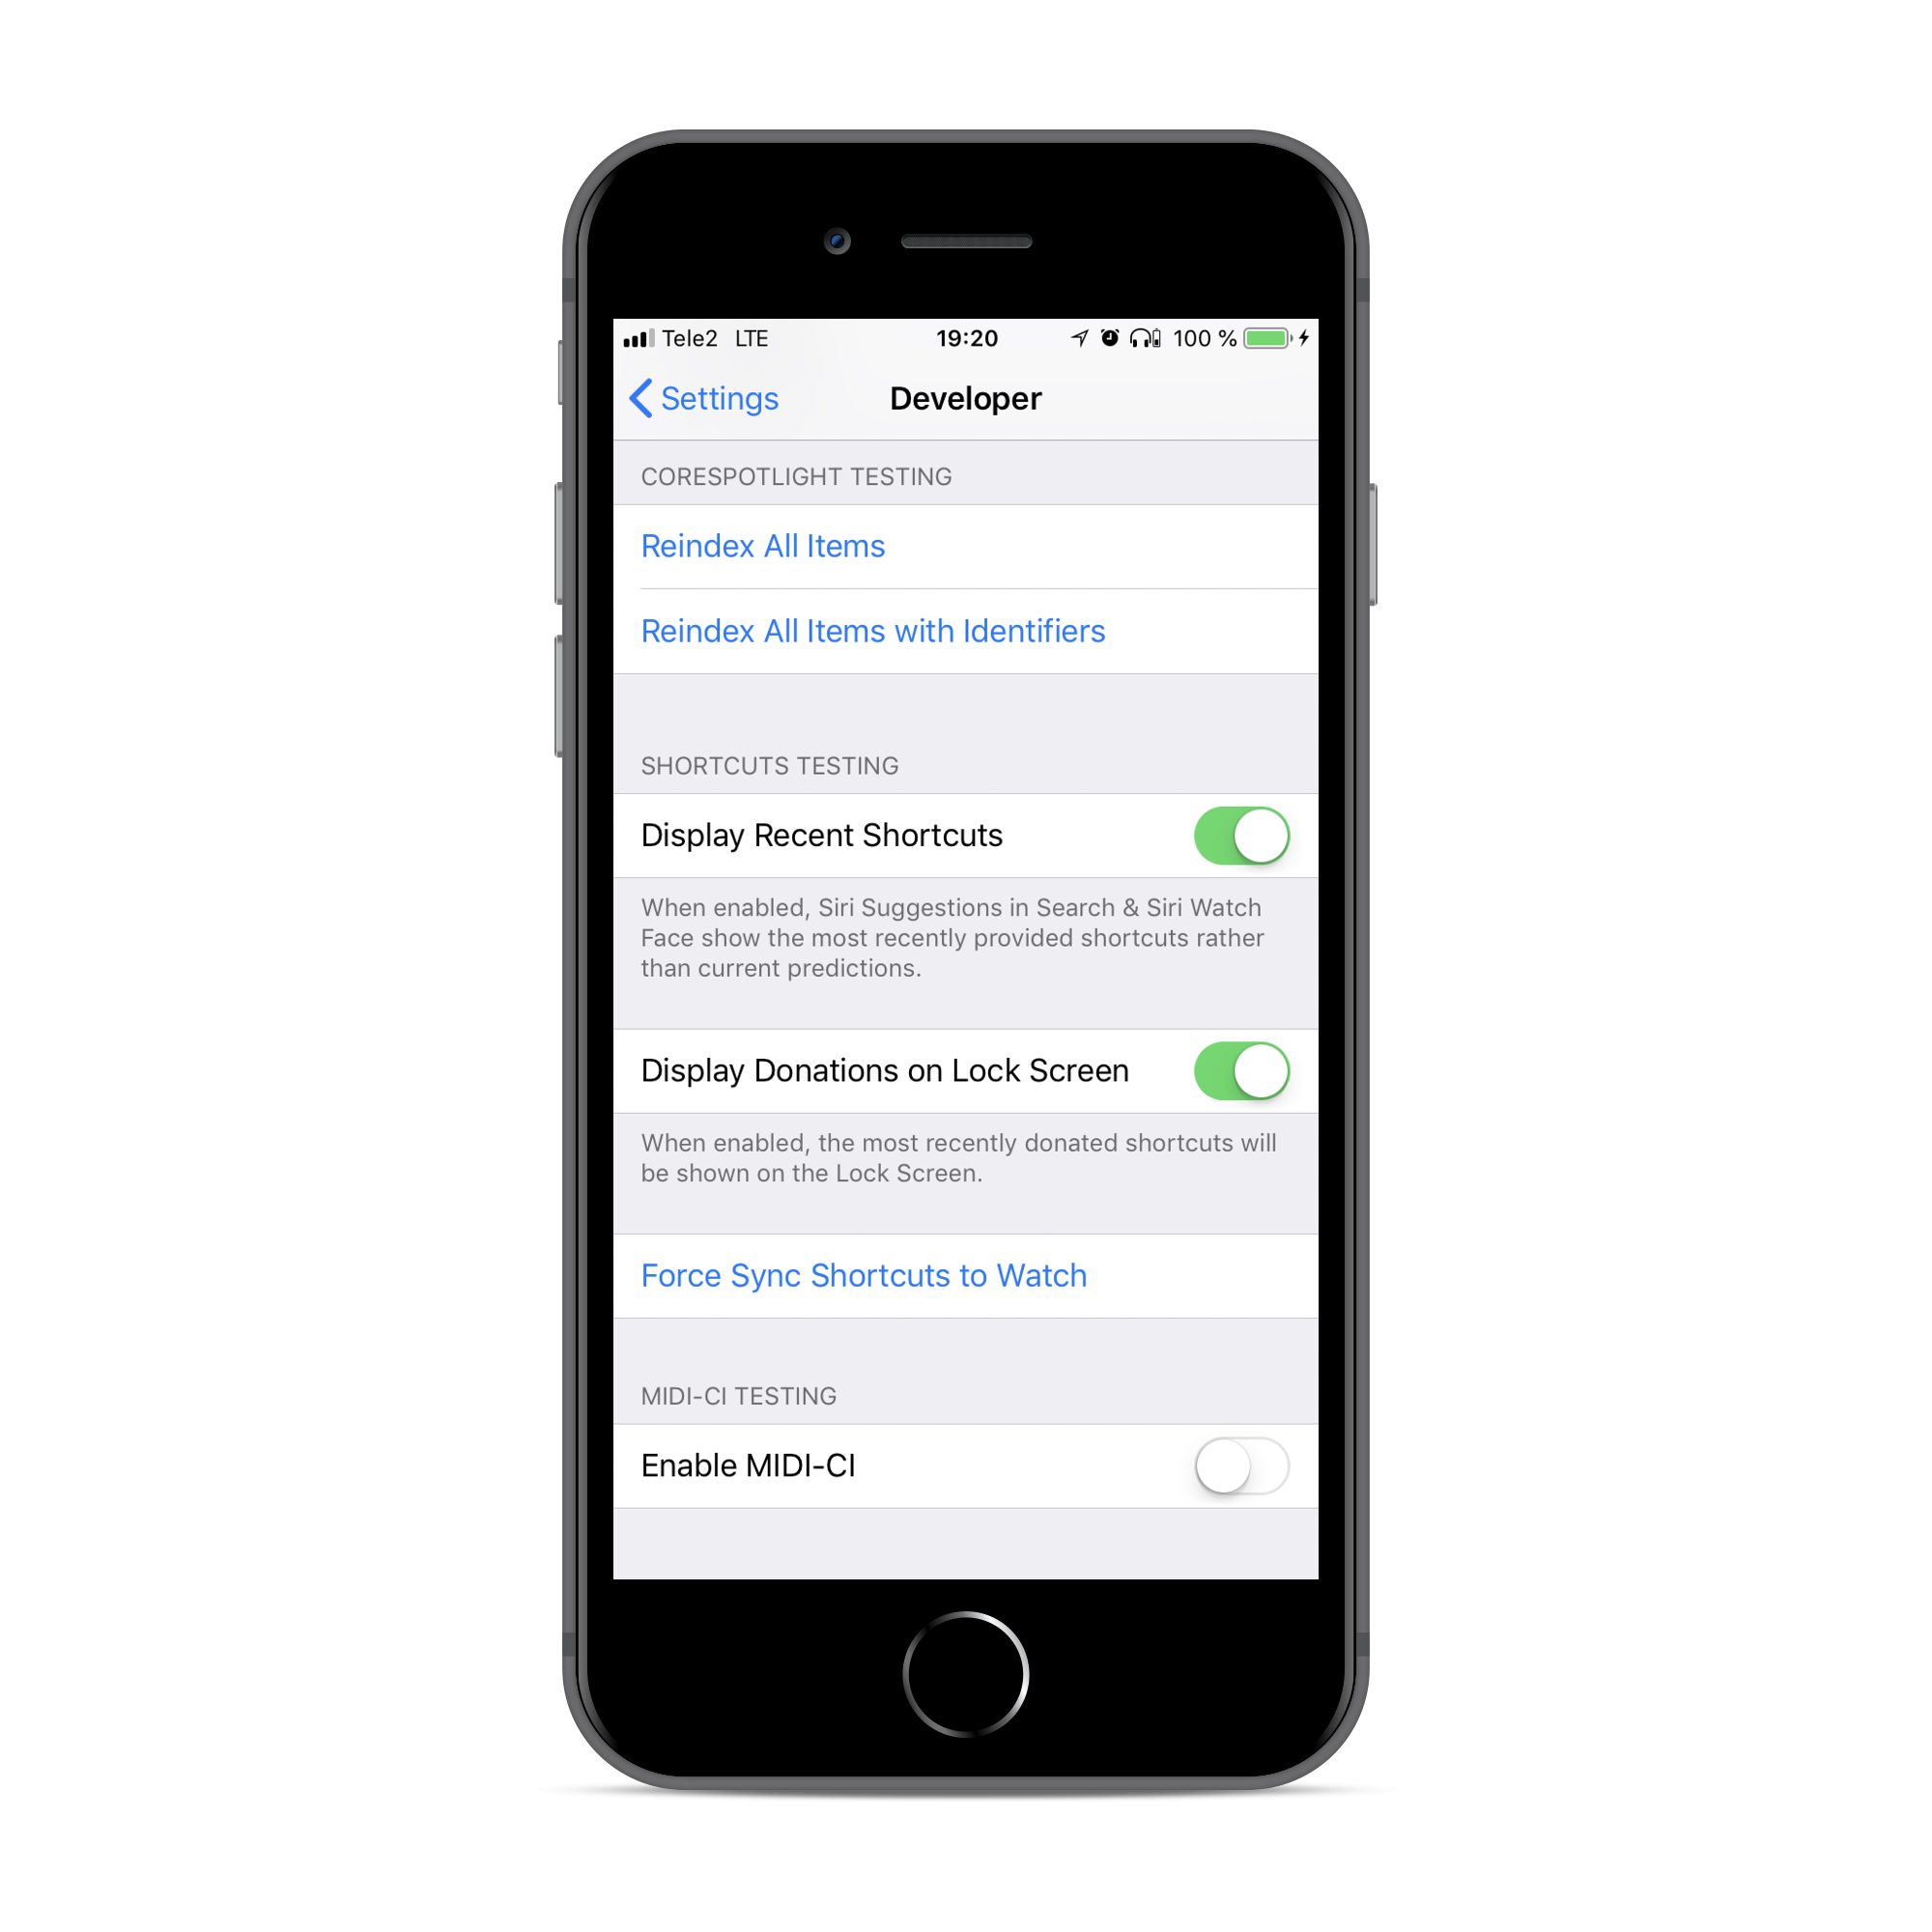
Testing shortcuts will help to help:
- Phone settings Settings → Developer : Display Recent Shortcuts and Display Donations on Lock Screen switches:
- To test Intens, you can immediately launch the target extension by setting the phrase with which Siri will open in XCode. For this you need to choose a scheme for the Siri target expansion

Click on this target, click Edit Scheme ...
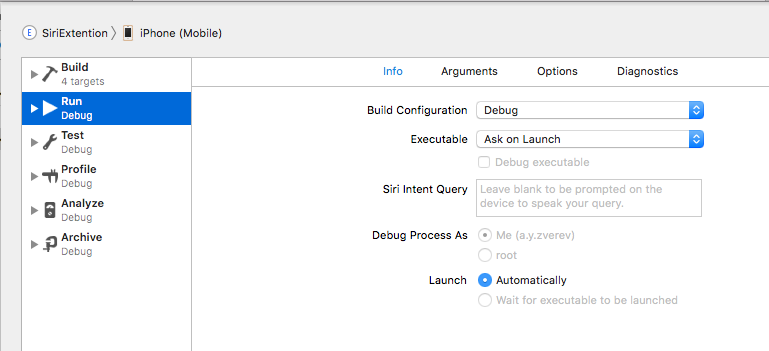
In the Siri Intent Query field, enter the phrase with which Siri will already start, as if you have already said it.
Total
I propose to stop and summarize what we have:
- Shortcuts can be created through
NSUserActivity , or through INIntent - Shortcuts need to be declared (declare), reported to the system (donate), and processed (handle).
- In the application, you can add the " Add to Siri " button, by clicking on which the user can add a phrase for the action and then call it with a voice.
- You can create your
Intents in addition to embedded. - Through shortcuts based on
Intents you can create actions that will be performed via the Siri interface (either on a locked screen or in a search) without the need to open the application itself.
The Apple documentation has a link to the Demo project , which is useful to download and focus on when developing.
I would like to emphasize that at the time of this writing this is an API at the beta stage. And I often catch problems and bugs. During work, I occasionally came across the following:
- , Intent Siri, .
- Siri .
- Siri.
Links
- WWDC 2018, session 211: Introduction to Siri Shortcuts
- WWDC 2018, session 214: Building for Voice with Siri Shortcuts
- Apple Developer: SiriKit
- Apple Developer: INUIHostedViewControlling
- Demo Soup Chef Apple