Hi, Habr! We continue our experimental series of articles, watching which you can in real time influence the course of creating a game on UWP. Today we will talk about the question constantly arising in the ranks of the developers - “Where to store data?”. Join and share your thoughts in the comments!
 I give the floor to the author, Alexey Plotnikov .
In the previous article, I raised the issue of conveniently synchronizing user data between devices and first solved the problem with its identification, but this is the smallest fraction of what needs to be done to accomplish the tasks.
A much more complicated issue is the way, and most importantly, the place where the user data is stored and, through the efforts of Microsoft, when raising such a question, the first thing that comes to mind is
Microsoft Azure . The Azure cloud platform includes such a wide range of services that it seems there are no tasks that cannot be solved with its help. Like it or not, I do not presume to judge, but my task is undoubtedly on the strength of this platform. However, first things first.
We start small - what is a cloud? For the first time I heard about the cloud in the distant 2012m and then the word cloud computing was most often used. The initial idea of such calculations was to distribute computational work between different devices that were far apart. Especially impressionable talked about the future, in which even the most difficult tasks will be processed in a couple of moments due to the fact that the calculations will be distributed among all computers in the world.
In practice, everything was reduced to data centers scattered around the world and providing their computing power to consumers, while the initial concept was left only to the distribution between the machines inside the data center and between the data centers themselves (most often within the same region).
Based on the above, we can assume that when you hear the word "cloud", you can perceive it as a more familiar "hosting", with the only difference that the power of the cloud can be expanded without additional efforts on your part.
The second question you may have is why Azure? “Since this is an article in the Microsoft blog, then the author will only talk about their products,” you say, and you will be wrong. The motives for using Azure are much more banal - since this is a Microsoft product, it has the highest possible degree of integration with their other products, with the help of which my application is being developed.
However, I note that the company is making every effort to ensure that the use of Azure is attractive for developers under Android or iOS. Well, the last one to mention, but not least, is the question of the cost of using the cloud. Since I am the owner of a BizSpark subscription, I have a monthly credit for the bag with interest, covering my needs for the cloud, although the conditions that are provided free of charge can also cover most of the needs of a private developer.
We now turn to the direct selection of the mechanism of synchronization and data storage. I’m not going to dissemble, as a self-taught person I often come across technologies that I don’t have the slightest idea of and before becoming familiar with UWP, I solved similar problems using SQL databases.
However, the UWP does not have the means to work with classic SQL databases, and SQLite is offered as an alternative, and starting to study it, I found out that such a database is built-in, which is suitable for conveniently storing and using local data, but is absolutely not suitable for data in remote storage. Already in the process of writing this article, when the desired technology was selected, I came across one of the Azure mobile application solutions that allows you to synchronize data from the SQLite table between devices, but after carefully considering everything, I remained at the initial choice.
By the way, it was not difficult to make an initial choice, since Microsoft politely suggested a list of technologies that the UWP developer might have to face. In the latest versions of Visual Studio, when you create a new UWP project, you will see a page with getting started recommendations, where one of the links reads "Adding Recommended Service". By clicking on this link, the Service Connection tab opens and in it we see the option “Cloud storage with the Azure storage service”.
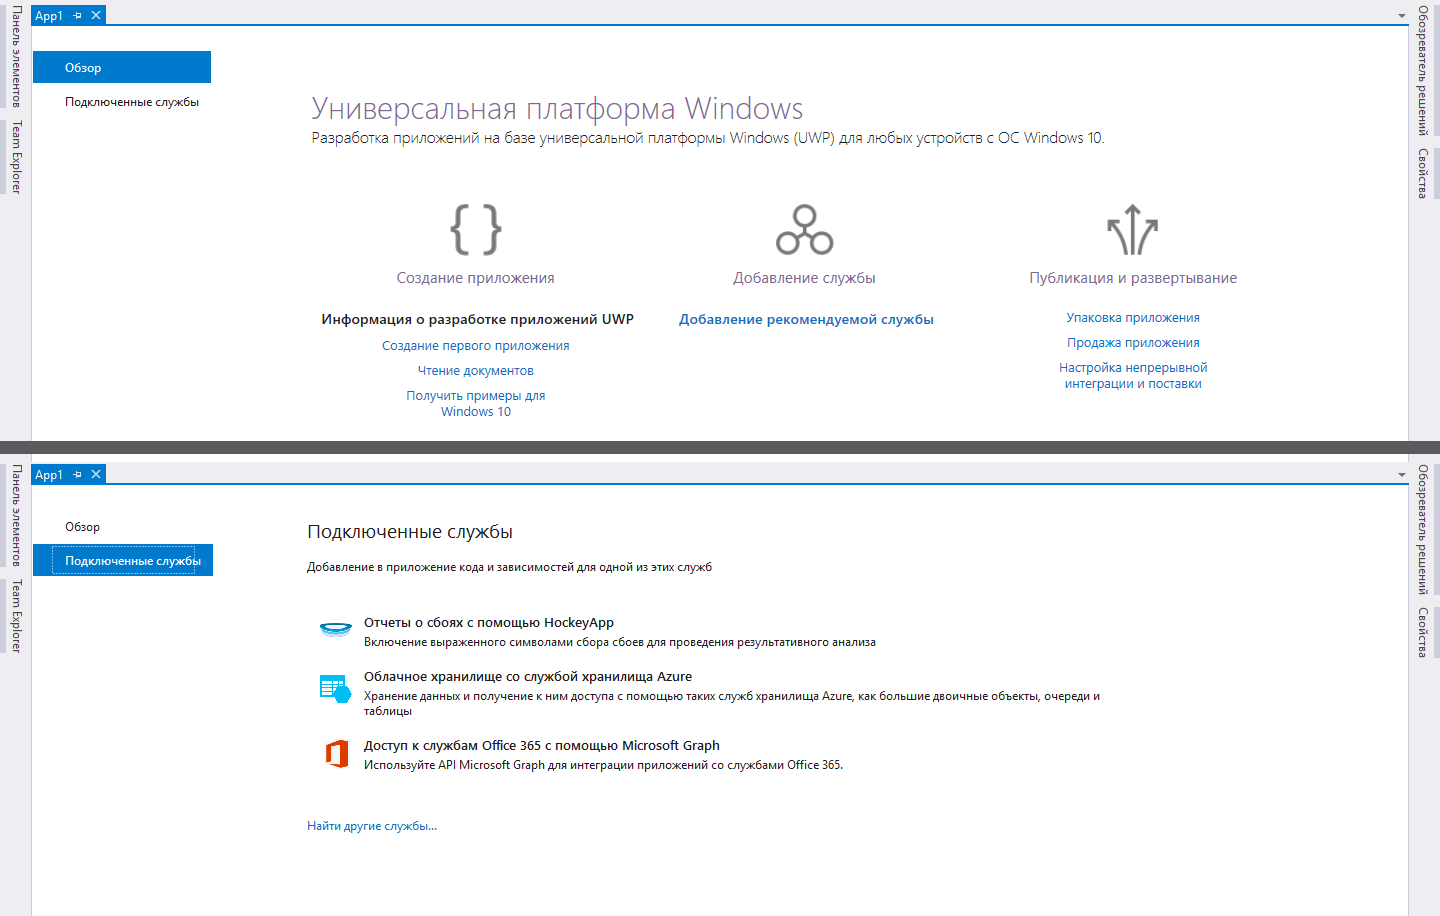
Intuition suggests that this is exactly what is needed, so I decided to stop at the in-depth study of this issue with a view to further use in the project.
Cloud storage is a set of several products for different tasks in more detail about which you can read
here , but I was primarily interested in the table storage, which turned out to be the NoSQL database.
NoSQL is a databaseless database, that is, one in which the table does not need to be structured in advance. In fact, the table in this case is only part of the path to what is called a section here, which means that in one table there can be rows, for example, with three and five columns at the same time. To fully understand the features of the table storage, I advise you to carefully read the
manual , and I will consider this topic from my mundane point of view, because in the end, the material is aimed at beginners, who I am in this topic.
To begin with, let's see how to create a NoSQL table:1. Register your
free Azure account. If you have an MSDN or BizSpark subscription and it is already activated in Azure, you can skip this step. A free account gives you a $ 200 loan for the first month and then free access to a certain amount of resources of most Azure services. Translated into an understandable language, everything is done in such a way that you will not have to pay until your product earns enough to cover the costs, not to mention the use of Azure for self-education.
But even if you overcome the free threshold, the prices for table storage are much more loyal than for the same amount of SQL databases. For example, at the time of writing the article I created two tables, with only one entry so far. For 18 days of the reporting period, I applied to it on average 20-30 times per day and 2 kopecks were written off from the credit account for this period. Scaling up such costs for the planned volume, I realized that they are more than covered by the potential income from the application.
2. Now, when you have an account in Azure, we proceed to create a storage account.
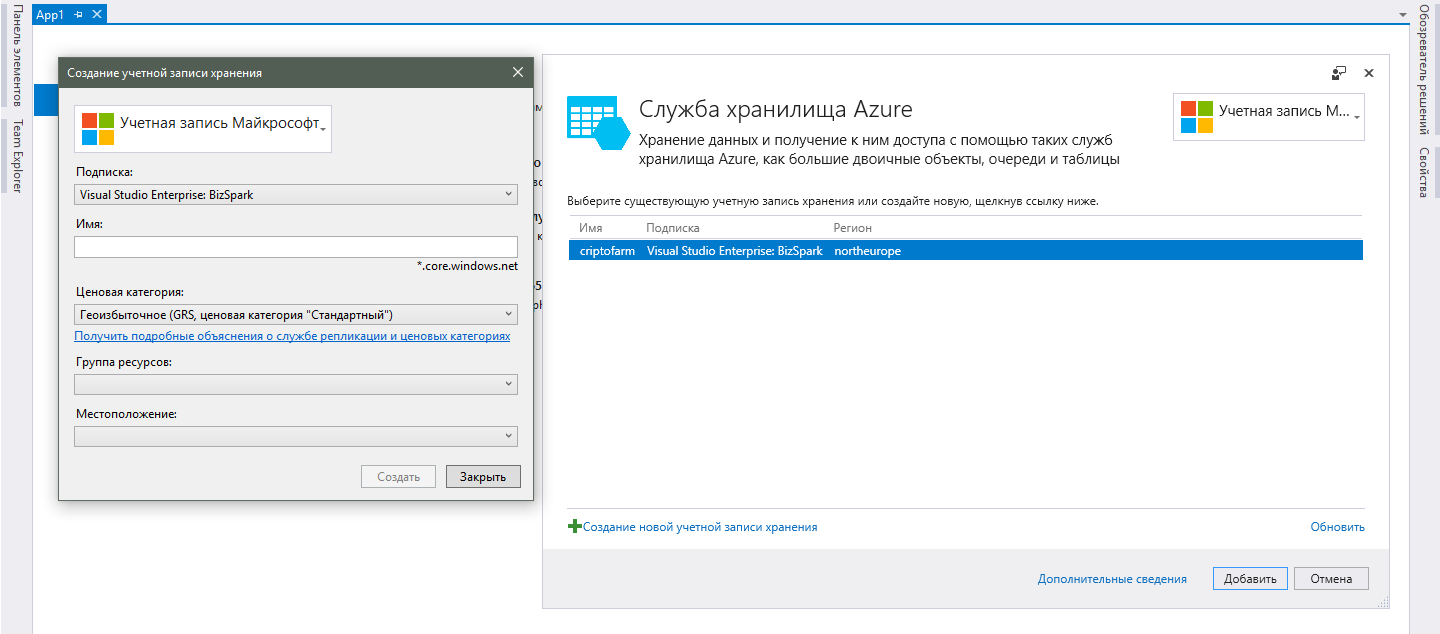
You can do this all from the same page connecting the services of Visual Studio that I described above. If you suddenly closed this page, you can open it by double-clicking on “Connected Services” in the Solution Explorer. After selecting the required service, a window will open with the existing storage accounts and, to add a new one, click the corresponding button.
In the new window you will need to perform the following steps:- First you need to log in with your Microsoft account. You need to use the account to which your subscriptions are attached or your free Azure account.
- In the "Subscription" field after logging into your account, your subscriptions (a) will appear. Everything is simple with a choice here, so comments are superfluous.
- In the field "Name" you need to specify the desired name of the storage service. Since this is also the domain name of the service, it must be unique across all existing accounts in Azure, and not just within yours.
- The “Price Category” field will require you to understand the differences between the cloud platform and the usual hosting, since clicking on the link below the field, you can see the list of prices, but not a clear explanation of what each option gives you. Of course, in the wilds of additional links you can find comprehensive information about all these abbreviations, such as GRS and LRS, but for an ordinary developer this is unnecessary. It is enough to understand that the more expensive the tariff, the more data centers will be used to process and store your data and the higher the probability of their safety. For a small project, the lowest LRS fare is fine.
- A “resource group” is a combination of several Azure services for a single management. In our case, we create a new one, assigning any clear name and move on.
- The last thing to choose is the “Location” for your service. By location is meant the actual location of the data centers that will be responsible for working with our data. Please note that I speak in the plural, since there can be several data centers in one region and the work can be distributed between them (in case you selected the advising price category). Choose the one that is as close as possible to your main user base. However, if you plan to grow to the scale of the whole world and you need the maximum response anywhere in the world, no one bothers you to create a separate storage account for each regional version of the application and implement data synchronization between them. This high level of extensibility is the main advantage of the cloud.
3. After creating a storage account, it will be added to the list and can be continued by clicking the “Add” button. The result of this action is to add a NuGet package to your project to work with Azure and save the connection string in the project's app.config file.
Unfortunately, it is impossible to work with the values from this file in the UWP (or perhaps with creepy crutches), so just copy the connection string to the storage service from there to a convenient place in the project and go on to the next item.
4. Now it remains to create a table and start working with it. And here begins the individual work, depending directly on the tasks.
The fact is that before you start creating any tables, it is worth thinking carefully about the storage architecture of your data. Working with the table storage is so convenient that creating a new table directly from the code is just a matter of a few lines, and with this convenience there is a natural desire to allocate a separate table for each user, because ultimately the task is to synchronize data between its devices. However, when working with an unfamiliar technology, you should not make hasty decisions and you need to carefully weigh the pros and cons. A special
guide article can help in making the right decision, but be prepared for the fact that it will have to be re-read several times, since it is very difficult at once to assimilate all the data, especially considering the mass of new terms.
I will continue the further narration taking into account the fact that you still read the manual and understood some of the features of working with the table storage. For example, I realized that conceptually, a table is not a separate unit and is rather a place of logical grouping of records. This is easy to understand if you present the table as a folder in which you store data files. The folder itself does not take up space and is not an integral part of the files, but merely defines a part of the path to the files that are logical, but not necessarily, to be saved in this folder.
The conclusion from this is quite simple - no one bothers to keep the settings of all users in one table, as long as the pair of values for the PartitionKey and RowKey columns are unique within the table. This is again realizable in my project, since the user ID will act as the PartitionKey and the RowKey, for example, the string “UserName”, which will allow you to define a unique record that stores the user name. But as I said above, you need to weigh the pros and cons, so let's weigh:
- “For” a separate table for the data of each user, appears convenience in the perception of the structure of the data. If you take the table as a folder with files, it is logical that all the files of one user are in the same folder and it’s more familiar to work with such an architecture.
- "Against" a separate table are all the other factors. User data inside a separate table - it is convenient exactly as long as the number of such tables is in the thousands. Since the storage account is a higher level above the table, there is no other grouping for them.
Given the potential user base, we risk drowning in thousands of separate tables, losing those that have any priority value. At the same time, storing the settings of all users in one table simplifies administration and work with data in order to collect statistical information or implement social functions.
Moreover, the low cost of using table storage allows you to duplicate any data in separate tables, according to the required logic. In particular, I plan to create an additional table with the user name, a link to the avatar, and an indication of belonging to the country that will be used for rating tables or other social functions that may be added to the application.
So, when the data storage structure is sorted out, let's finally add a new table. Since we refused to create it at the code level, two options remain: through the Azure web portal or with the help of the special tool “Microsoft Azure Storage Explorer”, which can be downloaded from storageexplorer.com. In both cases, you need to select the storage account you need and in the section “Table service / Tables” select “+ Table / Create Table”. In the dialog box that appears, enter the desired name and commit the changes.
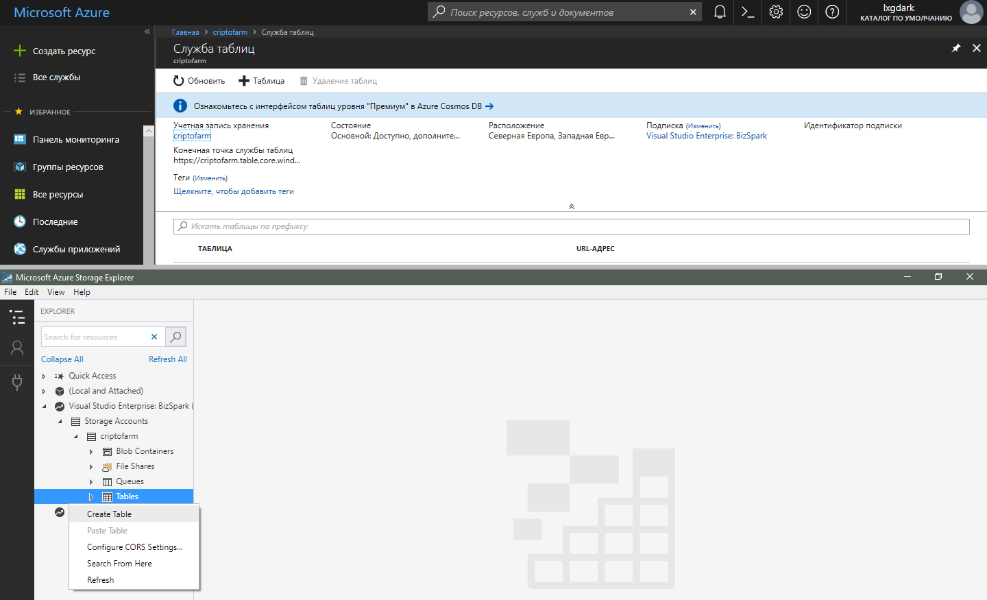
After that, with the new table, you can easily work from the code.
The main operations that I will perform with the table are the insertion and extraction of rows, which in the terminology of the table storage are called “entities”. This term is easier to understand when you realize that in order to insert and extract an entity, you will need to associate with it a class inherited from TableEntity from Microsoft.WindowsAzure.Storage.Table. The successor class will already contain some required fields, such as, for example, PartitionKey (partition name) and RowKey (row name), and those fields that we implement ourselves will be columns in the row (entity properties).
Consider an example of a table in which a list of all players with their name, avatar and belonging to a country will be stored.
: Imports Microsoft.WindowsAzure.Storage Imports Microsoft.WindowsAzure.Storage.Table
I decided to bring the methods for working with the table into a separate class for the convenience of working from different points of the application. Create it and immediately add the known constants:
Public Class AzureWorker Private Const AzureStorageConnectionString As String = " , app.config" Private Const GamerListTableNameString As String = "GamerList" ' … End Class
Now you need to create a class that we will associate with the entity (row) inside the table:
Private Class GamerListClodTableDataClass Inherits TableEntity Public Const RowKeyValue As String = "UserID" Public Sub New () RowKey = RowKeyValue End Sub Public Property UserName As String = "" Public Property UserountryID As String = "" Public Property UserAvatar As String = "" End Class
The mapped class must inherit from TableEntity and have fields for the data that we plan to place in the table. Note that it is not necessary to set values for RowKey or PartitionKey at the class level, but in my case RowKey is set because it is constant regardless of other input data.
But, since at this stage you probably didn’t fully understand the essence of working with the table storage, I’ll explain the logic put in this stage. The quickest way to work with a table is to query the entity by the name of the string and the name of the section, so you need to know this data in advance. In addition, the combination of PartitionKey and RowKey must be unique within the table, which means that it is logical to write down a unique user ID in one of these keys, and give the second key any name that we will always know. This is what is done in the GamerListClodTableDataClass class.
The last preparatory stage before direct requests to the table is the creation of its object in a separate function:
Private Shared Function GetCloudTable(tableName As String) As CloudTable Dim storageAccount As CloudStorageAccount = CloudStorageAccount.Parse(AzureStorageConnectionString) Dim tableClient As CloudTableClient = storageAccount.CreateCloudTableClient() Dim table As CloudTable = tableClient.GetTableReference(tableName) Return table End Function
This is done in order not to duplicate the code every time we want to read or write data in a table. Please note that this code does not directly query the cloud and will run without problems when there is no connection. All he does is step-by-step create a table object from existing data, such as the storage connection string and the table name.
Finally, let's move on to working directly with the table and start by saving the current user data:
Public Shared Async Function SavedOrUpdateUserData(u As UserManager) As Task(Of Boolean) Dim table As CloudTable = GetCloudTable(GamerListTableNameString) Try If Await table.ExistsAsync Then Dim UserDataClodTableData As New GamerListClodTableDataClass With {.PartitionKey = u.UserId, .UserName = u.UserName.Trim, .UserountryID = u.UserountryID, .UserAvatar = "https://apis.live.net/v5.0/" & u.UserId & "/picture"} Dim insertOperation As TableOperation = TableOperation.InsertOrReplace(UserDataClodTableData) Await table.ExecuteAsync(insertOperation) Return True End If Catch ex As Exception End Try Return False End Function
The request is executed in the form of an asynchronous function so that the calling code can get the result of the execution (True if successful and False if unsuccessful). Also, a parameter of type UserManager is passed to the function, which is a reference to the class with user data. We created such a class in the previous article, with the only difference that in this version there is a UserCountryID field that stores data about the user's country.
For queries to a table, you first need to create its object using the connection string to the storage and the name of the table (this process was taken out as a separate function earlier). Next, you should check the existence of the table and, although we are sure that we have a table with this name, an error may occur, for example, due to the lack of connection to the network or due to a failure in the cloud (this is why this code is in the Try / Catch). Then, before you write to the table, you need to create an instance of the UserDataClodTableData class and assign the required value to its fields and only then create an InsertOrReplace operation. As you can guess from the name of the operation, it inserts a new row into the table if there are no rows with the same PartitionKey and RowKey pair in the table and will replace the data if there is already such a row. Well, the final command ExecuteAsync, in fact, will perform the planned action on the side of the table storage.
Reading data from a table is as easy as writing it. Let's, for example, ask for the username:
Public Shared Async Function GetUserName(id As String) As Task(Of String) Dim table As CloudTable = GetCloudTable(GamerListTableNameString) Try If Await table.ExistsAsync Then Dim retrieveOperation As TableOperation = TableOperation.Retrieve(Of GamerListClodTableDataClass)(id, GamerListClodTableDataClass.RowKeyValue) Dim retrievedResult As TableResult = Await table.ExecuteAsync(retrieveOperation) If retrievedResult.Result IsNot Nothing Then Return CType(retrievedResult.Result, GamerListClodTableDataClass).UserName End If End If Catch ex As Exception End Try Return "" End Function
This code almost does not differ from the previous one and also begins with the creation of a table object and checking its existence. Further, as in the recording, we create an operation, but this time an extraction operation that requires specifying PartitionKey and RowKey. After we retrieve the result using ExecuteAsync, we work with the resulting object of type TableResult, which actually comes down to casting the Result property to the type of the class being mapped and retrieving the user name.
Working with a table is not limited to read and write operations and supports a lot of different scenarios. For example, you can create a query that will retrieve all entities with the specified PartitionKey or all entities that have the specified field, but it is important to remember about the speed of such operations, as well as the amount of data that will be transmitted over the network.
The above example is the most optimal from the point of view of query speed, since the addressing system will most quickly find the entity along the path “repository name \ table name \ PartitionKey + RowKey”, however, to get only one name, we load the whole entity, which does not have a favorable effect on the amount of data transmitted.
Below is the modified function code with the maximum query optimization:
Public Shared Async Function GetUserName(id As String) As Task(Of String) Dim table As CloudTable = GetCloudTable(GamerListTableNameString) Try If Await table.ExistsAsync Then Dim projectionQuery As TableQuery(Of DynamicTableEntity) = New TableQuery(Of DynamicTableEntity)().Where(TableQuery.CombineFilters(TableQuery.GenerateFilterCondition("PartitionKey", QueryComparisons.Equal, id), "and", TableQuery.GenerateFilterCondition("RowKey", QueryComparisons.Equal, GamerListClodTableDataClass.RowKeyValue))).Select({"UserName"}) Dim resolver As EntityResolver(Of String) = Function(pk, rk, ts, props, etag) Return props("UserName").StringValue End Function Dim result As TableQuerySegment(Of String) = Await table.ExecuteQuerySegmentedAsync(projectionQuery, resolver, Nothing) If result.Count > 0 Then Return result(0) End If End If Catch ex As Exception End Try Return "" End Function
Instead of creating an operation object, in this code we create a request object that contains several methods for determining what needs to be obtained as a result. The Where method creates a filter that indicates that you need to return only those rows where PartitionKey and RowKey are equal to the specified values, and the following Select tells you to select only the UserName column.
With this query, it makes no sense to compare the result with any class, so the IDictionary is used as the return value, where the key is the name of the column and the value is its contents. Since the ExecuteQuerySegmentedAsync function does not know what result of its execution will be received, it is possible (and in this case it is necessary) to pass the delegate EntityResolver, which refers to the function that extracts the desired value from the dictionary. The result of all this is to list the TableQuerySegment in the first index of which the name of the requested user is stored.
In general, using queries instead of the basic extraction operation can significantly expand the possibilities of working with a table, but be careful, because unlike classic SQL, here the speed of processing a query directly depends on its parameters. No one bothers you to execute a query in order to retrieve all user records whose names are equal to the specified one, but such a query will be longer than its counterpart in SQL. To assimilate this, I once again
direct you to the table design guide I referred to above, and I also recommend that you study the
article for examples of working with table storage.
Important! Reference articles use code for classic .NET applications and differ from the implementation in UWP. Fortunately, this difference is not significant and the analogs are intuitive (most often the differences in the “Async” prefix).In conclusion, I’ll share the results of using Azure storage in my project at the moment. When you first start, after receiving the user ID and downloading data from your Live ID, I suggest that you select a nickname (nickname) in case the name stored in the profile does not suit the game. Then the entered nickname is saved in the UserManager class instead of the standard one, and all this data is saved into the GamerList table. The next time you run it, the background will get the user ID and request an alias from the repository As a result, the user sees his nickname in the game, not the name from the standard profile.
Also in the future, a table with a list of users will come in handy for introducing social functions into the game and, right now, I have come up with at least one use of this data. The Azure tools, such as Queue Storage and Azure Features, will help me again in this task, but I’ll tell you about this in one of the following articles.