Today we have a continuation of a series of articles on the development of games on Clickteam Fusion 2.5. Let's talk about practice: consider the beginning of work with the platform and recall the basics of publishing in the application store. Look under the cat!
 I give the word to the author.
Practice
It is time for the practical part of the article. In this part, the basics of CF2.5 mechanics will be considered on the example of developing a small platform and the features of publication in the Microsoft Store.
1. Tools, materials, etc.
For development:
- Clickteam Fusion 2.5 Standart
- GIMP 2.8 or any other graphics editor. Or you can take materials from specialized sites (it's up to you to decide. The main thing is to prepare materials for work)
For publication:
- UWP Exporter for Clickteam Fusion 2.5
- Visual Studio Community 2015
- Account with developer rights in the "Development Center for Windows"
- Reserved product name in the development center (This can be done during the publication. I will describe)
Additionally:
- I recommend when working to have the developer mode enabled in Windows 10, which will allow the use of additional functions (Options -> Update and Security -> For Developers)
Note: If you do not intend to publish to the Microsoft Store, and you just want to personally familiarize yourself with the functionality of the program, then from all of the above, Clickteam Fusion 2.5 / Clickteam Fusion 2.5 Free Edition and a graphic editor are enough for you. With the difference of versions can be found here .2. Getting started
Note 2: In this program, you can come to the same result in completely different ways. In this case, the optimization of these methods can be both different and absolutely identical. If your method was worse than that presented by me, I will be glad that this article helped you a little with optimization. If your method is better - you are well done.Note 3: A little advice - if you plan to publish your work in the Microsoft Store, then just in case, reserve its name in advance.By the way, our super-complete guide to publishing in the Microsoft Store you can read
here .
0. Run CF2.5 and create a new project.

Either way:

Or like this:

Or just press Ctrl + N
1. In the newly created project you can observe his Majesty the editor. On the left side (Workspace Toolbar) is the hierarchy of our project. In the right part - information about each frame. Each frame is a scene that hosts a specific part of the game being developed. For example: frame 1 - menu, frame 2 - 1 level of the game, frame 3 - 2 level of the game, frame 4 - titles.
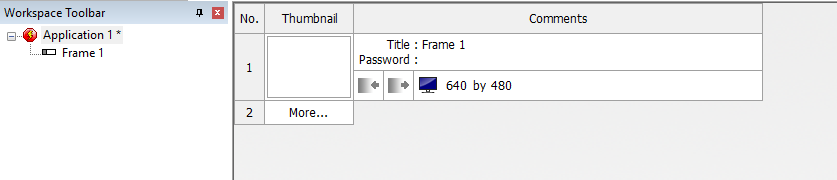
The first step is to set the basic settings and prepare the first frame to create a menu based on it. To do this, we change the name of the application, the name of the frame and set the frame size (which will be displayed both first and next).

2. Separately, I would like to note the Properties window of our application (not to be confused with a single frame, etc.). As you probably already guessed, these are the main settings of the application itself. With their help, icons are added, the name of the application is changed, an additional is indicated. information (author, language, etc.), build type is selected, etc. In it, in addition to changing the resolution, now you need to set the type of build. By default, Clickteam Fusion 2.5 Standart in the build type is “
Windows EXE Application ”, but since I’m going to give you an example of building and publishing for the Microsoft Store, I choose the “
UWP project ”.
Note 4: When creating projects in CF2.5, objects are used that perform various roles - setting up the interface, animation, etc. But not all of these objects have support for all platforms (available for development in CF2.5), so you should decide on the Build Type at a very early stage of work. By selecting a platform in the Build Type, you will see only those objects that support development for the specified platform. Why is that? Because the objects for CF2.5 are developed not only by Clickteam employees, but also by individual developers.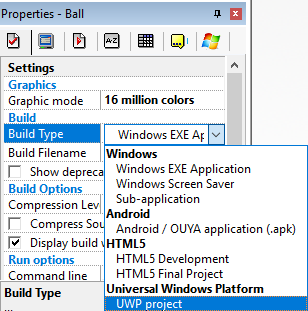

3. Now, to continue the work, go directly to the frame itself (double click on the frame)

4. As you can see - now a big scary sheet appeared on the right ... This is our scene where we will place the game objects. For more convenience, you can adjust the Zoom (in the left corner) so that the scene does not seem so big
 Note 5: if you do not have layers displayed (the Layers Toolbar tab should be on the right), add them via View - Toolbars - Layers Toolbar
In summary, everything should look like this:

5. Now you can go to work with the scene itself. To get started is to add a background for our menu. To do this, click the RMB on the scene and select Insert Object, after which the “Create new object” window will open, in which you should find the “Backdrop” object
It now remains to load the background for the menu. To do this, click RMB on our "
Backdrop " and select Edit

And in the window that opens, select Import.

Then choose an image that will play the role of the background. By the way, I rendered my background myself. We assume that I am an artist, and so I see.

By the way, you can change the names of objects. I strongly recommend that you do this so that you do not get confused about what you are responsible for. You can do this by right-clicking on the object and selecting Rename.

6. So, there is a background. Now you need to create a new layer and you can start creating the buttons of our menu. In the above example, three buttons will be used - Play, Credits and Quit.
To create a new layer, click on “New Layer” in the Layers Toolbar, which is located on the right side of the screen.

Having added a new layer, we will block the first layer by clicking on the icon in the form of a “lock” next to it. This is to prevent accidental changes in the first layer.

Now you need to go to the second layer (click on the layer) and place three active objects on it (right click - Insert object - Active).

For convenience, you should rename them to Play, Credits and Quit, and then upload your sprite to each object (the same as you did with Backdrop).
The result should be something like this. Yes I know. These sprites look great.

7. Add a couple of frames. On one we will place Credits, on the other the first level of our game (PCM in the name of the application is New Frame)

8. Create events for our buttons so that they start performing their functions. To do this, go to the Event Editor and start creating events.

The Credits and Play buttons are set up according to the principle “If the user clicks the button once on the button, the transition to the frame takes place”


Here we already choose our button. For example, choose Play

And we begin to create an event

To which we say that “if a user clicks on Play, a transition to ...

... the first level of our game "

Similarly, it should be done for the Credits button, so that the transition to the same frame occurs.

Now we will configure the most important button - the exit button from the game. Here the principle will be the following: “If a user clicks the button with the LMB on a button, the application is terminated”. Those. we have to create the same event, but instead of “Jump to frame” choose “End the application”

9. Essentially, the menu is ready to use. But for more convenience, I propose to add the ability to exit the menu. Please do not confuse with a pause, which displays the menu. Principle of operation: "Pressing Esc goes to the menu frame". To do this, go to the Event Editor, for example, frame Credits

And create a new event

Pressing the "Esc" button

And then already as usual - Jump to frame and select the menu frame


Similarly, we repeat for the frame with the first level of our game, or simply select the event that has already been created, copy it and paste it in another frame.
Now the menu is completely ready. To test, you can press F8

10. Go to the frame Credits. In essence, these are captions. To implement them, we proceed as follows: draw a background, add text to it, and then add the result to the frame via
Backdrop . Example:
 Note 6: when using free materials (music / sprites / etc.) it is very often necessary to indicate the authors in Credits. Please do not forget about it and always study the agreements under which you take these materials.
What's next
This is a loop article. In the next article we will continue to talk about practice!
about the author
 Lev Bulanov
 is a student at Tchaikovsky Industrial College and Udmurt State University, Microsoft Student Partner, C # developer, CF2.5 developer, Unity developer, computer operator (5th grade). The main area of interest is the development of mini-games, utilities and MR-projects.