
In this article, I will show you how to create a web application using Node.js, which allows you to track NHL match results in real time. The indicators are updated in accordance with changes in the account during the game.
I really liked writing this article, because the work on it included two things I loved: software development and sports.
During the work we will use the following tools:
- Node.js;
- Socket.io;
- MySportsFeed.com.
If you do not have Node.js installed, visit the download page and install it, and then we will continue.
What is Socket.io?
This is the technology that connects the client to the server. In the current example, the client is a web browser, and the server is a Node.js application. The server can work simultaneously with multiple clients at any time.
Once the connection is established, the server can send messages to all clients or to just one of them. That, in turn, can send a message to the server, providing communication in two directions.
Before Socket.io, web applications typically worked on AJAX. Its use required the client to poll the server and vice versa in search of new events. For example, such polls could be performed every 10 seconds to check for new messages.
This gave an additional load, since the search for new messages was conducted even when they were not there at all.
When using Socket.io, messages are received in real time without the need to constantly check their presence, which reduces the load.
Sample Socket.io Application
Before we start collecting real-time competition data, let's make an example application to demonstrate how Socket.io works.
First, I'm going to create a Node.js application. In the console window, go to the directory C: \ GitHub \ NodeJS, create a new folder for the application and in it a new application:
cd \GitHub\NodeJS mkdir SocketExample cd SocketExample npm init
I left the default settings, you can do the same.
Since we are creating a web application, I will use the NPM package called Express to simplify installation. At the command prompt, execute the following commands: npm install express --save.
Of course, we must also install the Socket.io package: npm install socket.io --save
Now you need to start the web server. To do this, create a new index.js file and place the following piece of code:
var app = require('express')(); var http = require('http').Server(app); app.get('/', function(req, res){ res.sendFile(__dirname + '/index.html'); }); http.listen(3000, function(){ console.log('HTTP server started on port 3000'); });
If Express is not familiar to you, the sample code above includes the Express library; here comes the creation of a new HTTP server. In the example, the HTTP server listens on port 3000, i.e.
localhost : 3000. The path goes to the root, “/”. The result is returned as an HTML file index.html.
Before creating this file, let's finish the server launch by configuring Socket.io. To create a Socket server, execute the following commands:
var io = require('socket.io')(http); io.on('connection', function(socket){ console.log('Client connection received'); });
As in the case of Express, the code starts with the import of the Socket.io library. This is indicated by the io variable. Further, using this variable, we create an event handler with the on function. This event is fired whenever a client connects to the server.
Now let's create a simple client. To do this, you need to make the file index.html and place such code inside:
<!doctype html> <html> <head> <title>Socket.IO Example</title> </head> <body> <script src="/socket.io/socket.io.js"></script> <script> var socket = io(); </script> </body> </html>
The HTML above loads the Socket.io JavaScript client and initializes the connection to the server. To see an example, run Node: node index.js.
Further in the browser we enter
localhost : 3000. The page will remain empty, but if you look at the console during the execution of a Node, you will see two messages:
HTTP server started on port 3000
Client connection receivedNow that we have successfully connected, let's continue the work. For example, send a message to the client from the server. Then, when the client receives it, a reply message will be sent:
io.on('connection', function(socket){ console.log('Client connection received'); socket.emit('sendToClient', { hello: 'world' }); socket.on('receivedFromClient', function (data) { console.log(data); }); });
The previous io.on function has been updated to include several new lines of code. The first, socket.emit, sends a message to the client. sendToClient is the name of the event. By naming events, you get the ability to send different types of messages, so that the client can interpret them differently. Another update is socket.on, where there is also the name of the event: receivedFromClient. All this creates a function that receives data from the client. In this case, they are also recorded in the console window.
The completed steps complete server preparation. Now he can receive and send data from any connected client.
Let's complete this example by updating the client by getting the sendToClient event. When an event is received, the receivedFromClient response is given.
This completes the javascript part of HTML. Add to index.html:
var socket = io(); socket.on('sendToClient', function (data) { console.log(data); socket.emit('receivedFromClient', { my: 'data' }); });
Using the socket built-in variable, we get similar logic on the server with the socket.on function. The client listens for the sendToClient event. Once the client is connected, the server sends this message. The client, receiving it, writes an event in the browser console. After that, the client uses the same socket.emit that the server previously used to send the original event. In this case, the client sends the received FromClient event to the server. When he receives a message, it is logged in the console window.
Try it yourself. First, in the console, start your Node application: node index.js. Then download
localhost : 3000 in your browser.
Check the browser console, and you will see the following in the JSON logs: {hello: "world"}
Then, while the Node application is running, you will see the following:
HTTP server started on port 3000
Client connection received
{my: 'data'}Both client and server can use JSON data to perform specific tasks. Let's see how you can work with the competition data in real time.
Information from the competition
After we understand the principles of sending and receiving data by the client and server, it is worth trying to ensure that updates are performed in real time. I used the competition data, although the same can be done not only with sports information. But since we are working with it, then you need to find a source. They will serve
MySportsFeeds . Service fee - from $ 1 per month, keep in mind.
Once the account is set up, you can start working with their API. For this, you can use the NPM package: npm install mysportsfeeds-node --save.
After installing the package, connect the API:
var MySportsFeeds = require("mysportsfeeds-node"); var msf = new MySportsFeeds("1.2", true); msf.authenticate("********", "*********"); var today = new Date(); msf.getData('nhl', '2017-2018-regular', 'scoreboard', 'json', { fordate: today.getFullYear() + ('0' + parseInt(today.getMonth() + 1)).slice(-2) + ('0' + today.getDate()).slice(-2), force: true });
In the example above, replace my data with your own.
The code makes an API call to get today's NHL results. The fordate variable is what determines the date. I also used force and true to get data in response even if the results are the same.
With the current setup, the results of the API call are written to a text file. In the last example, we will change this; for demonstration purposes, the results file can be viewed in a text editor to understand the content of the answer. In our result, we see the result table object. This object contains an array called gameScore. It saves the result of each game. Each object in turn contains a child object, called a game. This object provides information about who plays.
Outside the game object there are several variables that provide a display of the current state of the game. Data changes depending on its results. When the game has not started yet, variables are used that provide information on when this will happen. When the game has begun, additional data on the results are provided, including information on what period is now and how much time is left. In order to better understand what is at stake, let's move on to the next section.
Real time updates
We have all the pieces of the puzzle, so let's assemble it! Unfortunately, MySportsFeeds has limited support for data output, so you will have to constantly request information. There is a positive point here: we know that the data changes only once every 10 minutes, so it is not necessary to interrogate the service too often. Received data can be sent from the server to all connected clients.
To get the necessary data, I will use the setInterval JavaScript function, which allows you to access the API (in my case) every 10 minutes to search for updates. When data arrives, the event is sent to all connected clients. The results are then updated via JavaScript in a web browser.
MySportsFeeds is also addressed when the Node application is launched first. The results will be used for any customers who connect before the first 10-minute interval. Information about this is stored in a global variable. It, in turn, is updated as part of the interval survey. This ensures that each of the clients will have relevant results.
To make everything good in the main index.js file, I created a new file with the name data.js. It contains the function, exported from index.js, that performs the previous MySportsFeeds API call. Here is the full content of this file:
var MySportsFeeds = require("mysportsfeeds-node"); var msf = new MySportsFeeds("1.2", true, null); msf.authenticate("*******", "******"); var today = new Date(); exports.getData = function() { return msf.getData('nhl', '2017-2018-regular', 'scoreboard', 'json', { fordate: today.getFullYear() + ('0' + parseInt(today.getMonth() + 1)).slice(-2) + ('0' + today.getDate()).slice(-2), force: true }); };
The getData function is exported and returns the results of the call. Let's look at what we have in the index.js file.
var app = require('express')(); var http = require('http').Server(app); var io = require('socket.io')(http); var data = require('./data.js');
The first seven lines of code above provide the initialization of the required libraries and the call to the global variable latestData. The latest list of used libraries is: Express, Http Server, created using Express, Socket.io plus the newly created data.js file.
Taking into account the needs, the application fills in the latest data (latestData) for clients that will connect when the server is first started:
The next few lines set the path for the main page of the site (in our case
localhost : 3000 /) and give the command to the HTTP server to listen to port 3000.
Then Socket.io is configured to search for new connections. When they are detected, the server sends event data with the contents of the latestData variable.
And finally, the last piece of code creates the required polling interval. When it is detected, the latestData variable is updated with the results of the API call. This data then passes the same event to all clients.
As we can see, when a client connects and determines an event, it is issued from a socket variable. This allows you to send an event to a specific connected client. Inside the interval, the global io is used to send an event. It sends data to all customers. Server setup is complete.
How will it look like
Now let's work on the client frontend. In the earlier example, I created a basic index.html file that establishes a connection with the client in order to record server events and send them. Now I will extend the file.
Since the server sends us a JSON object, I will use jQuery and a jQuery extension called JsRender. This is a template library. It will allow me to create an HTML template that will be used to display the contents of each NHL game in a convenient form. Now you can see the breadth of its capabilities. The code contains more than 40 lines, so I will divide it into several smaller sections, and in the end I will show all the HTML content.
Here is what is used to display game data:
<script id="gameTemplate" type="text/x-jsrender"> <div class="game"> <div> {{:game.awayTeam.City}} {{:game.awayTeam.Name}} at {{:game.homeTeam.City}} {{:game.homeTeam.Name}} </div> <div> {{if isUnplayed == "true" }} Game starts at {{:game.time}} {{else isCompleted == "false"}} <div>Current Score: {{:awayScore}} - {{:homeScore}}</div> <div> {{if currentIntermission}} {{:~ordinal_suffix_of(currentIntermission)}} Intermission {{else currentPeriod}} {{:~ordinal_suffix_of(currentPeriod)}}<br/> {{:~time_left(currentPeriodSecondsRemaining)}} {{else}} 1st {{/if}} </div> {{else}} Final Score: {{:awayScore}} - {{:homeScore}} {{/if}} </div> </div> </script>
The template is defined using the script tag. It contains a template identifier and a special type of script called text / x-jsrender. The template defines a div container for each game that contains a game class for applying a specific base style. Inside this div is the beginning of the template.
The next div displays the guest team and the host team. This is implemented by combining the city name and team name with the game object from the MySportsFeeds data.
{{: game.awayTeam.City}} is how I define an object that will be replaced with a physical value when rendering a template. This syntax is defined by the JsRender library.
When the game is unPlayed, a line will appear in which the game will start with {{: game.time}}.
Until the game is completed, the current score is displayed: {{away away}}} - {{: homeScore}}. And finally, a small reception that will allow you to determine what period it is and clarify whether there is a break now.
If the currentIntermission variable appears in the results, then I use the I function defined by ordinal_suffix_of, which converts the period number to the following text: 1st (2nd, 3rd, etc.) Break.
When there is no break, I'm looking for the value of currentPeriod. It also uses ordinal_suffix_of to indicate that the game is in the 1st (2nd, 3rd, and so on) periods.
In addition, another function, which I defined as time_left, is used to convert the number of seconds remaining until the end of the period. For example: 10:12.
The last part of the code displays the final result when the game is over.
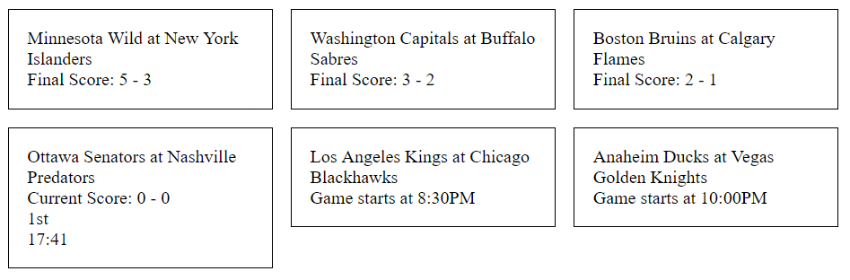
Here is an example of what it looks like when there is a mixed list of completed games, games that are not yet completed, and games that have not yet begun (I’m not a very good designer, so the result looks the way it should when a developer creates custom interface for the application do it yourself):
Next is a JavaScript fragment that creates a socket, helper functions ordinal_suffix_of and time_left, and a variable that refers to the jQuery template created.
<script> var socket = io(); var tmpl = $.templates("#gameTemplate"); var helpers = { ordinal_suffix_of: function(i) { var j = i % 10, k = i % 100; if (j == 1 && k != 11) { return i + "st"; } if (j == 2 && k != 12) { return i + "nd"; } if (j == 3 && k != 13) { return i + "rd"; } return i + "th"; }, time_left: function(time) { var minutes = Math.floor(time / 60); var seconds = time - minutes * 60; return minutes + ':' + ('0' + seconds).slice(-2); } }; </script>
The final snippet is the code for accepting the socket event and rendering the template:
socket.on('data', function (data) { console.log(data); $('#data').html(tmpl.render(data.scoreboard.gameScore, helpers)); });
I have a separator with a data id. The template render result (tmpl.render) writes HTML to this container. What is really cool is that the JsRender library can accept an array of data, in this case data.scoreboard.gameScore, which iterates through each element in the array and creates one game per element.
Here is the final version promised above, where HTML and JavaScript are brought together:
<!doctype html> <html> <head> <title>Socket.IO Example</title> </head> <body> <div id="data"> </div> <script id="gameTemplate" type="text/x-jsrender"> <div class="game"> <div> {{:game.awayTeam.City}} {{:game.awayTeam.Name}} at {{:game.homeTeam.City}} {{:game.homeTeam.Name}} </div> <div> {{if isUnplayed == "true" }} Game starts at {{:game.time}} {{else isCompleted == "false"}} <div>Current Score: {{:awayScore}} - {{:homeScore}}</div> <div> {{if currentIntermission}} {{:~ordinal_suffix_of(currentIntermission)}} Intermission {{else currentPeriod}} {{:~ordinal_suffix_of(currentPeriod)}}<br/> {{:~time_left(currentPeriodSecondsRemaining)}} {{else}} 1st {{/if}} </div> {{else}} Final Score: {{:awayScore}} - {{:homeScore}} {{/if}} </div> </div> </script> <script src="https://cdnjs.cloudflare.com/ajax/libs/jquery/3.3.1/jquery.min.js"></script> <script src="https://cdnjs.cloudflare.com/ajax/libs/jsrender/0.9.90/jsrender.min.js"></script> <script src="/socket.io/socket.io.js"></script> <script> var socket = io(); var helpers = { ordinal_suffix_of: function(i) { var j = i % 10, k = i % 100; if (j == 1 && k != 11) { return i + "st"; } if (j == 2 && k != 12) { return i + "nd"; } if (j == 3 && k != 13) { return i + "rd"; } return i + "th"; }, time_left: function(time) { var minutes = Math.floor(time / 60); var seconds = time - minutes * 60; return minutes + ':' + ('0' + seconds).slice(-2); } }; var tmpl = $.templates("#gameTemplate"); socket.on('data', function (data) { console.log(data); $('#data').html(tmpl.render(data.scoreboard.gameScore, helpers)); }); </script> <style> .game { border: 1px solid #000; float: left; margin: 1%; padding: 1em; width: 25%; } </style> </body> </html>
Now is the time to launch the Node application and open
localhost : 3000 in order to see the result!
Every X minutes the server sends an event to the client. The client, in turn, will redraw the game elements with updated data. Therefore, when you leave the site open, the game results will be constantly updated.
Conclusion
The final product uses Socket.io to create a server to which clients connect. The server retrieves the data and sends it to the client. When the client receives the data, it can update the results gradually. This reduces the load on the server, since the client acts only when it receives an event from the server.
The server can send messages to the client, and the client, in turn, to the server. When the server receives a message, it performs data processing.
Chat applications work much the same. The server will receive a message from the client, and then transmit all the data to the connected clients to show that someone has sent a new message.
I hope you enjoyed this article, as I, when developing this real-time sports application, just got a lot of fun, which I wanted to share with my knowledge. After all, hockey is one of my favorite sports!
