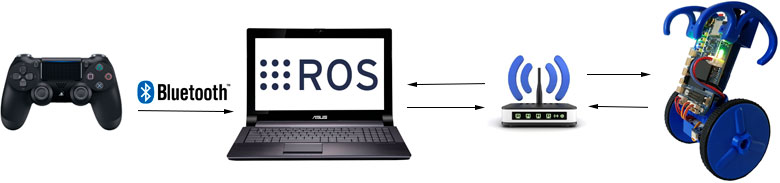
This is a simple example of how using ROS can connect multiple devices over a network and send control data.
Under the cut at the end - a video demonstration of the robot control from the joystick.
We will need the joystick itself, you can take it from your ps4 or buy it in a store. I bought dualshock 4 v2, the first version should work too.
You also need bluetooth on your computer with ROS, the driver documentation recommends usb blutooth adapters version 2.1+. It worked fine with the adapter built into the laptop. You can also connect a joystick and just a usb cable.
Then in Ubuntu c ROS you need to install the
driver according to the instructions .
After installing the drivers and connecting the joystick on the bluetooth, run the jstest-gtk graphical utility and see that we have two joysticks, we need the second one, since it has all the buttons and sticks.

Since ROS works with joy0 by default, we need to override this with joy1:
sudo chmod a+rw /dev/input/js1 rosparam set joy_node/dev "/dev/input/js1"
Now we need to connect it all into a single network. A laptop with ROS will be master, and EduMip with BeagleBone Blue ROS will be connected via wifi to a laptop. Both devices are in the wifi router's local network.
On your PC, set the ROS environment variables to search for the ros (roscore) wizard on a PC with .bashrc commands (add these commands to the end of your .bashrc file):
“export ROS_MASTER_URI=http://192.168.10.101:11311” <- ROS IP- , ros (roscore). “export ROS_IP=192.168.10.101” <- ROS IP- ( ).
On your EduMIP, set the ROS environment variables so that it finds the ros (roscore) wizard on a PC with .bashrc commands (add these commands to the end of your .bashrc file):
“export ROS_MASTER_URI=http://192.168.10.101:11311” <- ROS IP- , ros (roscore). “export ROS_IP=192.168.10.102” <- ROS IP- ( EduMIP).
It remains only to write a program that will read the position of the stick from the joystick and send it to the topic, and the robot to read this topic.
On your PC, you can visually look at the nodes and topics by running “rqt_graph”:

Demonstration of robot control using a joystick:
Summary: With the help of ROS, you can build a system for work distributed over several devices and, for example, perform large calculations on the main computer, while on the robot itself, leave only what is needed for quick response. BeagleBone Blue is equipped with a programmable real-time subsystem (PRU-ICSS).
PRU-ICSS consists of a microprocessor on two 32-bit cores that have a RISC architecture and operate at a frequency of 200 MHz. Each core has its own memory area, as well as a memory area shared with Linux, it can use general-purpose pins located on the P8-P9 connectors and form interrupts.
In addition, the MPU9250 sensor installed on the BeagleBone Blue can form an interrupt on which the function can be hung, which is actually done in EduMip.
If we talk about the next step of evolution, then this is ROS2, where one of the differences is the DDS (Data Distribution Service) allowing to build a network of different interacting robots and devices on which ROS is not running.