Hello!
In this article, we will demonstrate the basic components for creating RESTful microservices using the Consul service registry, Spring Boot for all scaffolding, dependency injection, Maven for building, as well as Spring REST and Jersey / JaxRS Java RESTful API.
The main advantages of microservices:
- Microservices allow you to loosen your code.
- Microservices allow various teams to work on small components using independent technologies, providing a more secure and frequent deployment. Spring Boot supports various implementations to create a REST API.
- Service discovery and calling does not depend on the service platform
- Swagger creates robust API documentation and a call interface.
If you are not using microservices yet, you didn’t have time in the early followers phase of the technology perception curve, and it’s probably time to start.

Over the past two decades, the enterprise has become very flexible in our SDLC process, but our applications, as a rule, still remain monolithic, with huge jars that support all the various APIs and versions on the market. But now there is a desire for more Lean, DevOps processes, and the functionality becomes “serverless”. Refactoring to microservices can reduce code and resource hooking, make assemblies smaller, releases safer, and APIs more stable.
In this article, we will create a simple portfolio management application for the stock market that customers can call to evaluate their stock portfolio (stock tickers and values). The portfolio microservice will retrieve the client's portfolio, send it to the pricing microservice to apply the latest prices, and then return the fully priced and subtotalized portfolio, showing all this through a rest call.

Before we begin work on creating our microservices, let's prepare our environment by setting up Consul.
Download Consul
We will use the Hashicorp Consul to discover services, so go to
www.consul.io/downloads.html and download Consul for Windows, Linux, Mac, etc. This will provide you with an executable file that you need to add to your path.
Run Consul
At the command prompt, start Consul in dev mode:
consul agent -dev
To make sure that it is running, go to the browser and access the consul interface
http: // localhost: 8500 . If all goes well, the consul must report that he is alive and well. By clicking on the service of the consul (left), you will receive additional information (right).

If there are any problems at the moment, make sure that you add the Consul to the execution path, and ports 8500 and 8600 are available.
Create a SpringBoot app
We will use
Spring Initializr , which is integrated into most IDEs, for scaffolding our SpringBoot applications. The screenshots below use IntelliJ IDEA.
Select “File / New Project” to open a new project template, and then “Spring Initializr”.
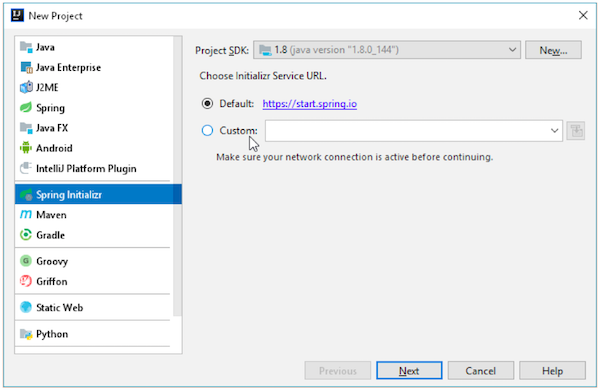
In general, you can set up scaffolding without an IDE by filling out an online form through the SpringBoot Initializr
start.spring.io web page, which will create a zip file of your empty project, ready for download.
Click “Next” and fill in the project metadata. Use the following configuration:

Click “Next” to select the dependencies, and enter “Jersey” and “Consul Discovery” in the dependency search. Add these dependencies:

Click “Next” to specify the name of the project and its location. Save the default name “portfolio” and specify the preferred location of the project, then click “finish” to create and open the project:

We can use the generated application.properties, but SpringBoot also recognizes the YAML format, which is a bit easier to visualize, so let's rename it application.yml.
Let's call microservice “portfolio-service”. We can specify a port or use port 0 so that the application uses the available port. In our case, we will use 57116. If you place this service as a Docker container, you will be able to match it with any port you choose. Name the application and specify our port by adding the following to our application.yml:
spring: application: name: portfolio-service server: port: 57116
To make our service available, add an annotation to our class of applications SpringBoot. Open the PortfolioApplication application and add @EnableDiscoveryClient above the class declaration.
Confirm the import. The class should look like this:
package com.restms.demo.portfolio; import org.springframework.cloud.client.discovery.EnableDiscoveryClient; . . . @SpringBootApplication @EnableDiscoveryClient public class PortfolioApplication { public static void main(String[] args) { SpringApplication.run(PortfolioApplication.class, args); } }
(To demonstrate how microservices can consist of independent platforms, we will use Jersey for this service and Spring REST for the next).
To configure a RESTful web service on Jersey, we need to specify the ResourceConfig configuration class. Add a JerseyConfig class (for demonstration, we will save it in the same package as our application class). It should look like this, plus the correct package and import:
@Configuration @ApplicationPath("portfolios") public class JerseyConfig extends ResourceConfig { public JerseyConfig() { register(PortfolioImpl.class); } }
Note that it is inherited from ResourceConfig to designate it as a jersey configuration class. The @ApplicationPath (“portfolios”) attribute defines the context of the call, which means that calls must begin with the element of the “portfolios” path. (If you omit it, the default context is “/”).
The PortfolioImpl class will serve two queries: portfolios / customer / {customer-id} returns all portfolios and portfolios / customer / {customer-id} / portfolio / {portfolio-id} returns one portfolio. A portfolio consists of a set of tickers and the number of shares owned by this ticker. (For the demonstration, there are three clients with identifiers 0, 1 and 2, each of which has three portfolios with identifiers 0, 1 and 2).
Your IDE will ask you to create a PortfolioImpl; do it now. For demonstration, add it to the same package. Enter the code below and confirm all imports:
@Component @Path("/") public class PortfolioImpl implements InitializingBean { private Object[][][][] clientPortfolios; @GET @Path("customer/{customer-id}") @Produces(MediaType.APPLICATION_JSON) // a portfolio consists of an array of arrays, each containing an array of // stock ticker and associated shares public Object[][][] getPortfolios(@PathParam("customer-id") int customerId) { return clientPortfolios[customerId]; } @GET @Path("customer/{customer-id}/portfolio/{portfolio-id}") @Produces(MediaType.APPLICATION_JSON) public Object[][] getPortfolio(@PathParam("customer-id") int customerId, @PathParam("portfolio-id") int portfolioId) { return getPortfolios(customerId)[portfolioId]; } @Override public void afterPropertiesSet() throws Exception { Object[][][][] clientPortfolios = { { // 3 customers, 3 portfolios each {new Object[]{"JPM", 10201}, new Object[]{"GE", 20400}, new Object[]{"UTX", 38892}}, {new Object[]{"KO", 12449}, new Object[]{"JPM", 23454}, new Object[]{"MRK", 45344}}, {new Object[]{"WMT", 39583}, new Object[]{"DIS", 95867}, new Object[]{"TRV", 384756}}, }, { {new Object[]{"GE", 38475}, new Object[]{"MCD", 12395}, new Object[]{"IBM", 91234}}, {new Object[]{"VZ", 22342}, new Object[]{"AXP", 385432}, new Object[]{"UTX", 23432}}, {new Object[]{"IBM", 18343}, new Object[]{"DIS", 45673}, new Object[]{"AAPL", 23456}}, }, { {new Object[]{"AXP", 34543}, new Object[]{"TRV", 55322}, new Object[]{"NKE", 45642}}, {new Object[]{"CVX", 44332}, new Object[]{"JPM", 12453}, new Object[]{"JNJ", 45433}}, {new Object[]{"MRK", 32346}, new Object[]{"UTX", 46532}, new Object[]{"TRV", 45663}}, } }; this.clientPortfolios = clientPortfolios; } }
The
Component annotation refers to this as the Spring component class and provides it as an endpoint.
Path annotations on the class declaration declare that the class is accessed through the “/” path element, and two supported api calls are available through portfolios / customer / {customer-id} and portfolios / customer / {customer-id} / portfolio / {portfolio- id}, as we see from the annotations of the method. Note that the path ("/") is the default, but we leave it for reference. Methods are denoted as HTTP GET via @GETannotation. Our method is designed to return an array and annotated to return a Json, so it returns an array of Json. Notice how
Path Param annotations are used in the method signature to extract the mapped parameters from the displayed queries.
(For our demo, we return hardcoded values. Of course, in practice, the implementation will query the database or other service or data source instead of the hardcode.)
Now create a project and run it. If you use IntelliJ, it will create a default executable file, so just click the green “run” arrow. You can also use
mvn spring-boot:run
Or you can install maven and run the application using java -jar, pointing to the generated jar in the target directory:
java -jar target\portfolio-0.0.1-SNAPSHOT.jar
Now we should see this service in Consul, so let's go back to our browser, download
http: // localhost: 8500 / ui / # / dc1 / services (or update if you are already there).

Hmm, we see our service there, but it is displayed as failed. This is because Consul expects a "healthy" heartbeat signal from our service.
To generate heartbeat signals, we can add a dependency on the
Spring “Actuator” service to the pom of our application.
<dependency> <groupId>org.springframework.boot</groupId> <artifactId>spring-boot-starter-actuator</artifactId> </dependency>
While we are in pom, note that there is a version conflict with Jersey between Consul-starter and Jersey-starter. To smooth this out, assign a Jersey-starter first addiction.
Now your pom should contain the following dependencies:
<dependencies> <dependency> <groupId>org.springframework.boot</groupId> <artifactId>spring-boot-starter-jersey</artifactId> </dependency> <dependency> <groupId>org.springframework.cloud</groupId> <artifactId>spring-cloud-starter-consul-discovery</artifactId> </dependency> <dependency> <groupId>org.springframework.boot</groupId> <artifactId>spring-boot-starter-actuator</artifactId> </dependency> <dependency> <groupId>org.springframework.boot</groupId> <artifactId>spring-boot-starter-test</artifactId> <scope>test</scope> </dependency> </dependencies>
After restarting Consul, the Portfolio service displays happy:

Now in the portfolio-service there are two transmitting nodes: one of them is our implementation of the portfolio service, and the other is heartbeat.
Let's check the port that was assigned. You can see that in the output of the application:
INFO 19792 --- [ main] sbcetTomcatEmbeddedServletContainer : Tomcat started on port(s): 57116 (http)
You can also see the port directly in the Consul user interface. Click “customer-service”, then select the “Service 'customer-service' check link” link that displays the service port, in this case 57116.

Request
http: // localhost: 57116 / portfolios / customer / 1 / portfolio / 2 and you will see the json array [["IBM", 18343], ["DIS", 45673], ["AAPL", 23456]]
Our first microservice is open for business!
Pricing service
Next, we will create our pricing service, this time using Spring RestController instead of Jersey.
The pricing service will take the client ID and the portfolio ID as parameters and will use RestTemplate to request the portfolio service, receive tickers and stocks, and return current prices. (I don't need to tell you that these values are fake news, so do not use them to make trading decisions!)
Create a new project using the following information:

This time, select the Web, Consul Discovery, and Actuator dependencies:

Leave the default project name “pricing” and create a project in your chosen directory.
This time we will use application.properties instead of application.yml.
Set the name and port in application.properties as:
spring.application.name=pricing server.port=57216
Annotate PricingApplication with @EnableDiscoveryClient. The class should look like this, plus the package and import.
@SpringBootApplication @EnableDiscoveryClient public class PricingApplication { public static void main(String[] args) { SpringApplication.run(PricingApplication.class, args); } }
Then we will create a class PricingEndpoint. Here I will give a more detailed example, since it demonstrates several important functions, including the discovery of services (search for portfolio service) and the use of RestTemplate for querying:
@RestController @RequestMapping("/pricing") public class PricingEndpoint implements InitializingBean { @Autowired DiscoveryClient client; Map<String, Double> pricingMap = new HashMap<>(); RestTemplate restTemplate = new RestTemplate(); @GetMapping("/customer/{customer-id}/portfolio/{portfolio-id}") public List<String> getPricedPortfolio( @PathVariable("customer-id") Integer customerId, @PathVariable("portfolio-id") Integer portfolioId) { List<ServiceInstance> instances = client.getInstances("portfolio-service"); ServiceInstance instance = instances.stream() .findFirst() .orElseThrow(() -> new RuntimeException("not found")); String url = String.format("%s/portfolios/customer/%d/portfolio/%d", instance.getUri(), customerId, portfolioId); // query for the portfolios, returned as an array of List // of size 2, containing a ticker and a position (
To find a portfolio service, we need to have access to the DiscoveryClient. It's easy to get it with Spring's @Autowired annotation.
@Autowired DiscoveryClient client;
This instance of DiscoveryClient is then used to find the service in the call:
List<ServiceInstance> instances = client.getInstances("portfolio-service"); ServiceInstance instance = instances.stream().findFirst().orElseThrow(() -> new RuntimeException("not found"));
After the service is found, we can use it to fulfill our request, which we compose in accordance with the api call created in our portfolio service.
String url = String.format("%s/portfolios/customer/%d/portfolio/%d", instance.getUri(), customerId, portfolioId);
Finally, we use RestTemplate to execute our GET request.
Object[] portfolio = restTemplate.getForObject(url, Object[].class);
Note that for Rest controllers (as for Spring MVC Request Controller), path variables are extracted using the
Path Variable annotation, unlike Jersey, which, as we have seen, uses the
Path Param.
This concludes our pricing with Spring RestController.
Documentation
We have solved all these problems in order to create our microservices, but they will not bring enough benefit if we do not give the world knowledge about how to use them.
To do this, we use the convenient and easy-to-use tool
Swagger , which not only documents our API calls, but also provides a convenient web client to call them.
First, let's specify the Swagger in our pom:
<dependency> <groupId>io.springfox</groupId> <artifactId>springfox-swagger2</artifactId> <version>2.7.0</version> </dependency> <dependency> <groupId>io.springfox</groupId> <artifactId>springfox-swagger-ui</artifactId> <version>2.7.0</version> </dependency>
Then we need to tell Swagger which of our classes we want to document. Let's introduce the new SwaggerConfig class containing the Swagger specification.
@Configuration @EnableSwagger2 public class SwaggerConfig { @Bean public Docket api() { return new Docket(DocumentationType.SWAGGER_2) .select() .apis(RequestHandlerSelectors.any()) .paths(PathSelectors.regex("/pricing.*")) .build(); } }
Let's see what this class does. First, we designated this as a Swagger configuration with the @ EnableSwagger2 annotation.
Then we created the Docket component, which tells Swagger which APIs to display. In the example above, we told Swagger to demonstrate any path starting with "/ pricing". An alternative would be to specify classes for documentation, and not for paths:
.apis(RequestHandlerSelectors.basePackage("com.restms.demo")) .paths(PathSelectors.any())
Restart the price microservice and call
http: // localhost: 57216 / swagger-ui.html from the browser

Click “List Operations” to view service operations in detail.
Click “Expand Operations” to create a request based on the form. Set some parameters, click “Try it out!” And wait for the answer:

You can add a lot more colors by adding Swagger annotations to your methods.
For example, decorate the existing PricingImpl.getPricedPortfolio method using the @ApiOperation annotation, as shown below:
@ApiOperation(value = "Retrieves a fully priced portfolio", notes = "Retrieves fully priced portfolio given customer id and portfolio id") @GetMapping("/customer/{customer-id}/portfolio/{portfolio-id}") public List<String> getPricedPortfolio(@PathVariable("customer-id") Integer customerId, @PathVariable("portfolio-id") Integer portfolioId)
Reload and update swagger-ui to see the new updated documentation:

And this is not all that you can do with Swagger, so read the documentation.
Yuri Dvorzhetsky , the teacher of our course
“Developer on the Spring Framework”, will tell you more about Spring Boot’s work:
Original article