
Hello!
Angular version 2.0.0 was released in September 2016. And immediately a large number of approaches to building and building applications on this framework appeared. On the Internet you can find Angular seed for every taste.
We also created our own Angular seed: we created a common project-template, obliged all the teams developing the front-end to use the same application structure.
And in half a year, in March 2017, the Angular cli version (cli - command-line interface) 1.0.0 was released. The idea, taken as a basis, is simply excellent: systematize the approach to developing applications on Angular 2+. Standardize the structure of the application, create the entities within the application, and automate the assembly of the application. These tasks and allows you to solve Angular cli, greatly saving your time.
In the article, I will show how to switch to
Angular cli 6Development with a custom project structure has quite a few advantages:
- full control over the application;
- ability to customize webpack / gulp / everything else, taking into account all the features of your application.
There are disadvantages:
- if there are several projects, you need to ensure that their structure is identical;
- it is necessary to follow the update of the used npm-modules and libraries (Angular and Webpack, for example, develop very dynamically);
- You will have to integrate npm-modules and configure the environment for working with Angular, connect the hot module replacement (HMR), use the Ahead-of-Time assembly (AOT).
You can eliminate the drawbacks in several ways, one of which is to create a common
project-template . Highlight a developer who occasionally updates it. Require all front-end teams to use the same application structure, applying the best development practices on your framework. In this example, this framework will be
Angular , and the core of the application will be
angular-cli .
At the time of this writing, the sixth version was released with the integration of webpack 4. There are a lot of innovations, I will mention only a few improvements:
- automatic creation of a library of components;
- the emergence of ng-update, which makes supporting projects on Angular cli even easier;
- integration with webpack 4, and therefore, the smaller size of the final bundles, a significant acceleration of build time, etc. The full list of updates can be found here ;
- the ability to customize Angular cli with Schematics .
I must say that in the sixth version of angular cli there are a lot of bugs. I will tell about some of them. Some of them are associated with angular cli, some with webpack 4. For example, some popular webpack loaders do not currently support the fourth version of the collector. I am sure that these are temporary difficulties.
It should be noted that the angular cli functional out of the box is enough, in my opinion, to solve 95% of the tasks of a standard application. If you are lucky enough to refine the remaining 5%, do not worry - you can configure angular cli for your project. However, in the sixth version of the framework, the ng eject feature, which allows you to get webpack.config, is temporarily disabled, so you have to wring your head a little.
Preparing for the transition
- Install the node.js version> = 8.9
- Perform npm i –g angular / cli (globally set angular-cli to execute commands in the console using ng).
- Go to the project directory and execute ng new <name of your project> (let's call the project: angular-cli-project, example of the command: ng new angular-cli-project - a folder with the name angular-cli-project will appear in the current directory).
The result of the preparation:
 More about the structure of the project on Angular cli and not only.
Next, we will make the basic settings for comfortable development.
Cli setting
1)
Connect the HMR (apply changes in the code without reloading the page) on the
guide . Also in
package.json we add
hmr to scripts and the
--open flag in order not to open the original page in the browser:

At the time of writing of the article in cli A6, when configuring the HMR through the above guide, you may encounter the following errors:
a) When connecting HMR configuration to angular.json
… "configurations": { "hmr": { "hmr": true, "fileReplacements": [{ "src": "src/environments/environment.ts", "replaceWith": "src/environments/environment.hmr.ts" }] }, …
Unfortunately, you get an error:
“Schema validation failed with the following errors:
Data path "" should NOT have additional properties (fileReplacements) ”.To fix it, do this:
… "configurations": { "hmr": { "hmr": true, "browserTarget": "angular-cli-project:build:hmr" }, …
The difference is that you need to specify
"browserTarget": "angular-cli-project: build: hmr" , where the value of the
browserTarget property consists of
<project-name>: build: hmr .
In addition, the substitution of the
HMR environment should be done not in
serve , but in
architect / build :
… "architect": { "build": { … "configurations": { "hmr": { "fileReplacements": [ { "src": "src/environments/environment.ts", "replaceWith": "src/environments/environment.hmr.ts" } ] }, …
b)
ERROR error
in src / main.ts: Cannot find name 'module' is fixed like this: in
tsconfig.app.json we delete the
“types” line: [] .
2.
Connect the preprocessor :
In angular.json add:
… "projects": { … "prefix": "app", "schematics": { "@schematics/angular:component": { "styleext": "less" } } …
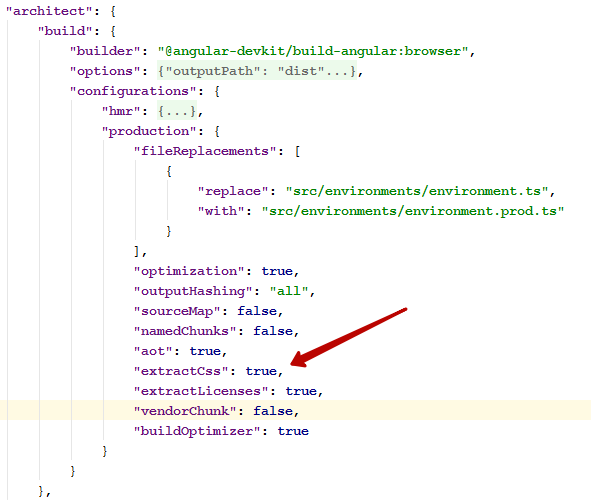
If your styles are in the
assets folder and merged with imports in base.less or scss, and the output is a .css file, then add
“extractCss”: true to
angular.json :
Also currently in HMR mode, the update in global less files imported through
import will not work. To work around this problem, temporarily install
less-loader@3.0.0 .
3.
Connect the autoprefixer . Specify which browsers need prefixes in
package.json :
… "browserslist": [ "last 2 versions", "IE 10", "IE 11" ], …
4.
Add icon processing using
gulp and svgstore , especially since
gulp of the fourth version has finally been released. Perform
npm i gulp@4.0.0 gulp-inject gulp-rename gulp-svgmin gulp-svgstore --SD and create a small
Gulpfile.js (see the
final application ).
Details on
Gulp will not stop - all questions, please, in the comments.
Specify in the
index.html notation for inserting SVG:
<div style="height: 0; width: 0; overflow: hidden; opacity: 0;position: absolute; top: 0;left: 0;"> </div>
Modify
package.json by adding
task SVG :
… "scripts": { ... "svg": "gulp svg", ... …
Now we can use SVG in our templates like this:
<svg> <use href='#icon-check'/> </svg>
5)
Install webpack-bundle-analyzerRunning the command:
npm i webpack-bundle-analyzer –-SD .
In
angular.json, add
“statsJson”: true :
"architect": { "build": { "builder": "@angular-devkit/build-angular:browser", "options": { ... "statsJson": true, ...
Now we can see what our bundle actually consists of. To automate this somehow, add the
report script to
package.json :
… "scripts": { ... "report": "webpack-bundle-analyzer dist/stats.json" ... …
An example of using webpack-bundle-analyzer:

Setting up the basic functionality is complete.
Now open our custom angular application and copy the modules, images, styles, etc. into the prepared template. I will copy everything from the final draft of the
article .
Run the command:
npm run hmr and get a few errors from rxjs, which migrated from the fifth to the sixth version. The following
guide will help
fix them .
The final application .
Run the command:
npm run build and get the result:
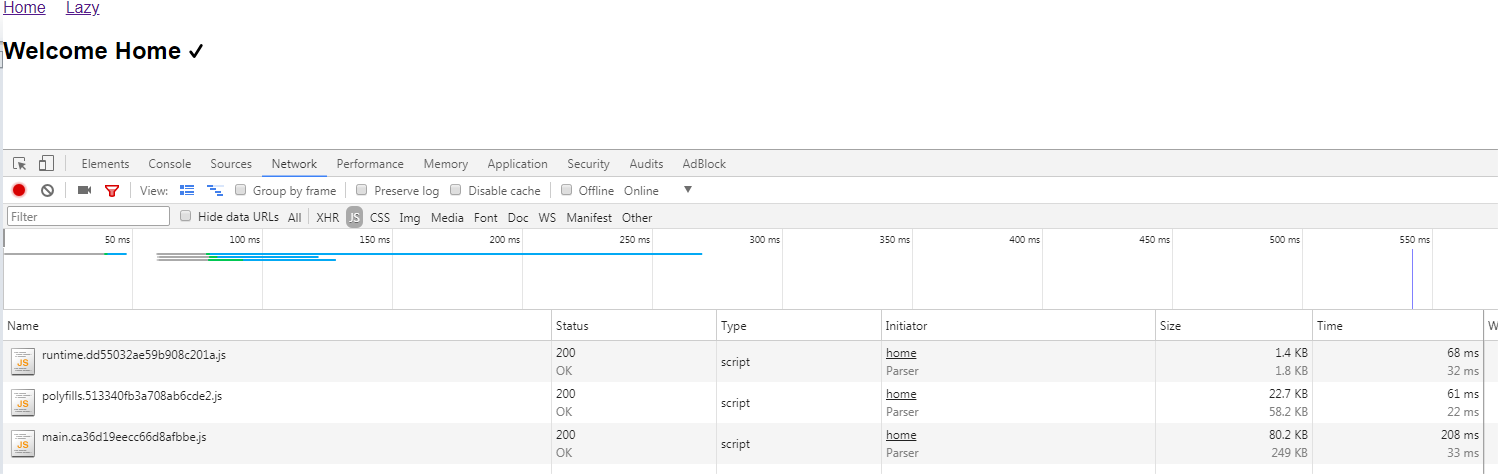
PS As you can see, so far the size of the bundle is quite large, though, it includes routing, rxjs, etc. However, the Angular team announced a new render engine Ivy and hello world application of 2.7 KB in size. Look forward to.
Thanks for attention.