Vue.js is a framework for developing web applications. It has a reactivity system that allows the developer to simulate and control the state of the application. As a result, when data changes, this is automatically reflected in the user interface, and the developer does not need to access the DOM. If you create applications using pure JavaScript or jQuery, this means that you have to explicitly access the DOM elements and update them in order to reflect changes in the application state in the interface, for example, to display some data on a web page.
In the case of large projects, manual control of state synchronization and application interface is a difficult task. The author of the material, the translation of which we present to your attention today, wants to share some of the results of his research aimed at comparing two versions of a
progressive web application using
Hoodie , which is
a shopping list . The basic version of this application is written in pure JS (in
this article you can find details about it). The translation of the application to Vue.js will be shown here along with an overview of the basic features of this framework and an analysis of what happened in the end.
 Ready application
If you want to work through this material, you can download the
source code of the application in pure JS and follow the author, reworking it using Vue.
Adding products to the list
▍JavaScript
The application allows the user to add products to their shopping list. This is done in the
index.html file in the
public folder. The markup is contained in lines 92-124 of this file. Here she is.
<div> <div class="mdl-grid center-items"> <div class="mdl-textfield mdl-js-textfield mdl-textfield--floating-label"> <input class="mdl-textfield__input" type="text" id="new-item-name"> <label class="mdl-textfield__label" for="new-item-name">Item Name</label> </div> <div class="mdl-textfield mdl-js-textfield mdl-textfield--floating-label"> <input class="mdl-textfield__input" type="number" id="new-item-cost"> <label class="mdl-textfield__label" for="new-item-cost">Item Cost</label> </div> <div class="mdl-textfield mdl-js-textfield mdl-textfield--floating-label"> <input class="mdl-textfield__input" type="number" id="new-item-quantity"> <label class="mdl-textfield__label" for="new-item-quantity">Quantity</label> </div> </div> <div class="mdl-grid center-items"> <button id="add-item" class="mdl-button mdl-js-button mdl-button--raised mdl-button--colored"> Add Item </button> </div> </div>
The code for processing and saving data is in the file
public/js/src/index.js . The
saveItems() function on line 28 is responsible for collecting values from the controls used for data entry and for storing this data. This function is tied to the
click event of the
add-item button. Here is the code in question.
function saveNewitem() { let name = document.getElementById("new-item-name").value; let cost = document.getElementById("new-item-cost").value; let quantity = document.getElementById("new-item-quantity").value; let subTotal = cost * quantity; if (name && cost && quantity) { hoodie.store.withIdPrefix("item").add({ name: name, cost: cost, quantity: quantity, subTotal: subTotal }); document.getElementById("new-item-name").value = ""; document.getElementById("new-item-cost").value = ""; document.getElementById("new-item-quantity").value = ""; } else { let snackbarContainer = document.querySelector("#toast"); snackbarContainer.MaterialSnackbar.showSnackbar({ message: "All fields are required" }); } } document.getElementById("add-item").addEventListener("click", saveNewitem);
▍Vue
Before reworking this project using Vue, you need to connect the framework to the page. In our case, in the
index.html file, this is done as follows:
<script src="https://cdn.jsdelivr.net/npm/vue@2.5.16/dist/vue.js"></script>
In addition, there was added a
<div> element with the
app identifier, which will include all page elements located inside the
body tag. This is necessary because when the Vue instance is initialized, the framework needs to be informed about which part of the page it should manage. In this case, we inform the framework that it should deal with everything that is in this block.
Now let's move on to translating the project to Vue. To begin, modify the markup in order to use some Vue directives. Vue directives are special attributes with the prefix
v- . Here's what the updated markup looks like.
<form v-on:submit.prevent="onSubmit"> <div class="mdl-grid center-items"> <div class="mdl-textfield mdl-js-textfield mdl-textfield--floating-label"> <input class="mdl-textfield__input" type="text" id="new-item-name" v-model="name"> <label class="mdl-textfield__label" for="new-item-name">Item Name</label> </div> <div class="mdl-textfield mdl-js-textfield mdl-textfield--floating-label"> <input class="mdl-textfield__input" type="number" id="new-item-cost" v-model.number="cost"> <label class="mdl-textfield__label" for="new-item-cost">Item Cost</label> </div> <div class="mdl-textfield mdl-js-textfield mdl-textfield--floating-label"> <input class="mdl-textfield__input" type="number" id="new-item-quantity" v-model.number="quantity"> <label class="mdl-textfield__label" for="new-item-quantity">Quantity</label> </div> </div> <div class="mdl-grid center-items"> <button id="add-item" class="mdl-button mdl-js-button mdl-button--raised mdl-button--colored"> Add Item </button> </div> </form>
The
v-on directive used here is used to listen for DOM events. In the code snippet above, it is used in the form element to listen for the
submit event. In addition, it uses the
.prevent modifier, which tells the
v-on directive to call
event.preventDefault() in the called event. We used the
v-model directive for the elements used for data entry. It is needed, as applied to form elements, to create two-way data binding. This allows the system to automatically select the correct way to update an item based on its type. We used the
.number modifier for the
cost and
quantity elements.
This ensures that the type of the value is automatically converted from the input field to a number. This is done due to the fact that even if the type is set to
type=number , the value will always be returned as a string. The modifiers used here automate the execution of additional checks that previously had to be performed independently.
Next, create a new file,
index-vue.js , in which we place the code equivalent to the one that was in
index.js , but using the features of Vue. Below is the code for this file. This creates an instance of Vue with the necessary properties for handling form events and collecting data.
const vm = new Vue({ el: "#app", data: { name: "", cost: "", quantity: "" }, methods: { onSubmit: function(event) { if (this.name && this.cost && this.quantity) { hoodie.store.withIdPrefix("item").add({ name: this.name, cost: this.cost, quantity: this.quantity, subTotal: this.cost * this.quantity }); this.name = ""; this.cost = ""; this.quantity = ""; } else { const snackbarContainer = document.querySelector("#toast"); snackbarContainer.MaterialSnackbar.showSnackbar({ message: "All fields are required" }); } } } });
In this code snippet, an instance of Vue is created, and an object is passed to it, telling Vue how to configure the application. The
el property tells the framework the ID of the DOM element whose contents will be controlled by Vue, considering it to be its “territory”. It is inside this element that Vue will consider the framework-specific directives (and everything else related to Vue), and, during the framework initialization process, it will configure the bindings and event handlers for the application.
The
data property contains the state of the application. All properties in the object that is present here will be, when Vue is initialized, added to the framework's reactivity system. It is the actions of this system that lead to an update of the user interface when the values associated with the DOM change. For example, the
name property is bound to the
name control using the directive
v-model="name" . This directive sets the two-way data binding between the property and the control in such a way that when something is added to the input field (or something is removed from it), the
name property is updated. As a result, the contents of the input field reflect the current state of the
name property.
Similarly, the binding works with other controls.
The
methods property contains functions. In the above code, the
onSubmit() function is
onSubmit() , which is tied to the
submit() form event.
Output of the saved data to the page
▍JavaScript
The
onSubmit function saves data to Hoodie. After that we need to output, in the form of a table, the elements added to the repository. In the case of an application written in ordinary JS, the corresponding markup looks like this:
<div class="mdl-grid center-items"> <table id="item-table" class="mdl-data-table mdl-js-data-table mdl-shadow--2dp"> <thead> <tr> <th class="mdl-data-table__cell--non-numeric">Item Name</th> <th class="mdl-data-table__cell--non-numeric">Cost</th> <th class="mdl-data-table__cell--non-numeric">Quantity</th> <th class="mdl-data-table__cell">Sub-total</th> <th class="mdl-data-table__cell--non-numeric"> <button class="mdl-button mdl-js-button mdl-button--icon"> <i class="material-icons">delete</font></i> </button> </th> </tr> </thead> <tbody> </tbody> </table> </div> <div class="mdl-grid center-items"> <div class="mdl-textfield mdl-js-textfield mdl-textfield--floating-label"> <input class="mdl-textfield__input" type="number" id="total-cost" readonly value="0"> <label class="mdl-textfield__label" for="cost">Total Item Cost</label> </div> </div> <script id="item-row" type="text/template"> <tr id='{{row-id}}'> <td class="mdl-data-table__cell--non-numeric">{{name}}</td> <td class="mdl-data-table__cell--non-numeric">{{cost}}</td> <td class="mdl-data-table__cell--non-numeric">{{quantity}}</td> <td class="mdl-data-table__cell">{{subTotal}}</td> <td class="mdl-data-table__cell--non-numeric"> <button class="mdl-button mdl-js-button mdl-button--icon mdl-button--colored" onclick="pageEvents.deleteItem('{{item-id}}')"> <i class="material-icons">remove</font></i> </button> </td> </tr> </script>
The table will contain dynamically added data, so there’s a way to replace the placeholders with real data and attach what came out to the DOM. In our case, this problem is solved using micro-patterns.
Below is the code that displays the elements in the user interface as they are added.
function addItemToPage(item) { if (document.getElementById(item._id)) return; let template = document.querySelector("#item-row").innerHTML; template = template.replace("{{name}}", item.name); template = template.replace("{{cost}}", item.cost); template = template.replace("{{quantity}}", item.quantity); template = template.replace("{{subTotal}}", item.subTotal); template = template.replace("{{row-id}}", item._id); template = template.replace("{{item-id}}", item._id); document.getElementById("item-table").tBodies[0].innerHTML += template; let totalCost = Number.parseFloat( document.getElementById("total-cost").value ); document.getElementById("total-cost").value = totalCost + item.subTotal; } hoodie.store.withIdPrefix("item").on("add", addItemToPage);
This code snippet retrieves the template from the DOM, replaces the placeholders with real data and attaches what came out to the DOM. Then the
total-cost indicator is calculated, the total amount for all elements of the list, which is also displayed in the interface.
▍Vue
When switching to Vue, the template used by the script was deleted, and the elements of the table were redesigned to use the Vue
v-for directive, which allows you to loop through the property that contains the elements data. Here is what the corresponding markup now looks like.
<div class="mdl-grid center-items"> <table id="item-table" class="mdl-data-table mdl-js-data-table mdl-shadow--2dp"> <thead> <tr> <th class="mdl-data-table__cell--non-numeric">Item Name</th> <th class="mdl-data-table__cell--non-numeric">Cost</th> <th class="mdl-data-table__cell--non-numeric">Quantity</th> <th class="mdl-data-table__cell">Sub-total</th> <th class="mdl-data-table__cell--non-numeric"> <button class="mdl-button mdl-js-button mdl-button--icon"> <i class="material-icons">delete</font></i> </button> </th> </tr> </thead> <tbody> <tr v-for="item in items" :key="item._id"> <td class="mdl-data-table__cell--non-numeric">{{ item.name}}</td> <td class="mdl-data-table__cell--non-numeric">{{ item.cost}}</td> <td class="mdl-data-table__cell--non-numeric">{{ item.quantity}}</td> <td class="mdl-data-table__cell">{{ item.subTotal}}</td> <td class="mdl-data-table__cell--non-numeric"> <button @click="deleteRow(item._id)" class="mdl-button mdl-js-button mdl-button--icon mdl-button--colored"> <i class="material-icons">remove</font></i> </button> </td> </tr> </tbody> </table> </div> <div class="mdl-grid center-items"> <div class="mdl-textfield mdl-js-textfield mdl-textfield--floating-label"> <h4>Total Cost: {{ total }}</h4> </div> </div>
In fact, the changes in the markup are not so big. The contents of the previously used micro template are copied and the Vue text interpolation directives and mechanisms are used. The
v-for directive is applied to display a list of items whose data was taken from the
items property. Data is displayed in columns using the capabilities of the Vue
{{ item.name }} construct. This mechanism is similar to the placeholders used in the micro template. The total amount is also displayed on the page using text interpolation technology.
Now we will modify the JavaScript code in the
index-vue.js and get the following.
const vm = new Vue({ el: "#app", data: { name: "", cost: "", quantity: "", items: [] }, computed: { // total: function() { // `this` vm return this.items.reduce( (accumulator, currentValue) => accumulator + currentValue.subTotal, 0 ); } }, methods: { ..... } }); hoodie.store.withIdPrefix("item").on("add", item => vm.items.push(item));
The variant of the described mechanism, prepared by means of Vue, turned out to be much shorter and simpler than what was created using the usual JS. In this code, the data property
items been added, it is used in the aforementioned
v-for directive. When adding an item, Hoodie calls a function that performs
vm.items.push(item) operation to update the state of the application, and this, thanks to the Vue reactivity system, leads to automatic updating of the user interface. In order to calculate the total amount, there is no need to refer to the DOM elements. Here, a computed property is used that processes the
items data set using the
.reduce() function. Now, thanks to the Vue reactivity system, the user interface is updated as these values change. The good thing is that all this allows the programmer not to worry about working with DOM elements in code. As a result, using a smaller code, we solved the same task, which required much more code in the case of regular JS (probably, if instead of the usual JS, the jQuery library would be used in a similar situation, the cat would also come out larger than the one that turned out when using Vue).
Save items as a list
▍JavaScript
After adding items, they need to be saved for later use, and so that later it would be possible to add to the system and other lists of items. The application has a
Save List button, which is responsible for collecting data, for saving them as a group of items using Hoodie, and for allowing the user to add a new set of items to the system.
When using regular JavaScript, the corresponding function is bound to the
onClick button
onClick . Here is the markup.
//index.html <div class="mdl-grid center-items"> <button class="mdl-button mdl-js-button mdl-button--raised mdl-button--colored" onclick="pageEvents.saveList()"> Save List </button> </div>
Here is the function code.
//index.js function saveList() { let cost = 0; hoodie.store .withIdPrefix("item") .findAll() .then(function(items) { for (var item of items) { cost += item.subTotal; } // hoodie.store.withIdPrefix("list").add({ cost: cost, items: items }); // hoodie.store .withIdPrefix("item") .remove(items) .then(function() { // document.getElementById("item-table").tBodies[0].innerHTML = ""; // var snackbarContainer = document.querySelector("#toast"); snackbarContainer.MaterialSnackbar.showSnackbar({ message: "List saved succesfully" }); }) .catch(function(error) { // var snackbarContainer = document.querySelector("#toast"); snackbarContainer.MaterialSnackbar.showSnackbar({ message: error.message }); }); }); } window.pageEvents = { deleteItem: deleteItem, saveList: saveList .... };
▍Vue
Switching to Vue will not require much change. We still need to bind the handler to the event called when the button is clicked, in addition, we need to add a method, which is the handler of this event, to the
methods property of the Vue object when it is initialized.
This is what the markup will now look like.
<div class="mdl-grid center-items"> <button @click="saveList" class="mdl-button mdl-js-button mdl-button--raised mdl-button--colored"> Save List </button> </div>
The
@click="saveList" is a shortcut for
v-on:click="saveList" . This mechanism is used to listen for DOM events. In the
methods property of the Vue object, the same
saveList function is
saveList , which is used in the application variant written in pure JS.
Navigation bar
▍JavaScript
Now that items can be saved as a list, we would like to be able to view previously saved lists with data on the total value of the items they contain. This information will be displayed on another page, it will look like the one below.
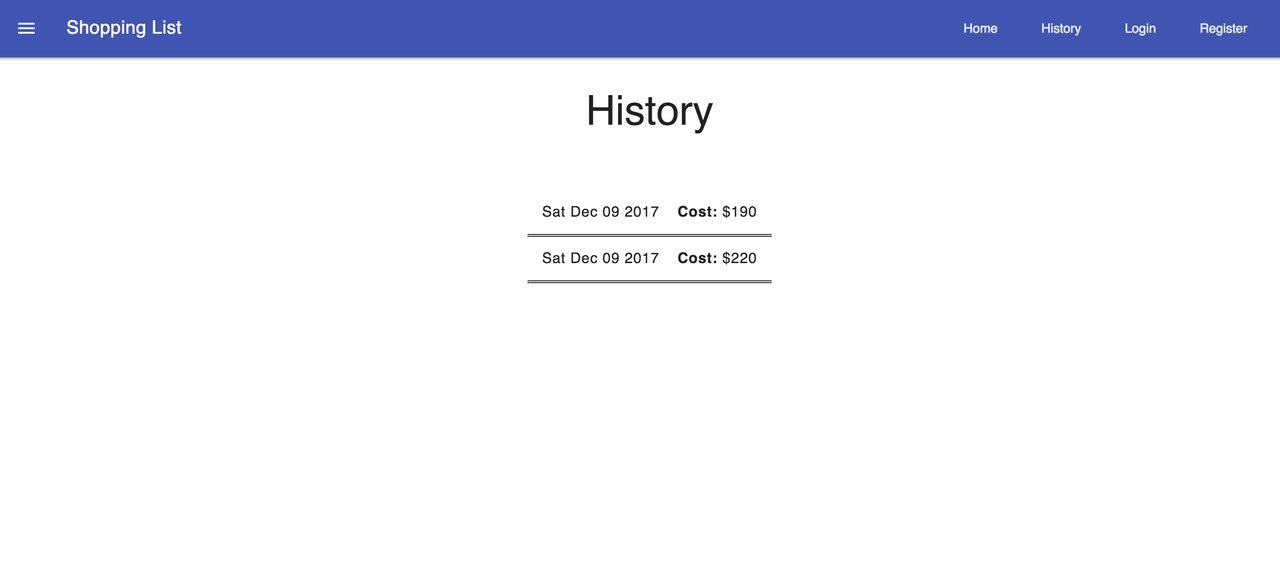 Data on previously created product listings
The markup of this page is in the file
public/history.html , the corresponding JS code is in the file
public/js/src/history.js . This page and
index.html have something in common. This is a navigation bar located at the top of the window. This panel contains links to various pages, the
Login and
Register links, which invoke dialog forms for entering the system and registering with it. There is also a
Signout button for logging out.
In the version of the application created using ordinary JS, it was necessary to duplicate the same markup on both pages. Here is the HTML code of the navigation bar.
<header class="mdl-layout__header"> <div class="mdl-layout__header-row"> <span class="mdl-layout-title">Shopping List</span> <div class="mdl-layout-spacer"></div> <nav class="mdl-navigation mdl-layout--large-screen-only"> <a class="mdl-navigation__link" href="index.html">Home</a> <a class="mdl-navigation__link" href="history.html">History</a> <a onclick="pageEvents.showLogin()" style="cursor: pointer" class="mdl-navigation__link login">Login</a> <a onclick="pageEvents.showRegister()" style="cursor: pointer" class="mdl-navigation__link register">Register</a> <a onclick="pageEvents.signout()" style="cursor: pointer" class="mdl-navigation__link logout">Logout</a> </nav> </div> </header> <div class="mdl-layout__drawer"> <span class="mdl-layout-title">Shopping List</span> <nav class="mdl-navigation"> <a class="mdl-navigation__link" href="index.html">Home</a> <a class="mdl-navigation__link" href="history.html">History</a> <a onclick="pageEvents.showLogin()" style="cursor: pointer" class="mdl-navigation__link login">Login</a> <a onclick="pageEvents.showRegister()" style="cursor: pointer" class="mdl-navigation__link register">Register</a> <a onclick="pageEvents.signout()" style="cursor: pointer" class="mdl-navigation__link logout">Logout</a> </nav> </div>
After analyzing this code, you will notice that when clicking on the
Login ,
Register and
Logout links, the corresponding functions will be called. Event handlers for the elements described in this markup are defined in the
index.js file.
import * as shared from "shared.js"; .... shared.updateDOMLoginStatus(); window.pageEvents = { showLogin: shared.showLoginDialog, showRegister: shared.showRegisterDialog, signout: shared.signOut };
Functions responsible for working with the navigation bar are declared in the file
shared.js .
// let loginDialog = document.querySelector("#login-dialog"); dialogPolyfill.registerDialog(loginDialog); let registerDialog = document.querySelector("#register-dialog"); dialogPolyfill.registerDialog(registerDialog); let showLoginDialog = function() { loginDialog.showModal(); }; let showRegisterDialog = function() { registerDialog.showModal(); }; let showAnonymous = function() { document.getElementsByClassName("login")[0].style.display = "inline"; document.getElementsByClassName("login")[1].style.display = "inline"; document.getElementsByClassName("register")[0].style.display = "inline"; document.getElementsByClassName("register")[1].style.display = "inline"; document.getElementsByClassName("logout")[0].style.display = "none"; document.getElementsByClassName("logout")[1].style.display = "none"; }; let showLoggedIn = function() { document.getElementsByClassName("login")[0].style.display = "none"; document.getElementsByClassName("login")[1].style.display = "none"; document.getElementsByClassName("register")[0].style.display = "none"; document.getElementsByClassName("register")[1].style.display = "none"; document.getElementsByClassName("logout")[0].style.display = "inline"; document.getElementsByClassName("logout")[1].style.display = "inline"; }; let updateDOMLoginStatus = () => { hoodie.account.get("session").then(function(session) { if (!session) { // showAnonymous(); } else if (session.invalid) { // , showAnonymous(); } else { // showLoggedIn(); } }); }; let signOut = function() { hoodie.account .signOut() .then(function() { showAnonymous(); let snackbarContainer = document.querySelector("#toast"); snackbarContainer.MaterialSnackbar.showSnackbar({ message: "You logged out" }); location.href = location.origin; }) .catch(function() { let snackbarContainer = document.querySelector("#toast"); snackbarContainer.MaterialSnackbar.showSnackbar({ message: "Could not logout" }); }); }; export { signOut, showRegisterDialog, showLoginDialog, updateDOMLoginStatus };
This code exports the functions that were used in
index.js . The
showLoginDialog() and
showRegisterDialog() functions show modal dialog boxes, respectively, for logging into the system and for registering with it. The
signout() function allows the user to log out and calls the
showAnonymous() function, which hides the
Logout link and shows only the
Register and
Login links. The
updateDOMLoginStatus() function checks if the user is authenticated and displays the appropriate links. This function is called when the page loads.
In order for two different pages to have the same navigation bar, we had to duplicate the markup, access the DOM elements, and use the CSS capabilities to show and hide the links in the panels. Let's look at an alternative navigation bar created by Vue.
▍Vue
Many web applications have the same snippets used on different pages. For example - navigation bars. Such entities should be put into some containers or presented in the form of components suitable for reuse. Vue provides a developer with a component mechanism that can be used to solve problems like the one we are considering. Vue components are self-contained and reusable.
Translating the project to the use of Vue components we create a new file,
shared-vue.js . Inside this file is described component Vue, which is a navigation bar. This is what its code looks like.
Vue.component("navigation", { props: ["isLoggedIn", "toggleLoggedIn"], template: `<div> <header class="mdl-layout__header"> <div class="mdl-layout__header-row"> <span class="mdl-layout-title">Shopping List</span> <div class="mdl-layout-spacer"></div> <nav class="mdl-navigation mdl-layout--large-screen-only"> <a class="mdl-navigation__link" href="index.html">Home</a> <a class="mdl-navigation__link" href="history.html">History</a> <a v-show="!isLoggedIn" @click="showLogin" style="cursor: pointer" class="mdl-navigation__link login">Login</a> <a v-show="!isLoggedIn" @click="showRegister" style="cursor: pointer" class="mdl-navigation__link register">Register</a> <a v-show="isLoggedIn" @click="logout" style="cursor: pointer" class="mdl-navigation__link logout">Logout</a> </nav> </div> </header> <div class="mdl-layout__drawer"> <span class="mdl-layout-title">Shopping List</span> <nav class="mdl-navigation"> <a class="mdl-navigation__link" href="index.html">Home</a> <a class="mdl-navigation__link" href="history.html">History</a> <a v-show="!isLoggedIn" @click="showLogin" style="cursor: pointer" class="mdl-navigation__link login">Login</a> <a v-show="!isLoggedIn" @click="showRegister" style="cursor: pointer" class="mdl-navigation__link register">Register</a> <a v-show="isLoggedIn" @click="logout" style="cursor: pointer" class="mdl-navigation__link logout">Logout</a> </nav> </div> </div>`, methods: { showLogin: function() { const loginDialog = document.querySelector("#login-dialog"); dialogPolyfill.registerDialog(loginDialog); loginDialog.showModal(); }, showRegister: function() { const registerDialog = document.querySelector("#register-dialog"); dialogPolyfill.registerDialog(registerDialog); registerDialog.showModal(); }, logout: function() { hoodie.account .signOut() .then(() => { this.toggleLoggedIn(); }) .catch(error => { alert("Could not logout"); }); } } });
Vue,
navigation , , , Vue. —
props .
props — . , , ,
props .
isLoggedIn , .
,
template , , . , , JS, , Vue —
v-show @click .
v-show .
Logout ,
isLoggedIn true ,
false —
Login Register . , Vue
v-if v-else .
.
@click —
v-on:click .
showLogin ,
showRegister logout .
methods .
logout , ,
this.toggleLoggedIn() ,
props . ,
props , ,
isLoggedin , . , Vue DOM.
index.html . , 59-84. .
<navigation v-bind:is-logged-in="isLoggedIn" v-bind:toggle-logged-in="toggleLoggedIn"></navigation>
JS-
isLoggedIn toggleLoggedIn , ,
props , , kebab-case.
v-bind .
isLoggedIn .
: v-bind , .
<navigation :is-logged-in="isLoggedIn" :toggle-logged-in="toggleLoggedIn"></navigation>
isLoggedIn ,
toggleLoggedIn — , Vue
index-vue.js . .
const vm = new Vue({ el: "#app", data: { name: "", cost: "", quantity: "", items: [], isLoggedIn: false }, computed: { .....// }, methods: { toggleLoggedIn: function() { this.isLoggedIn = !this.isLoggedIn; }, ......// } }); .....// hoodie.account.get("session").then(function(session) { if (!session) { // vm.isLoggedIn = false; } else if (session.invalid) { vm.isLoggedIn = false; } else { // vm.isLoggedIn = true; } });
Vue , , , , Vue. , Vue DOM , .
▍JavaScript
Login Register , . , , , . 171-244
index.html 100-158
history.html .
<dialog id="login-dialog" class="mdl-dialog"> <h4 class="mdl-dialog__title">Login</h4> <div class="mdl-dialog__content"> <div class="mdl-grid center-items"> <div class="mdl-textfield mdl-js-textfield"> <input class="mdl-textfield__input" type="text" id="login-username"> <label class="mdl-textfield__label" for="login-username">Username</label> </div> </div> <div class="mdl-grid center-items"> <div class="mdl-textfield mdl-js-textfield"> <input class="mdl-textfield__input" type="password" id="login-password"> <label class="mdl-textfield__label" for="login-password">Password</label> </div> </div> <div class="mdl-grid center-items"> <div class="mdl-textfield mdl-js-textfield"> <span id="login-error"></span> </div> </div> </div> <div class="mdl-dialog__actions"> <button onclick="pageEvents.closeLogin()" type="button" class="mdl-button close">Cancel</button> <button onclick="pageEvents.login()" type="button" class="mdl-button">Login</button> </div> </dialog> <dialog id="register-dialog" class="mdl-dialog"> <h4 class="mdl-dialog__title">Login</h4> <div class="mdl-dialog__content"> <div class="mdl-grid center-items"> <div class="mdl-textfield mdl-js-textfield"> <input class="mdl-textfield__input" type="text" id="register-username"> <label class="mdl-textfield__label" for="register-username">Username</label> </div> </div> <div class="mdl-grid center-items"> <div class="mdl-textfield mdl-js-textfield"> <input class="mdl-textfield__input" type="password" id="register-password"> <label class="mdl-textfield__label" for="register-password">Password</label> </div> </div> <div class="mdl-grid center-items"> <div class="mdl-textfield mdl-js-textfield"> <span id="register-error"></span> </div> </div> </div> <div class="mdl-dialog__actions"> <button onclick="pageEvents.closeRegister()" type="button" class="mdl-button close">Cancel</button> <button onclick="pageEvents.register()" type="button" class="mdl-button">Register</button> </div> </dialog>
, ,
shared.js index.js .
//shared.js // let loginDialog = document.querySelector("#login-dialog"); dialogPolyfill.registerDialog(loginDialog); let registerDialog = document.querySelector("#register-dialog"); dialogPolyfill.registerDialog(registerDialog); let closeLoginDialog = function() { loginDialog.close(); }; let closeRegisterDialog = function() { registerDialog.close(); }; let showAnonymous = function() { ... }; let showLoggedIn = function() { .... }; let signOut = function() { .... }; let updateDOMLoginStatus = () => { .... }; let login = function() { let username = document.querySelector("#login-username").value; let password = document.querySelector("#login-password").value; hoodie.account .signIn({ username: username, password: password }) .then(function() { showLoggedIn(); closeLoginDialog(); let snackbarContainer = document.querySelector("#toast"); snackbarContainer.MaterialSnackbar.showSnackbar({ message: "You logged in" }); }) .catch(function(error) { console.log(error); document.querySelector("#login-error").innerHTML = error.message; }); }; let register = function() { let username = document.querySelector("#register-username").value; let password = document.querySelector("#register-password").value; let options = { username: username, password: password }; hoodie.account .signUp(options) .then(function(account) { return hoodie.account.signIn(options); }) .then(account => { showLoggedIn(); closeRegisterDialog(); return account; }) .catch(function(error) { console.log(error); document.querySelector("#register-error").innerHTML = error.message; }); }; export { register, login, closeRegisterDialog, closeLoginDialog, ... };
index.js.
//index.js window.pageEvents = { closeLogin: shared.closeLoginDialog, showLogin: shared.showLoginDialog, closeRegister: shared.closeRegisterDialog, showRegister: shared.showRegisterDialog, login: shared.login, register: shared.register, signout: shared.signOut };
▍Vue
Vue . , .
Vue.component("login-dialog", { data: function() { return { username: "", password: "" }; }, props: ["toggleLoggedIn"], template: `<dialog id="login-dialog" class="mdl-dialog"> <h4 class="mdl-dialog__title">Login</h4> <div class="mdl-dialog__content"> <div class="mdl-grid center-items"> <div class="mdl-textfield mdl-js-textfield"> <input v-model="username" class="mdl-textfield__input" type="text" id="login-username"> <label class="mdl-textfield__label" for="login-username">Username</label> </div> </div> <div class="mdl-grid center-items"> <div class="mdl-textfield mdl-js-textfield"> <input v-model="password" class="mdl-textfield__input" type="password" id="login-password"> <label class="mdl-textfield__label" for="login-password">Password</label> </div> </div> <div class="mdl-grid center-items"> <div class="mdl-textfield mdl-js-textfield"> <span id="login-error"></span> </div> </div> </div> <div class="mdl-dialog__actions"> <button @click="closeLogin" type="button" class="mdl-button close">Cancel</button> <button @click="login" type="button" class="mdl-button">Login</button> </div> </dialog>`, methods: { closeLogin: function() { const loginDialog = document.querySelector("#login-dialog"); dialogPolyfill.registerDialog(loginDialog); loginDialog.close(); }, login: function(event) { hoodie.account .signIn({ username: this.username, password: this.password }) .then(() => { this.toggleLoggedIn(); this.closeLogin(); }) .catch(error => { console.log(error); document.querySelector("#login-error").innerHTML = "Error loggin in"; }); } } });
data ,
props ,
template methods ,
Vue.component() .
, , Vue .
//index.html <login-dialog v-bind:toggle-logged-in="toggleLoggedIn"></login-dialog>
.
, , Vue. ,
, . ,
- Push API .
Results
-, JS, Vue.js. HTML, CSS JavaScript (jQuery), Vue . ES6 , .
Vue , , . , , , Vue. , , Vue .
, JS.
— , Vue.
Dear readers! - ?
