Story
A little background. The first version of Shopkeeper was released in 2009. Then it was a module for CMS
MODX , and more precisely for its first branch, which is now called Evolution. At that time MODX had only one such module, but its quality did not suit me, so I decided to write my own. Plus, I needed some kind of project to build on my PHP programming experience. Since there was almost no competition, my component became the most popular for that version of MODX.
At first, Shopkeeper was the only component for creating a basket of goods and managing orders. Later added functionality to manage the catalog (creating and editing products, etc.).
Later released MODX Revolution. For him, I also developed a new version of my component.
This is how the Shopkeeper 2.0 order management interface looked Then I moved away a bit from development on MODX and went deeper into Front-end development. Mostly at the time I was working on AngularJS 1.x. When it came time to upgrade my component to create an online store, I decided to develop it on AngularJS.
3.2.7-pl3 - The latest version of Shopkeeper from the 3.x branch at the moment.
In my main job, I often use
Symfony ,
Angular 2.0+ and
MongoDB , so I am developing a new version of SHK using these tools.
Feature Overview
Shopkeeper 4.0 is not just a component for CMS, it is an independent engine. I try to make this application as simple as possible, but at the same time flexible. The possibility of integration with other CMS is planned. First of all, integration for MODX Revolution will be done. I believe that it makes no sense to create a highly specialized component for a single CMS. After all, you still have to sell not only the basket of goods, but also the management of the catalog, etc. We must try to create applications as universal as possible.
Shopkeeper 4.0 is currently under development, a beta version has just been released. Already implemented almost all the main features that were planned, but there are minor flaws, as well as plan to add more Ajax.
Opportunities:
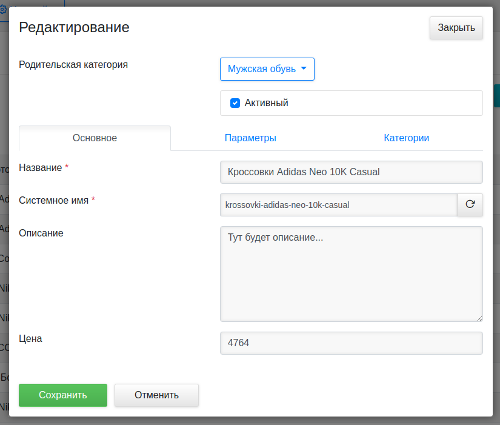
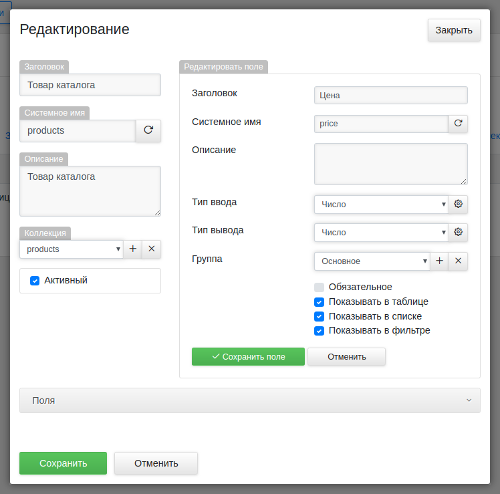
- You can create different types of products with different sets of parameters (fields). For each field, you can select the type of input and output (as in MODX).
- Products can be saved in different collections (tables) of the MongoDB database.
- User management for the administrator.
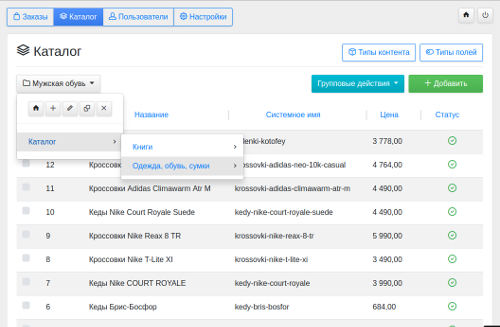
- Order management for the administrator.
- Interface for managing currencies, delivery methods, methods of payment for goods, etc.
- For the buyer there is a personal account where he can track the status of the order and edit their contact details.
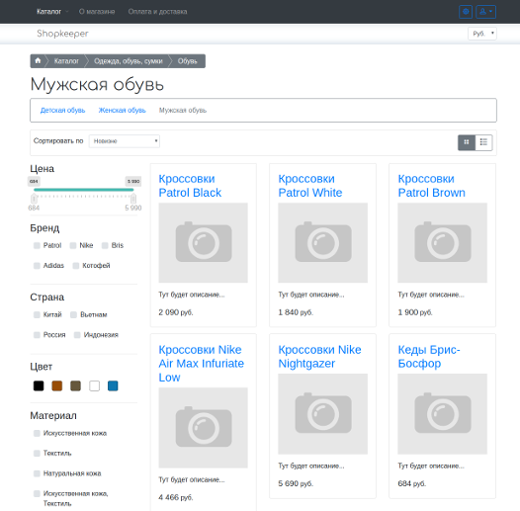
- Display of goods with the ability to filter by parameters.
- Parameters of goods that may affect the price.
- Template with responsive layout using Bootstrap 4.
... another.
Yes, I know that Symfony already has at least one engine to create an online store -
Sylius . But I personally did not really like its implementation. I think you will immediately see the difference in approach. For example, there is no Angular, TypeScript and MongoDB, but for me it is important.
Technical information
In the properties of the content type, you can add a field and select the input type and output type for this field. There is an interface for creating your input and output types.
Data fields of goods in the site template can be displayed in several ways.
Raw data output:
<span class="text-secondary"> {{ currentPage.price }} </span>
Data output using output type template:
{{ renderOutputTypeField(currentPage, fields, 'price') | raw }}
Arguments:
1. Array with all page data.
2. Array with data fields of content type.
3. The system name of the field.
Further I will not enumerate arguments, this information can be received in documentation on GitHub.
Data output by chunk name:
{{ renderOutputTypeChunk(currentPage, fields, 'price') | raw }}
Chunk - a concept taken from MODX. Here, the chunk is used not only as a template name, but also as a label to search for the desired fields. For example, by this label it is determined from which field to take the price of the goods when adding to the basket.
Displays all fields in the properties of which the "Show in list" box is checked.
{{ renderOutputTypeArray(currentPage, fields, 'prefix_') | raw }}
For convenience, many Twig functions have been made. For example, this is the menu of catalog categories:
{{ categoriesTree(0, 'menu_dropdown', null, true) }}
Here, the 4th argument is responsible for managing caching (disabled by default).
If caching is enabled, then all the HTML menu code will be saved in a file. But at the same time it is possible to mark the current menu item. More details in the
documentation .
So the template displays a basket of goods:
{{ shopCart('shop_cart_edit', 'shop_cart_edit_empty') }}
Here the first parameter is the name of the template, the second is the name of the template of the empty basket (it is not necessary to specify).
This is how a simple cart template code looks like, where only the number of selected items and the total price are displayed:
<div class="shop-cart-bottom"> <div class="shop-cart-bottom-b"> <div class="container"> <div class="float-md-left"> {{ 'Selected' | trans }}: <span class="badge badge-pill badge-light big mx-2"> {{ countTotal }} </span> {{ 'product with a total cost|products with a total cost' | transchoice(countTotal) }} <span class="badge badge-light big mx-2"> {{ priceTotal | price }} </span> {{ currency }} </div> <div class="float-md-right mt-3 mt-md-0"> <a class="btn btn-outline-light" href="{{ path('shop_cart_edit') }}"> {{ 'Proceed to checkout' | trans }} </a> <a class="btn btn-outline-light ml-1" href="{{ path('shop_cart_clear') }}" data-toggle="tooltip" data-placement="top" title="{{ 'Empty cart' | trans }}"> <i class="icon-cross"></i> </a> </div> <div class="clearfix"></div> </div> </div> </div>
To automatically resize images, use the
LiipImagineBundle . Example of displaying the product image:
<img src="{{ imageUrl(data) | imagine_filter('thumb_small') }}" alt="">
Here, “thumb_small” is the name of one of the filter sets that are created in the configuration file. By default, three such sets are created: thumb_small, thumb_medium, thumb_big. Read more in the
documentation .
Example of filter set settings:
thumb_small: quality: 85 filters: relative_resize: widen: 200 thumbnail: { size: [200, 200], mode: inset } background: { size: [200, 200], position: center, color: '#ffffff' }
I will not give a link to the demo site, because I am afraid of "habr-effect". But if you want it is easy to find.
I would be grateful for your comments, criticism and pull requests.
Latest version at the moment:
beta3 .
GitHub projectDocumentation