I was prompted to write this article by a question on the Toaster related to WSL. After several years of using systems on the Linux kernel, I switched back to using Windows 10 on my home PC about six months ago. Dependence on the terminal and the Linux environment in my work almost immediately led me to the question: either set a virtual machine or try WSL. I chose the second, and was quite pleased.
Under the cat, I'll tell you how to install and configure WSL, what problems and limitations I came across, how to run Linux applications from Windows and vice versa, as well as integrate elements of the Xfce environment into the Windows desktop environment.
I never thought that I would return to Windows one day, but I was given a chance to try coincidences: my wife, far from IT, tugged almost every time she needed to use a computer; Nostalgia for one game woke up, but she didn’t want to work adequately under wine; and here I was also presented with a boxed Windows 10 Pro. I put the WSL almost immediately after the installation of the system, I played for several evenings, I realized that the product was good for my tasks, but I want a more familiar terminal and in general some amenities.
Installing WSL and Distribution
Immediately make a reservation, on the Internet you can find a description of the installation using the command lxrun /install in the command line or PowerShell console. This method no longer works (after the release of WSL in a stable release). As far as I know, WSL can now be installed only from the Microsoft Store along with the preferred distribution.
I also note that when I made the installation, the distributions of OpenSUSE, SUSE Linux Enterprise and Ubuntu 16.04 were available to choose from - the last one I installed. Ubuntu 18.04, Debian 9 and Kali Linux are also available now, other distributions may appear. Installation steps may vary. Also, some of the problems described in the article may already be fixed.
Find the desired distribution in the store and install it. The installation will be quick, as it only downloads the Linux kernel emulator and the utility for running the subsystem, which will be in the system folder in three instances: wsl.exe, bash.exe and ubuntu.exe (instead of ubuntu will be the name of your distribution). All of them are equivalent and do the same thing - they launch their own terminal emulator, in it a linux bash running under the kernel emulator. When you first start we will be asked to come up with a username and password for the default user, and then the distribution will be installed directly. As the default user, we specify root without a password - this will be required for further steps. Security will not suffer, besides when preparing materials for the article, in an English-language tutorial, I came across information that new versions of WSL are now made the default user by root without a password without asking questions.
We are waiting for the installation. Next, the first thing is to update apt mirrors for the next. To do this, you need a CLI text editor. Only vi is included, but I prefer nano, so I put it:
apt install nano
sudo is not required, since we are already under root. Edit the /etc/apt/sources.list file:
nano /etc/apt/sources.list
Yandex mirrors work best for me, so my file looks like this:
deb http://mirror.yandex.ru/ubuntu/ xenial main universe restricted deb-src http://mirror.yandex.ru/ubuntu/ xenial main universe restricted deb http://mirror.yandex.ru/ubuntu/ xenial-security main universe restricted deb-src http://mirror.yandex.ru/ubuntu/ xenial-security main universe restricted deb http://mirror.yandex.ru/ubuntu/ xenial-updates main universe restricted deb-src http://mirror.yandex.ru/ubuntu/ xenial-updates main universe restricted
Press Ctrl + O to save and Ctrl + X to exit. Now you can upgrade your system to the current state:
apt update && apt upgrade
After the upgrade, you can create our primary user. In this article I will call it user1, but you can set a familiar name:
addgroup --gid 1000 user1 adduser --home /home/user1 --shell /bin/bash --uid 1000 -G user1,sudo user1
Next, go to the user folder, go under it, set a password and edit the file ~ / .bashrc:
cd /home/user1 su user1 passwd nano .bashrc
My basic .bashrc looks like this. That's it, the subsystem is ready for use ... almost ...
Installing the X server, Xfce, and other GUI applications
The very first problem I encountered was that bash-completion in the proposed terminal emulator worked, to put it mildly, incorrectly. In addition, this emulator does not know how to tab, and each copy of it runs everything in a new process space, with a separate init (which cannot be replaced by the way). I wanted a normal terminal emulator, some other GUI applications, as well as a socket to get it all running quickly.
When I googled this question, I came across a lot of problems, such as the need to translate dbus to tcp protocol. At the moment, all these problems are not. In the subsystem, unix-domain-sockets normally work and everything calmly communicates through them.
First of all, we need an X-server, moreover, installed on the main system (in Windows). Personally, I use VcXsrv for this purpose - an X11 port on Windows. The official site specified in the utility itself does not currently provide it, so we google the installer and set everything by default.
While the installation is going back to the WSL terminal, use the exit command to exit back to root. First of all, we set up the Russian locales:
locale-gen ru_RU locale-gen ru_RU.UTF-8 update-locale
Next, install some of the Xfce components. You can of course install it entirely from the meta package, but most of the components we do not need, and the modular architecture of Xfce allows us to deliver only the necessary:
apt install -y xfce4-session xfce4-notifyd xfce4-appfinder xfce4-panel xfce4-quicklauncher-plugin xfce4-whiskermenu-plugin xfce4-xkb-plugin xfce4-settings xfce4-terminal xfce4-taskmanager mousepad
It’s not very convenient to run the environment each time with my hands, so I automated this process. To do this, in the main system we will create a folder in a convenient place for us, and in it there will be 3 files to run:
- config.xlaunch - configuration file for VcXsrv
<?xml version="1.0" encoding="UTF-8"?> <XLaunch WindowMode="MultiWindow" ClientMode="NoClient" LocalClient="False" Display="0" LocalProgram="xcalc" RemoteProgram="xterm" RemotePassword="" PrivateKey="" RemoteHost="" RemoteUser="" XDMCPHost="" XDMCPBroadcast="False" XDMCPIndirect="False" Clipboard="True" ClipboardPrimary="True" ExtraParams="" Wgl="True" DisableAC="False" XDMCPTerminate="False" />
x-run.vbs - WSL always starts with its terminal emulator; if you close it, all its child processes will end. So that this window does not callous eyes, it is not bad to launch it hidden. Fortunately, Windows has a built-in VBScript interpreter that allows you to do this in one line:
WScript.CreateObject("Shell.Application").ShellExecute "wsl", "cd /home/user1; DISPLAY=:0 LANG=ru_RU.UTF-8 su user1 -c xfce4-session", "", "open", 0
I will explain what is happening here. We tell VBscript to run the wsl application with the cd /home/user1; DISPLAY=:0 LANG=ru_RU.UTF-8 su user1 -c xfce4-session cd /home/user1; DISPLAY=:0 LANG=ru_RU.UTF-8 su user1 -c xfce4-session , the launch folder is not important to us, so the empty line, the action open is start, 0 is hidden mode. We issue the wsl command itself: go to the user’s folder, then with setting the environment variables DISPLAY (X server display) and LANG (used locale), we run xfce4-session on behalf of our user user1 (thanks to the su command)
- start.bat - batch file to start, if desired it can be thrown into autoload
start config.xlaunch wscript x-run.vbs
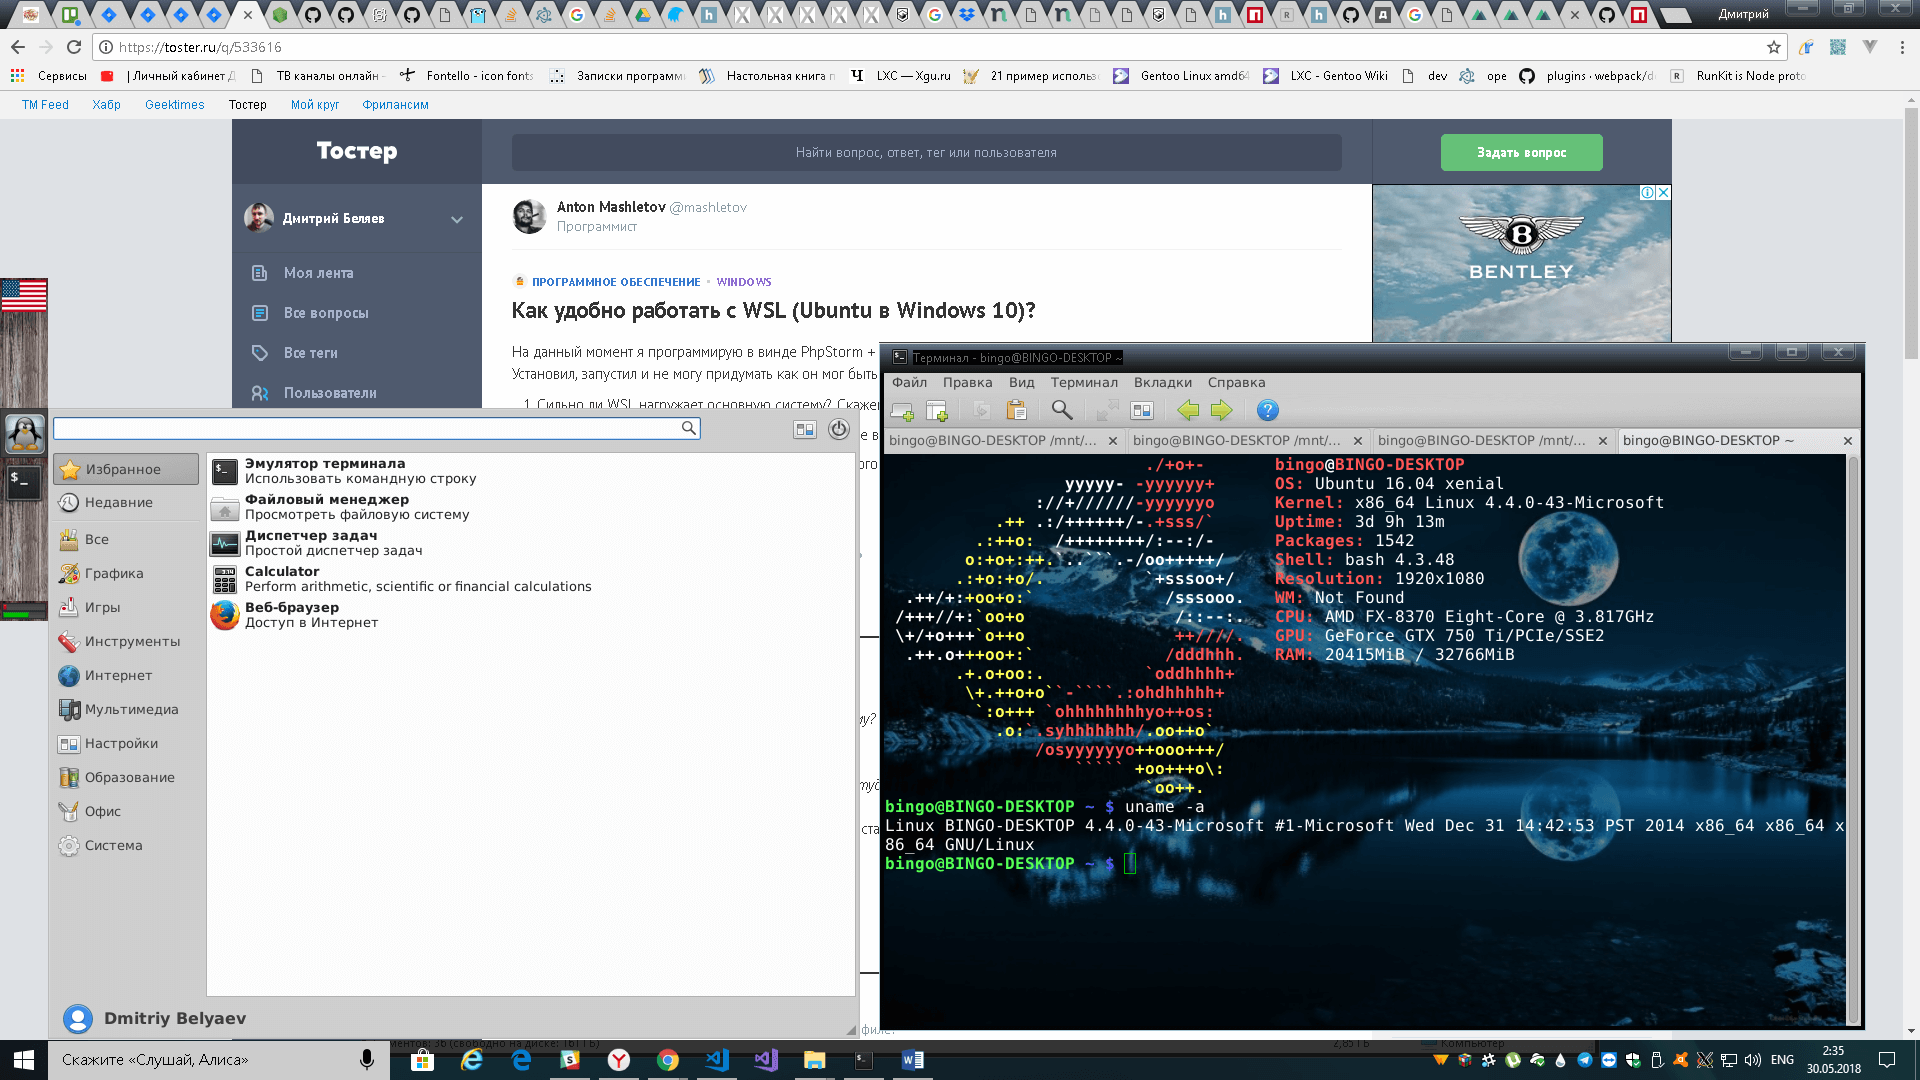
Then we can start our start.bat and customize the Xfce panel for ourselves. I note that here I stumbled upon another problem - the panel is perfectly displayed on top of all windows, but it cannot allocate a place for itself, like a panel on the Windows desktop. If anyone knows a solution to this problem, share it in the comments.
Well, at the end of this part, a screenshot of my desktop:
The interaction of the Windows environment and the environment of the Linux subsystem
You can run Linux applications directly from Windows using the same 3 commands - bash, wsl or ubuntu. Do not forget that the default launch is from root, so you should lower the privileges through su , just do not forget to pass the environment variable DISPLAY =: 0 if the application requires an X server. You also need to change the folder from which the application should work, via cd inside the WSL. For example, let's calculate md5 for file.txt on disk D using Linux md5sum:
wsl md5sum < d:\file.txt
Access to the Linux file system is also available, it lies in %localappdata%\Packages\CanonicalGroupLimited.UbuntuonWindows_79rhkp1fndgsc\LocalState\rootfs . You can read files this way, but writing is not desirable, you can break the file system. I think the problem is that Windows does not know how to work with the rights and owners of the Linux file system.
From Linux, you can also run Windows applications. Just run the exe-shnik and it will run in the main system.
Windows drives are mounted on /mnt in accordance with their lowercase letters. For example, drive D will be mounted on /mnt/d . From Linux, you can freely read and write Windows files. You can make symlinks on them. The rights of such files will always be 0777, and the owner will be root.
The network stack of the subsystem is common with Windows. A server raised in Linux will be available on localhost in Windows and vice versa. However, the unix-domain-socket for Windows will simply be an empty file, you can work with this only inside Linux. Linux also has access to the external network, including it is possible to listen to ports, if the firewall does not prohibit it.
ifconfig on Linux and ipconfig on Windows provide the same information about network interfaces.
From the Windows Task Manager, you can safely nail the process inside the Linux subsystem. However, Linux will only see its processes.
Features, limitations and pitfalls
The Linux kernel in WSL is not real. This is just an emulator layer, which itself performs some of the Linux-specific tasks, and some proxies directly into the winNT kernel. Most of the api is implemented in it, but not all. It’s impossible to assemble your kernel, just as it’s impossible to connect kernel modules (.ko, Kernel Object).
The init process at WSL is also yours and it will not work out, for example, system.d. I have long wanted to write a go manager daemon, which would work with the system.d unit files and provide a similar interface, but all hands do not reach.
There is no support for openFUSE, respectively, mount a virtual or remote file system will not work. It is also impossible to make a mount from a file, mount seems to be nothing at all except bind here.
There is also no possibility to split the Linux file system into several partitions / disks.
Direct access to the gland is practically absent. All the same, we are in the Windows sandbox, not in full-fledged Linux. / dev and / sys are noticeably empty, they contain only a percentage and virtual devices. Access to the GPU is only through the X server, directly - in any way, so the neural networks will have to be trained in Windows.
In JS, development faced the fact that electron.js refused to run in WSL, it was necessary to duplicate the node.js environment in Windows.
Results
The article was quite long, I hope that it will also be useful.
WSL for me personally turned out to be a completely usable tool that solves my tasks. fullstack developer backend. Virtualka with Linux for six months was not needed. In general, Windows + WSL is much more functional than Linux + Wine.
While writing the article, I discovered that the WSL build with Debian 9.3 appeared in the Microsoft Store, this distribution kit is more appealing to me than Ubuntu, so I will try to install it.