November 2017, the number eleven was displayed on the calendar. Sale on Aliexpress was in full swing, itching to buy something. The choice fell on "
Mi-light RGBW LED lamp AC86-265V remote control Smart lighting ." As a result, two copies of the maximum power, 9 watts, and the hub controller MiLight WiFi iBox were purchased. Delivery from China was not long in coming, and 4 months later, on March 13, 2018,
the Yandex.Dialogia platform opened (a platform that allows third-party developers to add skills to the Alice voice assistant). Following Alice will learn to control the lighting (and not only) in your apartment, and we will help her with this, step by step and without a single line of code.
- Xiaomi Smart Lamp Setup
- OpenHAB installation
- OpenHAB light control
- External access to openHAB
- IFTTT
- Alice
1. Setting up smart bulbs from Xiaomi.
The first thing that needs to be done is to set up lamp control, at least with the help of an application from Xiaomi. If this stage is passed for you, feel free to go further, to setting up a smart home server, or even further, directly to the integration of Alice and openHAB. But first things first. The lamps themselves will not connect to your home router, for this you need an iBox hub that can control up to four groups of light sources. You need to connect it to the network, and then connect the lamp with it.
- We supply power to the iBox by connecting it via usb, for example, to the charger for the phone.
- The first time you connect, you must reset the settings of the hub, so click RST .
- Next, install the application from Xiaomi for iOS or Android on the phone. Make sure the phone is connected to a home Wi-Fi network.
- Open the application Mi-Light 3.0 , click + . Here we are interested in the Smart Link tab.
- Enter the name and password of the home Wi-Fi network to which the phone is connected and it is planned to connect the iBox .
- Now your iBox should be connected to the network, and the SYS and LINK indicators should blink, slowly and quickly, respectively. If not, press RST again.
- If the indicators are flashing, click in the Start Configuration application, the process of setting up the connection for the hub will begin.
- After ten seconds, the blinking will stop, then the SYS will begin to blink slowly again, and LINK will remain on. The application displays the message Configured . The hub is connected to the network. If it is not in the Device List , then just click Searching for device .
Already, you can control the color and brightness of the iBox itself, but we need to connect the lamps. To do this, we will bind the lamps to one of the four zones available to the hub for control.
- Open in the application Mi-Light 3.0 from the list of hub Mi-Light . Go to the Colors section.
- At the top of the screen, select one of the zones, let it be Zone1 . And click on the device binding icon in the upper right corner. The LINK / UNLINK screen opens with instructions.
- Now we are setting up those lamps that we want to tie to Zone1 , and they will be controlled simultaneously in the future. To control the brightness and color of each lamp separately, they must be attributed to the individual zones. So, turn on the lamp, and within the first three seconds click in the Link application. If the lamp blinked three times, then everything is fine, the synchronization was successful. You can control the lamp.
In principle, at this stage you already have a remote control for remote control of light. Moreover, you can write your own lighting control system, since the communication protocol with the hub has long been known (it was once available at link
limitlessled.com/dev ). There are ready libraries for
php ,
javascript ,
python . But management is possible only from a local network, which is clearly not enough for Alice. Let's try to solve this problem.
2. Installing openHAB
Briefly, what is
openHab . This is a server for managing an open source smart home. Developed by the community, supports the management of a huge number of devices. There is a mobile client, there is a possibility to manage Alex from Amazon and an assistant from Google. Written in java, based on the
Eclipse SmartHome framework. So it can be installed even on the refrigerator, the main thing is that the Java virtual machine worked on this refrigerator. Installation instructions are for
Linux ,
Windows ,
Mac OS ,
Raspberry Pi , for various
Synology and
QNAP network storages. Quickly run through the first option.
- Add repository keys:
wget -qO - 'https://bintray.com/user/downloadSubjectPublicKey?username=openhab' | sudo apt-key add - sudo apt-get install apt-transport-https
- Add the repository itself:
echo 'deb https://dl.bintray.com/openhab/apt-repo2 stable main' | sudo tee /etc/apt/sources.list.d/openhab2.list
- We update and install the server along with the additions:
sudo apt-get update sudo apt-get install openhab2 sudo apt-get install openhab2-addons sudo apt-get install openhab2-addons-legacy
- We configure the automatic start of the service after the device is rebooted and start it:
sudo systemctl start openhab2.service sudo systemctl status openhab2.service sudo systemctl daemon-reload sudo systemctl enable openhab2.service
- Now we wait around 15-20 minutes (this is not an exaggeration, it is a harsh reality with jokes about the speed of Java) until it loads and a web interface appears at
http://openhab-device:8080 . - On this page we are interested in the item Paper UI . We will work with this type of interface in the future.


3. Light control through openHAB
So, we have a working server of a smart home and a lamp from Xiaomi with remote control. It is necessary to connect them. openHAB supports binders (instructions for controlling connected electronics) for a variety of devices, including for these lamps.
- Go to the Add-on → Bindings .
- Install Milight Binding .
- To add our device, click on + in the Configuration → Things section.
- We select Milight Binding , automatic search of the device begins.
- I automatically found nothing, so I manually added the " Manually add thing ".
- Choose to add the iBox / iBox2 hub .
- On the page that opens, you need to fill in the IP and Bridge ID fields (mac address of the device to be connected), you can find them, for example, in the router's control panel (I have a hub registered on the network with the name of the Wi-Fi module used in it HF-LPB100). We add.
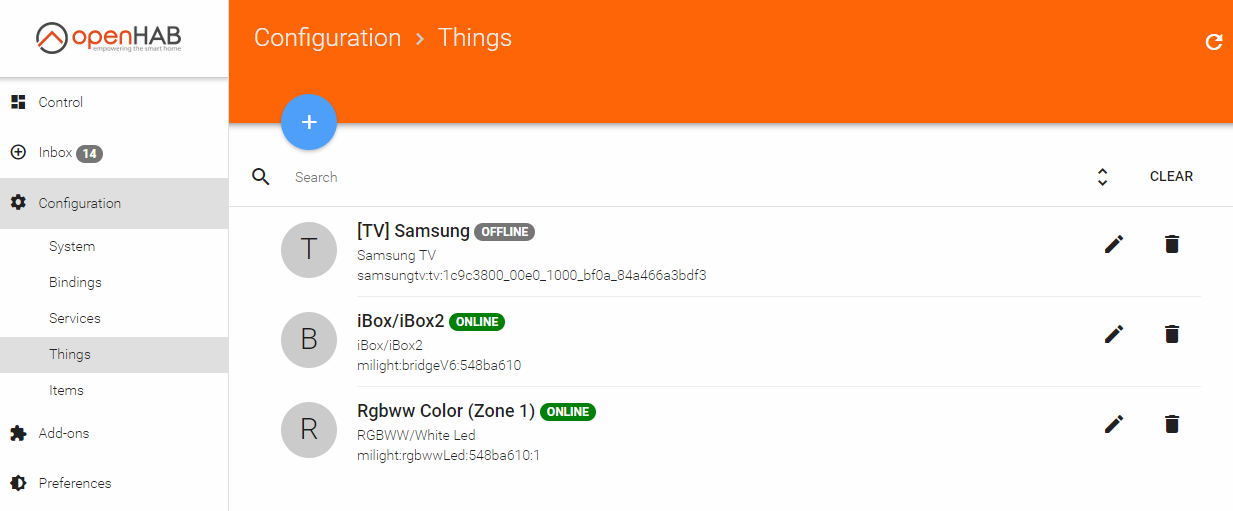
- Great, the iBox / iBox2 with the word " Online " is now displayed in the device list.
- Again, click on the + and select the Milight Binding , this time to add the lamps directly.
- Now you don’t need to add anything with your hands, just select a group of lamps from the list (in my case, this is Rgbww Color (Zone 1) ).
- The selected item should appear in the list of things also with the words " Online ".
- Devices are configured, now you need to add controls to them. To do this, click on the item that has just been added.
- A list of lamp parameters that we can remotely control opens. Click on the blue circle Brightness .
- Next, select the control with which we want to associate the device parameter, since we don't have them yet, click on Create new item .
- Set an arbitrary name, for example, Light_Switcher , and, change the type from Dimmer to Switch , since I do not need to adjust the brightness of the lamp, I just want to turn it on and off. We simply change the category to Light so that the control is displayed with an icon in the Control section. Click Link .
- Go to the Control section and enjoy the Brightness switch on the device.
4. External access to openHAB
For security reasons, after the above manipulations, the smart home server can be controlled only from the local network. This is clearly not enough for our task.
There are several configuration options : configure a VPN for access from the Internet to the local network, configure a reverse proxy, or connect your server to the myopenHAB Cloud service at myopenHAB.org. So, as in Russia, the number of Roscomnadzor employees is directly proportional to the number of VPN users and proxy servers, we will use the last option.
Do not multiply things without need
- We register on the myopenHAB website, log in and go to https://myopenhab.org/account . On this page we are interested in two fields: openHAB UUID and openHAB Secret . They allow you to organize communication servers. Let's figure out where to get them.
- Go to the PaperUI openHAB control panel.
- Open the Configuration → Add-ons → Misc .
- Install the openHAB Cloud Connector .
- In Configuration → Services , the openHAB Cloud module with the " Notifications & Remote Access " mode should appear.
- In Configuration → System → Add-on Management , the switch " Acceess Remote Repository " must be activated.
- After installing the add-on, the data we are looking for will be in the files / var / lib / openhab2 / uuid and / var / lib / openhab2 / openhabcloud / secret ( userdata / uuid and userdata / openhabcloud / secret , if you did not install it from the package). Enter them in your account settings on myopenHAB and click Update . If everything is configured correctly, the word " Online " should appear to the left of your email address. This suggests that access to your smart home from the Internet is open, but Alice will not be able to use it right away. First you need to make available the device that was previously configured.
- Go to the section Configuration → Services → openHAB Cloud → Configure .
- In the list Items to expose to apps such as IFTTT, activate the checkbox for the brightness control and click Save .
- After a while, we check that the selected item is on the list on the myopenhab.org/items page with the status " ON ".

Now it is possible to control the lamp from the Internet through the openHAB Cloud API, which supports OAuth2 authorization. But, unfortunately, clients are predetermined in advance, these are Alexa, Google Assistant and the IFTTT service. Alice in this list yet. But it's not a problem!
5. IFTTT
If this then.
A service that allows building a chain of actions from several services. Conditionally respond to action in one service, if the trigger for an event in another service worked. IFTTT supports a huge number of services, including myopenHAB. But does not support Alice. In general, anyone can create a module there for their service, first of all you need to contact the sales department and find out the size of your annual payment in favor of IFTTT. Our goal is to use the service for free to be able to redirect requests from Alice to openHAB.
- Register on ifttt.com and go to Applets → New Applet .
- After pressing + this , you need to select the service, the event in which will be the trigger. Since Alice’s service is not listed, we need to choose something that can receive commands from her. This is a Webhooks service. Click Connect .
- Further we select from the list with one item the trigger " receiving web request ".
- Specify the name of the event, for example, light_on , and click Create .
- Now you need to choose a response action, click on + that . Our choice is openHAB , we connect.
- In the opened window, mentioned earlier OAuth2 authorization, click on Allow .
- A single " send command " response is available.
- From the drop-down list, select the lamp control element (for example, Light_Switcher), and specify the word " ON " as the light on command. We create.
To check, we need to call a trigger at the Webhooks service. How to do it? Send POST request.
- We search on the site IFTTT Webhooks service and go to the related documentation.
- On the page that opens, there is a command that we need to execute, replacing {event} with light_on .
- After clicking on Test It , your lamp should turn on.
It remains to create a similar recipe for the light_off event, which will send the OFF command to the light control. And then teach Alice to call these triggers at our will.

6. Alice
In my command, in my desire, Alice will turn on the light, if you use the
Yandex.Dialogy platform. The platform opened in March of this year and allows anyone who wants to add Alice skills, by writing the appropriate code. At the moment
, the catalog already contains a huge amount of skills. Developing skills is a topic for a separate article on Habré, and here we have "
without a single line of code ." So let's use the available practices.
- We install the beta version of the Yandex search application , only it currently has support for user skills .
- We say Alice " turn on magic spells ." The skill magic spells / magic spell allows us to perform POST requests to servers IFTTT .
- Click Add and specify the address to turn on the light of the form:
https://maker.ifttt.com/trigger/light_on/with/key/{user_id}
- The next step is to pronounce the phrase or word to which Alice will respond by performing the request to the address indicated (my Alice responds to “turn on the light”).
If you now click on the appropriate button or voice a sentence, the request from Yandex servers will go to the skill server, from there to IFTTT, then to myopenHAB, which will transfer data to your local instance that has direct access to the lamp hub and the light will turn on. A similar command will be immediately added to turn off the lighting.
We must understand that it is not enough just to turn on Alice and say "
turn on the light ." Yandex knows nothing about our teams for the smart home, the data about them is stored in the "
magic spells " skill base. Therefore, you first need to call the skill by saying "
turn on magic spells ", and only then turn on and off the light with your voice.
PS
The approach with the integration of Alice and openHAB through IFTTT does not limit your imagination. You can use your
magic spell to control all things in your smart home. For example, in openHAB there is a binding for Samsung SmartTV, which allows you to control the sound and TV channels. The interaction of Alice and Webhooks is the implementation of the voice interface to all IFTTT services, "
magic spells " allow you to execute a command of any of them. Or you can not use Alice at all, and write your frontend, for example, a mobile application that will fulfill requests to IFTTT through all the same Webhooks. Yes, and IFTTT is not necessary to use, by analogy, you can configure the "
magic spells " to perform requests to your server.